

A Little Secret from My Kitchen
I have a funny story for you. My grandson once said pizza couldn’t be “real” without bread. I told him to close his eyes. I gave him a slice of this. He took a big bite. He opened his eyes wide. He said, “Grandma, you’re magic!” I still laugh at that.
This crust is our little secret. It lets us enjoy pizza night in a new way. It feels light and crispy. You won’t miss the heavy dough. Doesn’t that sound nice?
Why This Simple Swap Matters
Here is why I love this recipe. It is not about taking things away. It is about adding good things in. You get more veggies without even trying. That matters for feeling good and full of energy.
It also lets everyone join the fun. Maybe someone is watching carbs. Maybe someone just wants a lighter meal. This pizza crust brings everyone to the same happy table. What is your favorite family meal to share?
Getting the Cauliflower Just Right
The big trick is drying the cauliflower. Cooked cauliflower holds lots of water. You must pat it dry with a towel. Squeeze it gently. Get out as much moisture as you can.
A dry crust is a crispy crust. A wet crust will be soft. Trust me on this step. It makes all the difference. *Fun fact: One head of cauliflower makes about three cups of “rice.”*
The Joy of Building Your Pizza
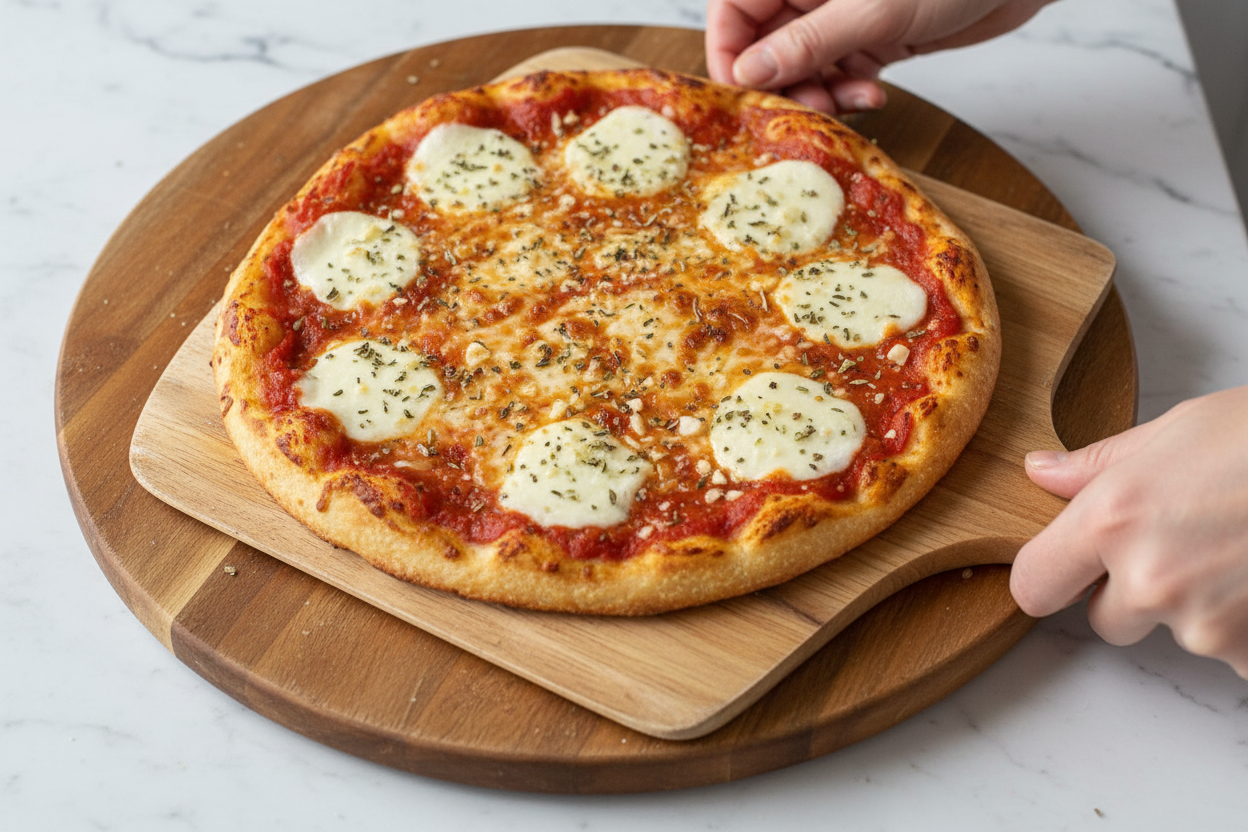
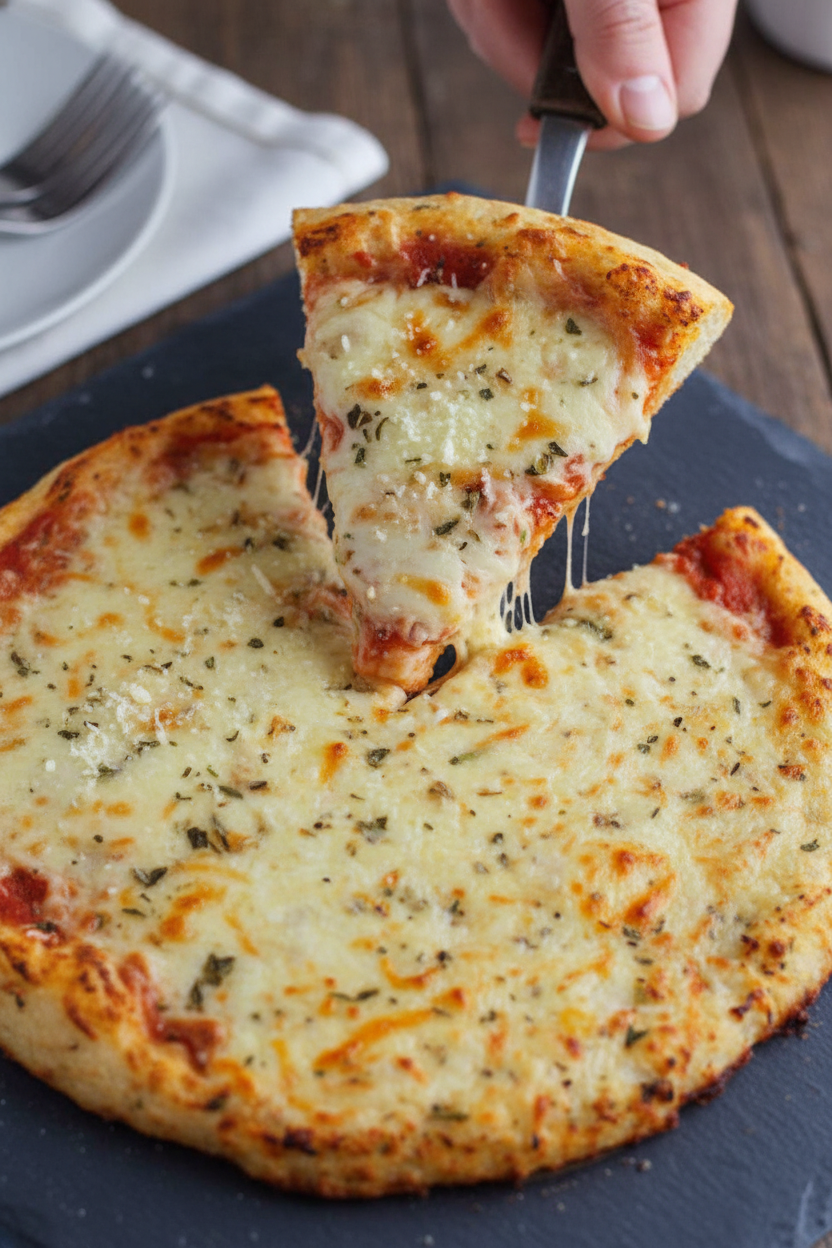
After the crust bakes, the fun begins. Spread your sauce. Add your toppings. This is where you make it yours. I love mushrooms and a little extra cheese.
The broiler is your friend. It melts the cheese so fast. But you must watch it! Do not walk away. It goes from perfect to burnt in seconds. What three toppings would you pile on yours?
A Lesson in Making Do
This recipe teaches a good lesson. Sometimes you change a classic. You make it work with what you have. That is real cooking. It is creative and smart.
It matters because food should fit your life. It should make you feel happy and healthy. This pizza does both for me. Give it a try and tell me, does it feel like magic to you too?
Ingredients:
| Ingredient | Amount | Notes |
|---|---|---|
| Cauliflower, cooked and riced | 1 cup | |
| Egg whites | 2 | |
| Mozzarella cheese | 1 cup | |
| Oregano | 1 teaspoon | |
| Garlic, minced | 1 teaspoon | |
| Pizza sauce | ½ cup | |
| Parmesan cheese | 2 tablespoons | more if desired |
| Non-stick cooking spray or olive oil | as needed | for pan |
My Magical Cauliflower Pizza Crust
Hello, my dear! It’s Anna. Let’s make a fun pizza together. This crust is made from cauliflower. I know, it sounds wild. My grandson thought I was tricking him. He loved it! It’s light and crispy. You can pick it up with your hands. Doesn’t that smell amazing when it bakes?
Here is how we make the magic happen. Get your bowl ready. We are going to turn a veggie into pizza. I still laugh at that idea. It makes me feel clever. Let’s begin.
- Step 1: Wash your cauliflower head. Pat it very dry. We need to remove the water. Chop it into small pieces. Toss them into a food processor. Pulse it until it looks like tiny grains of rice. This is called “ricing.” It’s my favorite part.
- Step 2: Put the riced cauliflower in a bowl. Microwave it for 7-8 minutes. It will get soft and steamy. Let it cool a bit. Now, heat your oven to 450 degrees. Spray your pizza pan well. (My hard-learned tip: use parchment paper. It stops any sticking!).
- Step 3: Mix the cauliflower, egg whites, mozzarella, oregano, and garlic. Stir it with love. Press this mix onto your pan. Make it even and push to the edges. Sprinkle parmesan on top. This makes a golden crust. What’s your favorite pizza topping? Share below!
- Step 4: Bake it for 12-15 minutes. It will become firm and golden. Take it out carefully. Now add your sauce and favorite toppings. Pop it under the broiler. Watch it for just 30-60 seconds. The cheese will bubble perfectly. Then slice and enjoy your creation!
Cook Time: 25 minutes
Total Time: 40 minutes
Yield: 8 slices
Category: Lunch, Dinner
Three Fun Twists to Try
This crust is like a blank canvas. You can paint it with so many flavors. Here are my favorite ideas. They make dinner feel like a party. I hope you try one.
Breakfast Pizza: Use marinara sauce. Top with scrambled eggs and crispy bacon. Sprinkle cheddar cheese on top. It’s wonderful for a slow Saturday morning.
Garden Fairy Pizza: Skip the red sauce. Spread creamy pesto instead. Add tiny cherry tomatoes and fresh mozzarella balls. It tastes like a summer garden.
Spicy Fiesta Pizza: Mix a little salsa into your pizza sauce. Top with black beans, corn, and jalapeños. Use pepper jack cheese. It has a nice little kick.
Which one would you try first? Comment below!
Serving It Up Right
This pizza is a full meal. But I love to add a little something extra. A simple green salad is perfect. It’s crisp and fresh. A bowl of tomato soup for dipping is cozy too. My family likes both.
For drinks, I have two choices. A cold glass of lemonade with mint is so refreshing. For the grown-ups, a light Italian red wine pairs nicely. It feels like a treat. Which would you choose tonight?
Keeping Your Cauliflower Crust Fresh
Let’s talk about storing your pizza. First, let the crust cool completely. I learned this the hard way. My first crust got soggy in a warm container.
For the fridge, wrap it tightly in plastic. It will stay good for three days. For the freezer, use foil and a freezer bag. It keeps for one month. This matters because good food should never be wasted.
To reheat, use your oven or toaster oven. Bake at 375 degrees until warm. This keeps the crust crispy. You can make and bake crusts ahead for easy dinners. Have you ever tried storing it this way? Share below!
Fixing Common Cauliflower Crust Troubles
Is your crust too wet? Squeeze the cooked rice in a towel. Remove every drop of water. I remember a pizza that turned into a puddle. A dry crust is a crispy crust.
Does it fall apart? Press the mixture firmly into the pan. Make sure it sticks together well. This builds your cooking confidence. A sturdy crust holds all your favorite toppings.
Is it not browning? Place it under the broiler at the end. Watch it closely for just a minute. This final step makes the flavor perfect. Which of these problems have you run into before?
Your Cauliflower Crust Questions, Answered
Q: Is this gluten-free?
A: Yes! This crust has no flour. It is perfect for gluten-free friends.
Q: Can I make it ahead?
A: Absolutely. Bake the crust, cool it, and freeze. Dinner is ready in minutes.
Q: What cheese can I swap?
A: Try cheddar or a dairy-free shred. Fun fact: The cheese helps bind the crust.
Q: Can I double the recipe?
A: Yes, just use two pans. Do not crowd one pan.
Q: Any optional tips?
A: Add a pinch of red pepper flakes. It gives a nice little kick. Which tip will you try first?
From My Kitchen to Yours
I hope you love this crispy, healthy pizza. It reminds me of cooking with my grandkids. We make a big mess and have more fun.
I would love to see your creations. Share a photo of your topped masterpiece. Have you tried this recipe? Tag us on Pinterest! Use the handle @AnnasCozyKitchen. Your pictures make my whole week.
Happy cooking!
—Anna Whitmore.

Cauliflower Pizza Crust: Healthy Cauliflower Pizza Crust Recipe
Description
Crispy, low-carb cauliflower pizza crust recipe! A healthy, gluten-free alternative for guilt-free pizza nights. Easy to make and delicious.
Ingredients
Instructions
- Wash the head of cauliflower and pat it dry removing as much moisture as possible. Chop into bite size pieces and toss them into a food processor and process until it is the size of rice.
- Put the riced cauliflower into a microwave safe bowl and microwave for 7-8 minutes until it has softened and appears cooked.
- Preheat your oven to 450 degrees F.
- Spray a pizza pan with plenty of non-stick cooking spray. You can also use parchment paper if you have it. Spray the parchment paper with a light coat of cooking oil.
- In a medium bowl, combine the cauliflower, egg whites, mozzarella, oregano and garlic.
- Press evenly in the pan. Push it down into all the corners making sure its stuck to itself pretty well. Sprinkle with parmesan cheese.
- Bake at 450 degrees for 12-15 minutes.
- Remove the pan from the oven. Add your sauce, toppings and cheese.
- Place under a broiler for about 30-60 seconds, just until the cheese is melted. Watch it carefully or it will burn.
- Remove, slice and enjoy!
Notes
- Nutrition Facts (per serving, 8 servings per recipe): Calories: 54kcal | Carbohydrates: 2g | Protein: 4g | Fat: 3g | Saturated Fat: 2g | Polyunsaturated Fat: 0.1g | Monounsaturated Fat: 1g | Cholesterol: 11mg | Sodium: 177mg | Potassium: 111mg | Fiber: 1g | Sugar: 1g | Vitamin A: 165IU | Vitamin C: 7mg | Calcium: 81mg | Iron: 0.4mg


Leave a Reply