
My First Truffle Fumble
Let me tell you about my first try. I was so excited. I skipped the freezer step.
My peanut butter balls melted into a puddle in the chocolate. It was a sweet, sticky mess. I still laugh at that. Patience matters in the kitchen. It teaches us good things take a little waiting.
Why Two Ingredients Are Magic
Just sugar and peanut butter. That’s it for the inside. Mixing them is so simple.
It becomes a soft, sweet dough. Doesn’t that smell amazing? This matters because cooking doesn’t need to be hard. Fun fact: This sticky mix is called a “paste” or “ganache” by fancy chefs. We just call it delicious.
The Chocolate Dip Secret
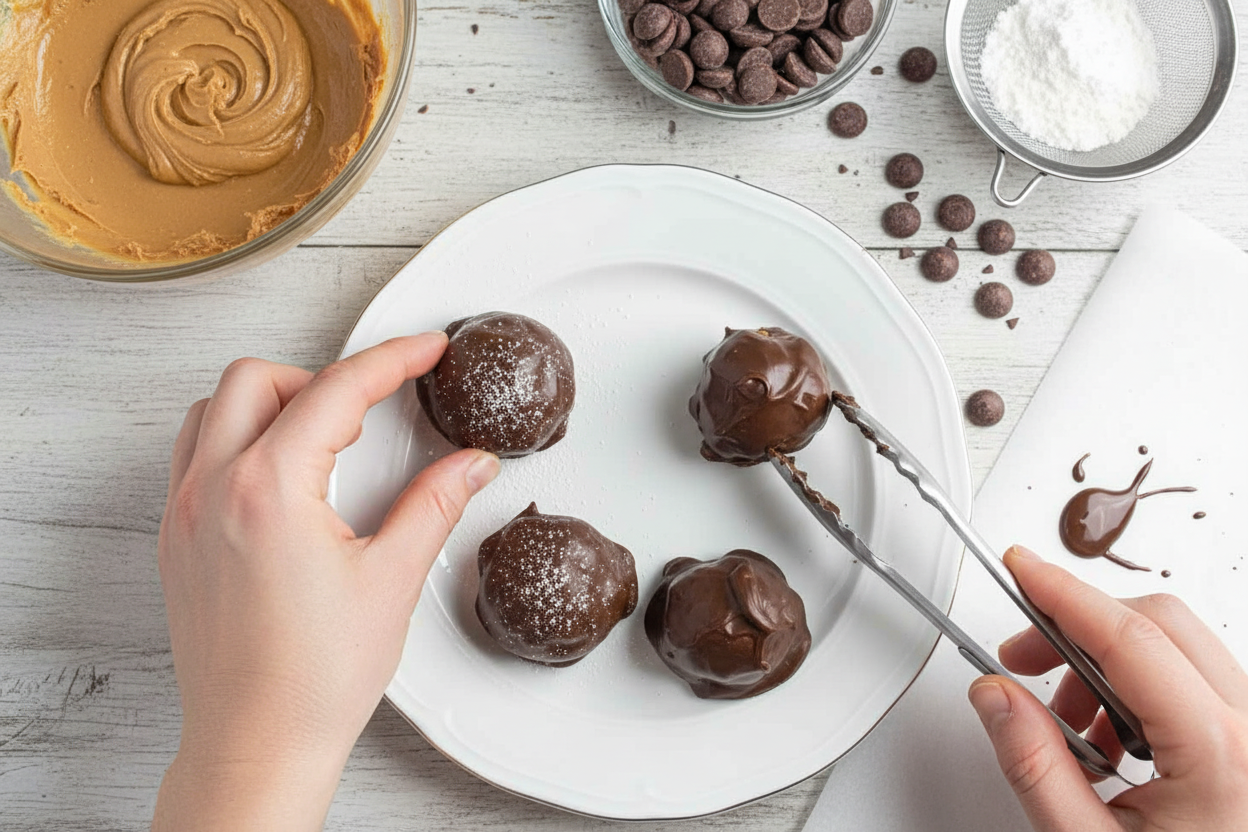
Freezing the balls first is the big trick. It makes them firm for dipping. Use a fork and let the extra chocolate drip off.
You get a nice, thin coat. What’s your favorite chocolate to use? Milk, dark, or maybe white? Tell me in the comments. A smooth finish makes them look like you bought them from a shop.
Making Memories, Not Just Sweets
I make these with my grandkids now. We get powdered sugar everywhere. Their little hands roll the balls all different sizes.
It’s messy and perfect. This matters more than a perfect treat. You are making happy kitchen memories. Do you have a favorite person to bake with?
Your Turn to Create
Now, you try. Follow the steps, but make them yours. Maybe roll them in sprinkles before the chocolate sets.
Or add a tiny pinch of salt on top. Would you try that? Share a picture if you do. I love to see your creations. Cooking is a way to share joy, one little truffle at a time.

Ingredients:
| Ingredient | Amount | Notes |
|---|---|---|
| Powdered sugar | 1 cup | Sifted |
| Creamy peanut butter | 1/2 cup | |
| Melting wafers | 1 1/2 cups |
My No-Bake Chocolate Peanut Butter Balls
Hello, my dear! Come sit at the counter. Let’s make something sweet. These treats remind me of my grandson, Leo. He calls them “magic bites.” They are so simple. You just mix, roll, and dip. Doesn’t that sound nice? We can chat while they set. I love how the kitchen smells like chocolate. It feels like a hug.
You only need three things. I always sift the powdered sugar first. It keeps the mixture nice and smooth. (My hard-learned tip: Sifting is worth the extra bowl. It avoids lumpy truffles!). Now, let’s begin. I’ll tell you a story as we go.
Step 1:
Grab your hand mixer. Blend the peanut butter and sugar together. It will look crumbly at first. Keep mixing until it becomes a sticky dough. It should hold together when you pinch it. My sister once tried to mix it with a spoon. Her arm got so tired! I still laugh at that.
Step 2:
Line a tray with parchment paper. Use a small scoop or a spoon. Roll the dough into little balls. You should get about twelve to fifteen. Place them on the tray. Now, the waiting part! Pop the whole tray into the freezer. Let them get very firm for an hour or two.
Step 3:
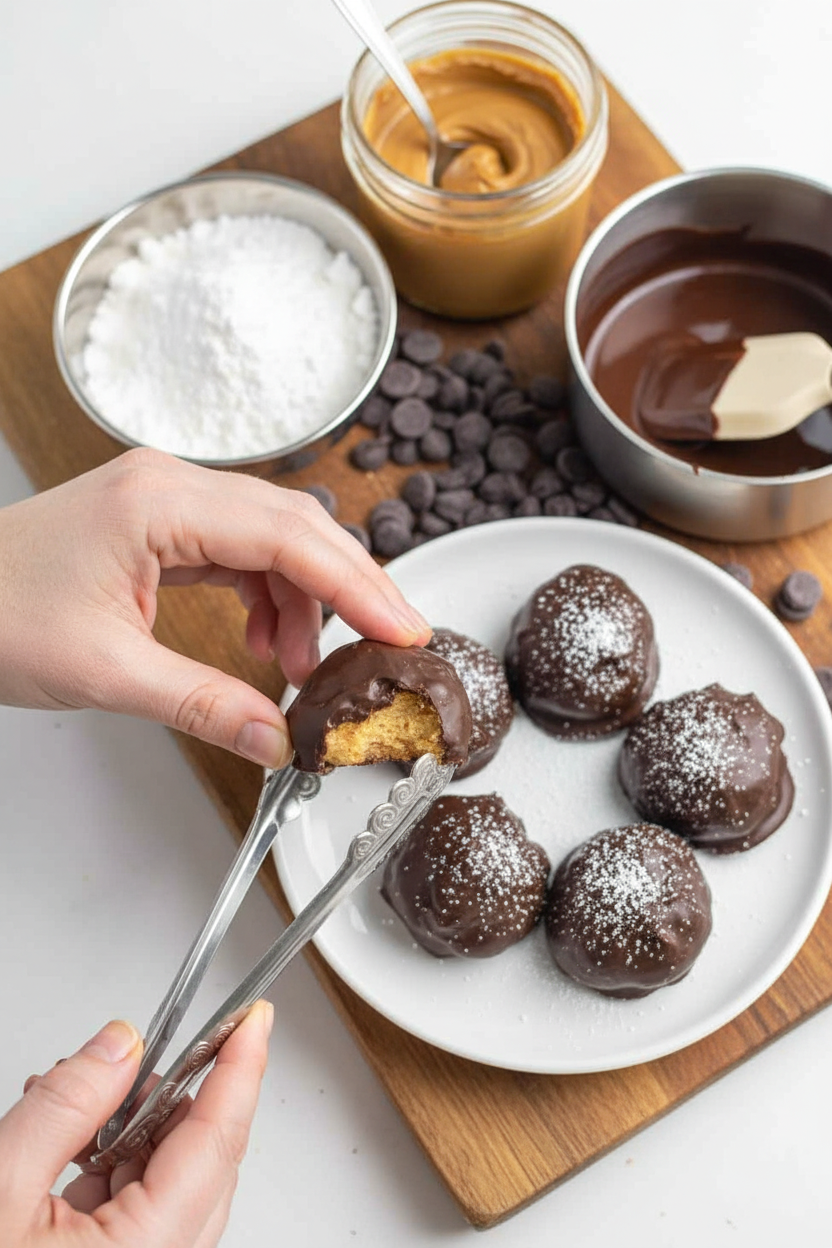
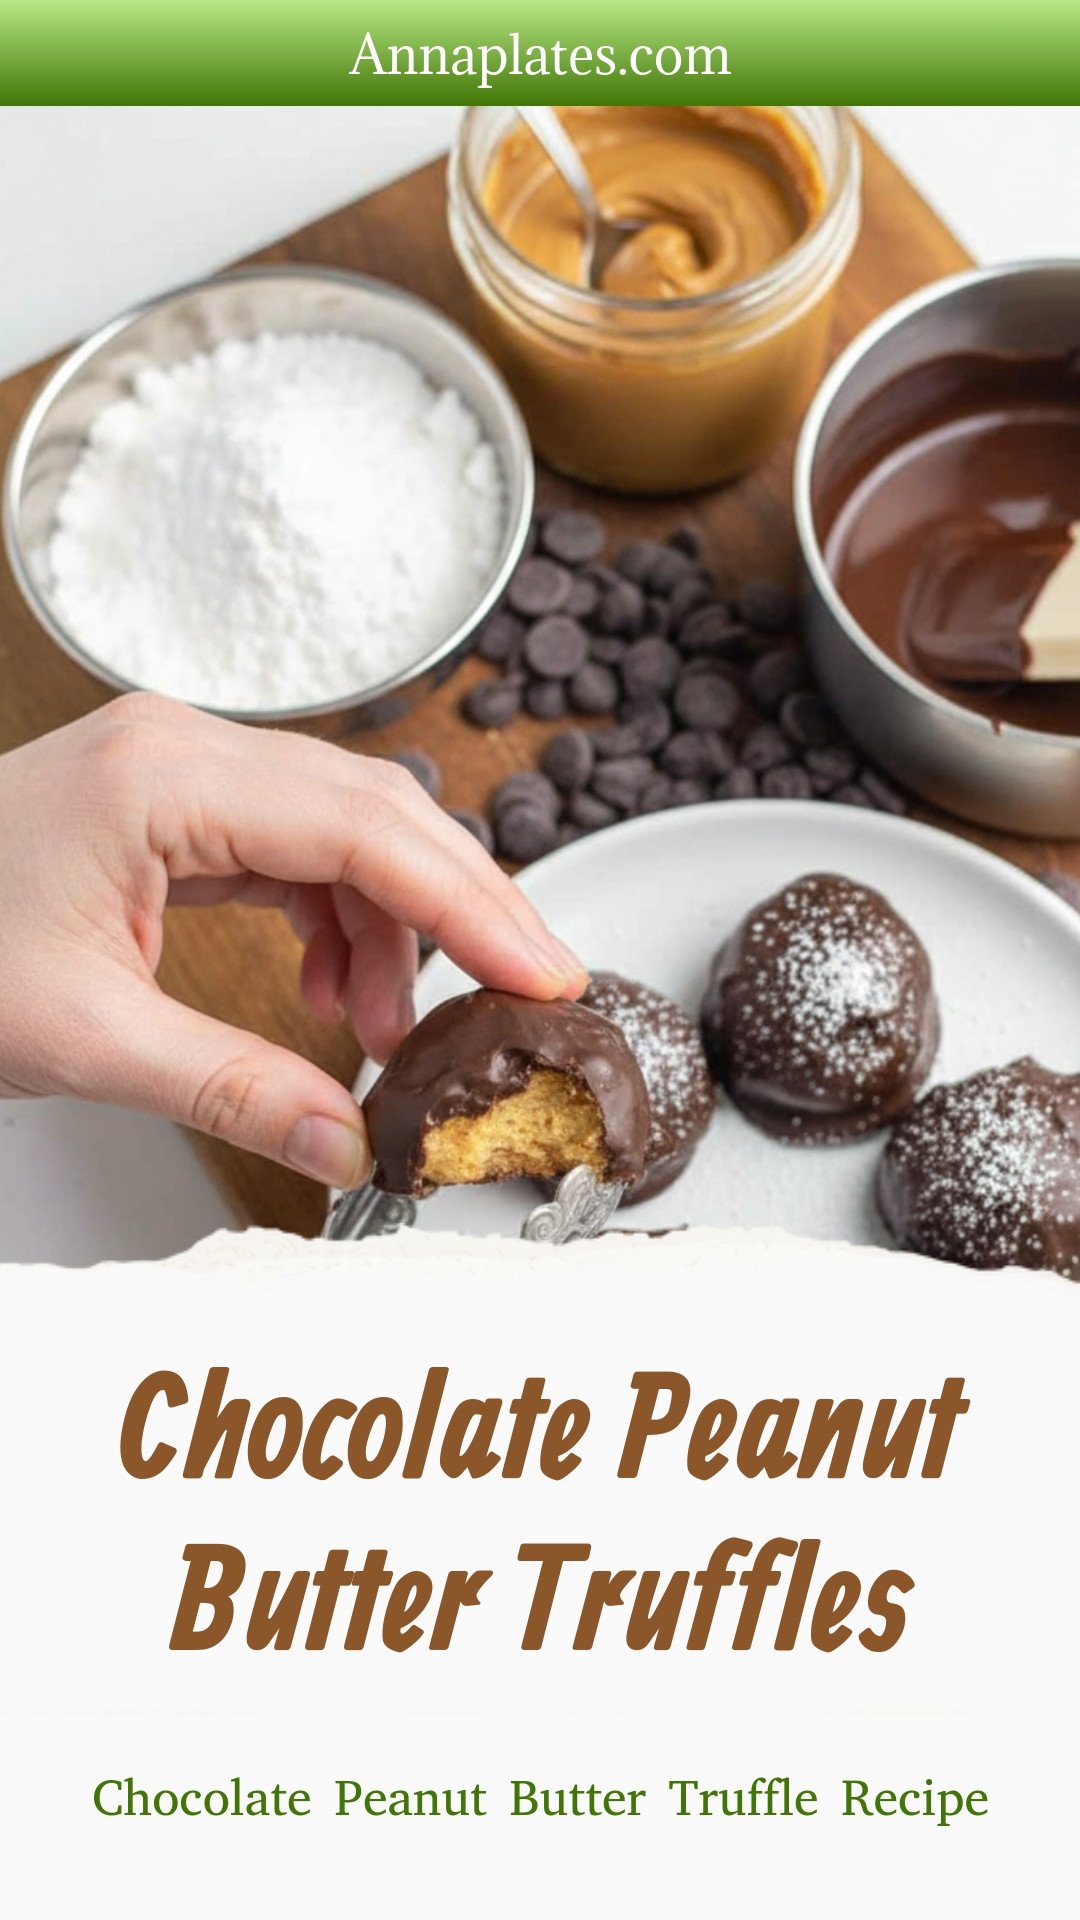
Time for chocolate! Melt the wafers slowly. Follow the package directions. I use a deep, narrow mug for dipping. It’s perfect for coating the balls. Quick quiz: What’s the best tool for dipping truffles? A spoon or a fork? Share below!
Step 4:
Take your peanut butter balls from the freezer. Spear one with a fork. Dip it into the melted chocolate. Tap the fork gently on the mug’s edge. This lets the extra chocolate drip off. Place each coated ball back on the paper. They look so pretty already.
Step 5:
Let the chocolate shell harden. You can be patient and wait an hour. Or, pop them back in the freezer for fifteen minutes. I like the fast way! Then they are ready to eat. Store them in the fridge in a little tin. They never last long at my house.
Cook Time: 1-2 hours (freezing)
Total Time: 1 hour 30 minutes (active)
Yield: 12-15 truffles
Category: Dessert, Snack
Three Fun Ways to Mix Them Up
These are wonderful just as they are. But sometimes, it’s fun to play. Here are three easy twists. You can roll the finished truffles in toppings right after dipping. The chocolate acts like glue. It’s so simple.
The Crunchy Roll: Roll your wet truffle in crushed pretzel bits. Sweet and salty is the best combo.
The Party Sparkle: Use colorful sprinkles or sanding sugar. Perfect for a birthday or a rainy day.
The Grown-Up Twist: Add a tiny pinch of sea salt on top. It makes the chocolate taste even richer.
Which one would you try first? Comment below! I am leaning toward the pretzel one myself.
Serving Them With Style
Presentation is part of the fun. I like to put these in a fancy little paper cup. It keeps your fingers clean. You could also pile them high on a vintage plate. For a party, stick a mini flag in each one. It makes everyone smile.
What to drink with them? For a cozy night, I love a cold glass of milk. It’s a classic for a reason. For the adults, a small glass of ruby port is lovely. It sips like liquid berries. Which would you choose tonight? The milk is always my first pick.
Keeping Your Truffles Happy
These truffles are best kept cool. Store them in the fridge in a sealed container. They will stay good for about two weeks. You can also freeze them for a month. Just layer them between parchment paper.
I once left a batch on the counter overnight. They became a soft, melty mess. Now I always use the fridge. Batch cooking is a wonderful trick. Make a double batch and freeze half. This matters because you always have a sweet treat ready. It is perfect for surprise guests.
Have you ever tried storing it this way? Share below!
Little Fixes for Big Smiles
Is your dough too crumbly? Add a tiny spoon of milk. Mix it in gently. Is it too sticky? Chill it for twenty minutes. Your hands will stay cleaner.
I remember when my chocolate coating was too thick. It made big lumps. Now I thin it with a drop of oil. This matters for a smooth, pretty finish. Is your chocolate cracking? Your peanut butter balls were too cold. Let them sit for five minutes before dipping. Fixing small problems builds your cooking confidence. It makes your food taste and look better.
Which of these problems have you run into before?
Your Truffle Questions, Answered
Q: Are these gluten-free? A: Yes, if your peanut butter and powdered sugar have no gluten. Always check the labels.
Q: Can I make them ahead? A: Absolutely! Make the balls a day early. Chill them until you are ready to dip.
Q: What can I swap? A: Try almond butter instead of peanut butter. Use chocolate chips if you have no wafers.
Q: Can I double the recipe? A: You sure can. Just use a bigger bowl for mixing. *Fun fact: Doubling is called “scaling” a recipe.*
Q: Any extra tips? A: Sprinkle sea salt on top before the chocolate sets. It tastes wonderful. Which tip will you try first?
From My Kitchen to Yours
I hope you love making these little bites. Cooking is about sharing joy. It is about creating sweet memories. I would love to see your creations. Please share a photo of your truffles.
Have you tried this recipe? Tag us on Pinterest! You can find me at @AnnasCozyKitchen. Thank you for cooking with me today.
Happy cooking!
—Anna Whitmore.
Chocolate Peanut Butter Truffles: Chocolate Peanut Butter Truffle Recipe
Description
Decadent no-bake chocolate peanut butter truffles. An easy 4-ingredient dessert perfect for gifting or cravings! Ready in minutes.
Ingredients
Instructions
- With a hand mixer, blend the powdered sugar and creamy peanut butter together until it forms a sticky dough and is well mixed.
- Using a mini scoop, scoop the mixture out onto a parchment lined baking sheet. You should get about 12-15 balls, depending on the size of the scoop you use.
- Stick the whole thing in the freezer for about 1-2 hours.
- When ready, melt the wafers according to package directions. If you find you need to make more, simply heat a handful to finish off. Usually about 1 1/2 cups is what I use total.
- Remove the peanut butter balls from the freezer and using a fork, dip them into the chocolate, coating them evenly.
- Set them back on the parchment paper to dry.
- To speed drying, you can pop them back into the freezer for about 15-20 minutes. Otherwise, if air drying, allow about an hour or so before trying to handle them.
Notes
- Nutrition Facts (per serving): Calories: 132 kcal, Carbohydrates: 16 g, Protein: 2 g, Fat: 7 g, Saturated Fat: 3 g, Polyunsaturated Fat: 1 g, Monounsaturated Fat: 2 g, Sodium: 47 mg, Potassium: 49 mg, Fiber: 0.4 g, Sugar: 15 g, Calcium: 4 mg, Iron: 0.2 mg


Leave a Reply