
A Happy Accident
I was making a pie one rainy afternoon. I had some extra pie crust left over. I also had a jar of peanut butter sitting right there. I thought, why not put them together? I still laugh at that.
That was the first peanut butter lava cookie. It matters because the best ideas often come from playing. You don’t always need a fancy plan. What’s your favorite “happy accident” in the kitchen?
Why These Cookies Work
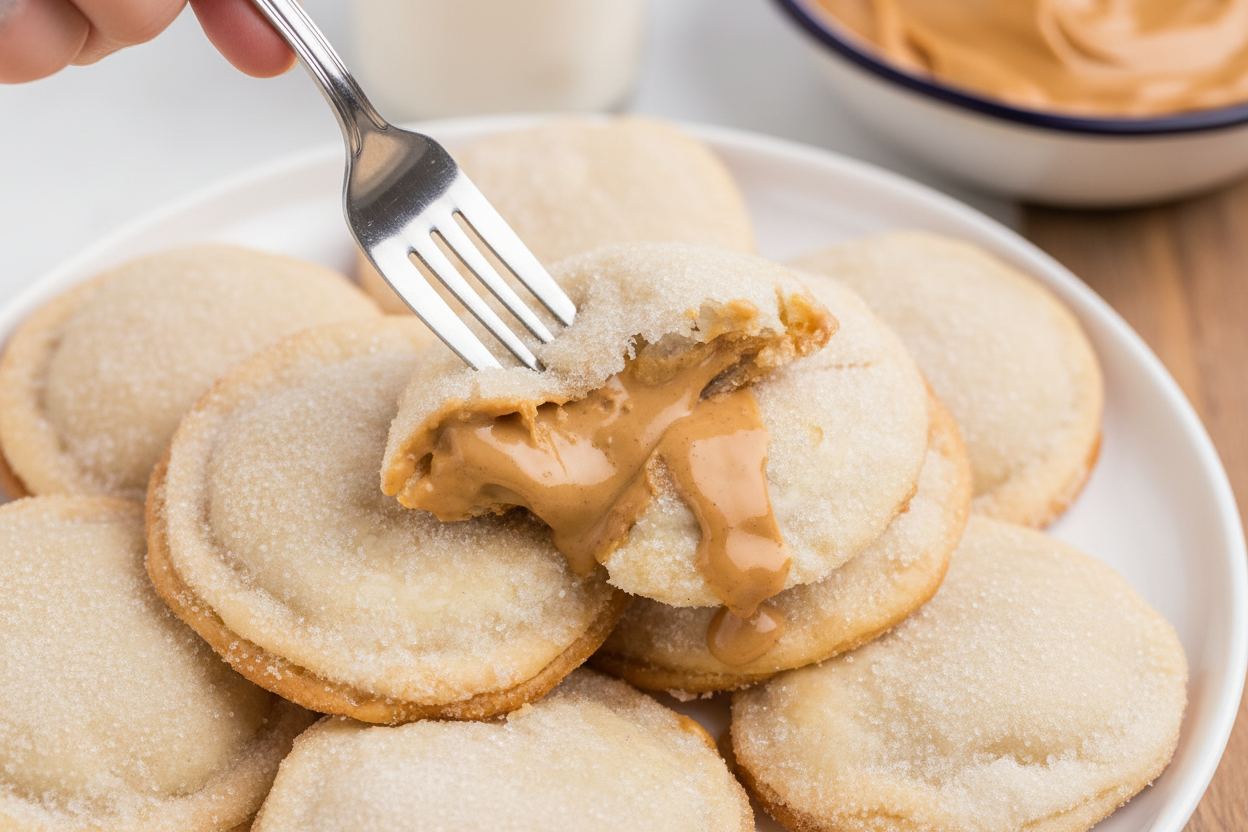
The pie crust is the magic part. It bakes up so flaky and golden. The peanut butter gets all warm and gooey inside. Doesn’t that sound amazing?
Here’s why this matters. Using simple things you know creates something new. It builds kitchen confidence. Fun fact: The sugar on the peanut butter is a tiny trick. It stops the edges from sealing so the lava can flow!
Let’s Make Some Magic
Let your pie crusts warm up on the counter. Roll one out just a little thinner. Use a glass to cut as many circles as you can. This part is fun, like cutting paper snowflakes.
Now, the good stuff. Spoon that peanut butter right in the middle. A tiny sprinkle of sugar on top. Then place another circle on it. Pinch the edges tight with your fingers. Give it a little sugar coat. Ready for the oven!
A Word of Care
These cookies bake fast. Watch for just the start of browning. Take them out after 12 minutes. Let them cool for just two minutes before you try one.
This is very important. The peanut butter inside is like real lava. It is very, very hot. Let it cool a bit first. Do you prefer your desserts warm and gooey, or cool and set?
Sharing the Warmth
I love making these with my grandkids. We reroll the scraps to get every last cookie. Nothing goes to waste. The kitchen fills with a warm, toasty smell.
That smell is the real magic. It brings everyone to the table. This matters because food is about more than eating. It’s about the feeling you share. Tell me, what smell makes you feel most at home?

Ingredients:
| Ingredient | Amount | Notes |
|---|---|---|
| Premade Pie Crust | 14 oz package | The kind that is rolled up in a box. You will use both crusts. |
| Creamy peanut butter | 14 tablespoons | JIF original creamy worked best for me. |
| Granulated sugar | 1 cup |
My Peanut Butter Lava Cookie Secret
Hello, my dear. Come sit at the counter. Let’s make something magical. These cookies are my grandson’s favorite. He calls them “lava pockets.” The secret is using simple pie crust. It makes them so flaky and golden. Doesn’t that sound wonderful? I love how the warm peanut butter oozes out. It’s like a sweet, nutty hug. I still laugh at that first time I made them. I was so impatient to try one. I learned about “lava” the hard way. Let me tell you the right way to do it.
Step 1: First, heat your oven to 400°F. Take your pie crusts from the fridge. Let them sit on the counter. They need to get soft and friendly. This makes them easy to roll. A hard, cold crust will just crack. Trust me on this. (My hard-learned tip: Set a timer for the crust! If you rush, it tears.)
Step 2: Unroll one crust on some parchment paper. Give it a few gentle rolls with your pin. You want it just a tiny bit thinner. Think of a thick coin. Now, find a glass or a cookie cutter. Cut out as many circles as you can. This feels like making play-dough shapes. It’s my favorite part.
Step 3: Spoon a big tablespoon of peanut butter onto a circle. Sprinkle a tiny bit of sugar on top. Keep the sugar just on the peanut butter. This is very important. If sugar gets on the crust edges, your cookie won’t seal. The lava will escape. Why do we keep the sugar off the edges? Share below!
Step 4: Place another circle on top like a hat. Pinch the edges together very tightly. You can also press with a fork. It makes pretty lines. Now, roll the whole cookie in a bowl of sugar. It gets a lovely, sparkly coat. Doesn’t that smell amazing already? Place it on your baking sheet.
Step 5: Bake them for 12 minutes. Watch for a light golden color. Do not overbake. They will look soft. That’s perfect. Let them cool for two whole minutes. The peanut butter inside is like molten lava. It is very, very hot. Please wait. I promise it’s worth it.
Cook Time: 12 minutes per batch
Total Time: About 45 minutes
Yield: About 14-16 cookies
Category: Dessert, Cookies
Three Tasty Twists to Try
These cookies are wonderful just as they are. But sometimes, a little change is fun. Here are three ideas for you. Chocolate Chip Lava: Mix mini chocolate chips into the peanut butter. Jam Surprise: Add a tiny spoonful of jelly with the peanut butter. Cinnamon Sugar: Roll the finished cookie in cinnamon sugar instead. It’s so cozy. Which one would you try first? Comment below!
The Perfect Way to Serve Them
These cookies are a full experience. Place one on a small plate. Dust it with powdered sugar like snow. A scoop of vanilla ice cream beside it is heavenly. The cold melts into the warm lava. For a drink, cold milk is the classic choice. It just belongs. For the grown-ups, a glass of sweet sherry is a nice match. It tastes like nuts and raisins. Which would you choose tonight?
Keeping Your Lava Cookies Perfect
These cookies are best fresh and warm. But you can save some for later. Let them cool completely first. Then store them in a sealed container on the counter.
They will keep for two days. The peanut butter will firm up, of course. You can reheat them to get the lava back. Just warm in a 300°F oven for five minutes.
I once froze a whole batch for my grandkids. They thawed on the counter and tasted great. Batch cooking like this saves time for busy days. It means you always have a sweet treat ready for surprise guests.
Have you ever tried storing it this way? Share below!
Simple Fixes for Cookie Troubles
Sometimes the lava leaks out while baking. This happens if the edges are not sealed well. Pinch them very firmly with your fingers. A fork crimp adds extra security.
If the sugar spreads, the top won’t stick. Keep the sugar only on the peanut butter. I remember when my first batch came out as open-faced pies. A clean seal makes a perfect pocket for the lava.
Do not overbake them. They are done when just lightly golden. Overbaking cooks the lava solid. Getting this right builds your cooking confidence. A gooey center is the best surprise.
Which of these problems have you run into before?
Your Quick Questions, Answered
Q: Can I make these gluten-free? A: Yes! Use a gluten-free pie crust from the store. Check the label to be sure.
Q: Can I make the cookies ahead? A: You can assemble them ahead. Keep them covered on a tray in the fridge. Bake just before you need them.
Q: What can I use instead of peanut butter? A: Try almond butter or a seed butter. Fun fact: The first peanut butter patent was in 1884!
Q: Can I make a bigger batch? A: Absolutely. Just roll your crust thinner to get more circles. You might need extra peanut butter.
Q: Any optional tips? A: A sprinkle of sea salt on top is lovely. It makes the sweet peanut butter taste even better.
Which tip will you try first?
From My Kitchen to Yours
I hope you love making these little cookies. They always make my kitchen smell wonderful. I feel happy knowing you are baking too.
It would delight me to see your creations. Please share a photo of your baking adventure. You can tag my blog on Pinterest so I can see.
Have you tried this recipe? Tag us on Pinterest!
Happy cooking! —Anna Whitmore.

Peanut Butter Lava Cookies: Peanut Butter Lava Cookie Recipe
Description
Gooey peanut butter lava cookies with a molten chocolate center. The ultimate easy dessert recipe that’s irresistibly delicious and perfect for sharing.
Ingredients
Instructions
- Preheat the oven to 400°F. Set out pie crusts until they are at room temperature (refer to package instructions for time requirements).
- On a piece of parchment paper, unroll/unfold one pie crust layer and roll slightly with a rolling pin to achieve a crust just a bit thinner than it comes in the package (1/16th-⅛th of an inch).
- Use a 3-inch round cookie cutter or a glass/jar to cut as many circles as you can fit from the crust.
- Spoon 1 tablespoon of JIF original creamy peanut butter onto the center of the round pie piece. Sprinkle with a ⅛ teaspoon of granulated sugar, making sure the sugar stays right on the peanut butter and does not spread to the edges of the pie crust (this will prevent the top from sealing to the bottom piece when we sandwich them together.)
- Place a second pie piece over the first to form a “sandwich”. Use your fingers to pinch the edges together firmly all the way around the cookie. *You can also use the tips of a fork to crimp and seal each cookie*
- Gently toss the formed cookie in granulated sugar and place it on a baking sheet lined with parchment paper.
- Repeat with the additional peanut butter and the remaining pie crust pieces. Collect excess pie crust, press into a ball, and reroll to form additional rounds.
- Bake cookies for 12 minutes. The pie crust will just start beginning to brown. Do not overbake.
- While the cookies are baking, repeat the above steps with the other roll of pie crust.
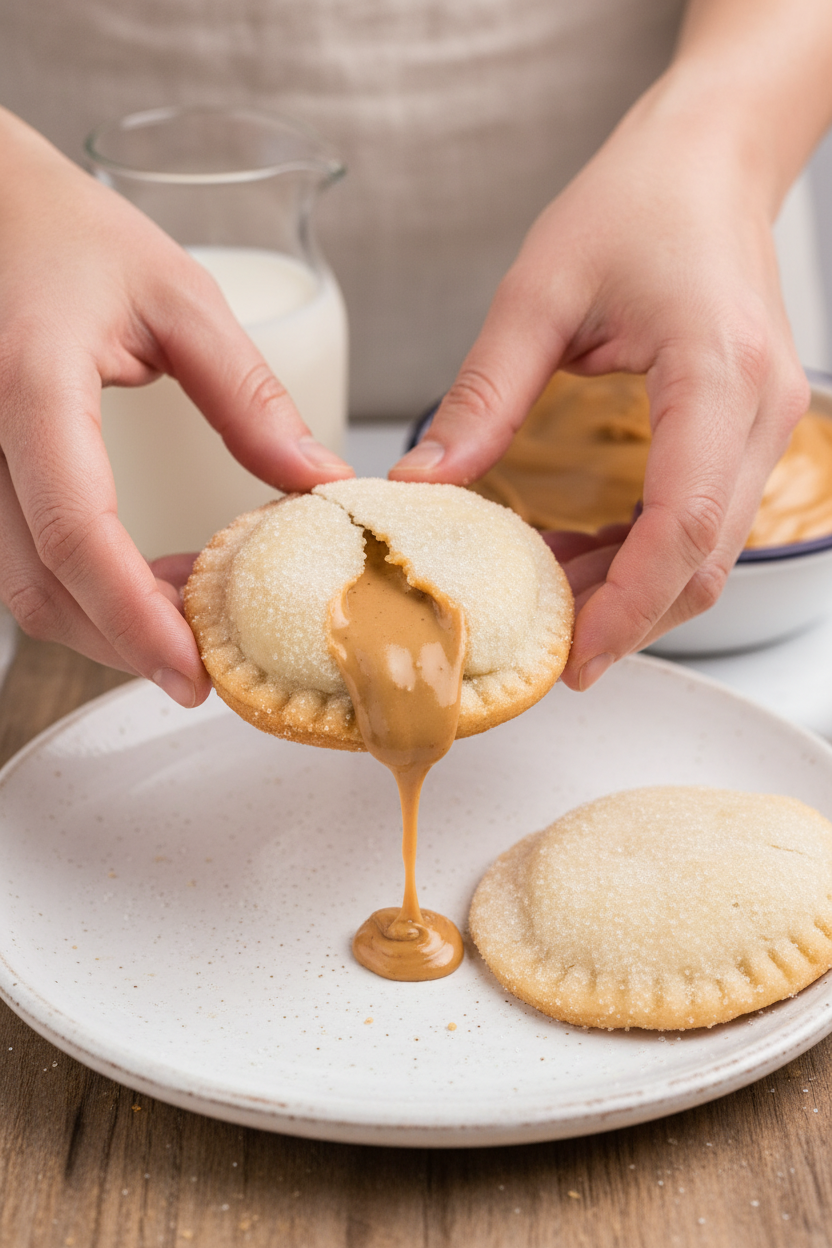
- Remove from the oven and let cool for 2 minutes before serving. **Be careful because the peanut butter will still be very hot while in the “lava” state** Peanut butter in the center remains in the “lava” state while the cookies are warm and will firm up as they cool.


Leave a Reply