

The Upside-Down Magic
Let’s make a magic trick. We bake a pie upside down. Then we flip it over. The secret is on the bottom becomes the beautiful top. I still laugh at that. It feels like a kitchen surprise party.
This recipe is a savory tarte tatin. Usually, it’s made with apples. But root vegetables work just as well. Their natural sugars get sweet and cozy in the oven. Doesn’t that smell amazing? Have you ever tried an upside-down cake before?
A Rainbow from the Earth
Look at your veggies. Orange carrots, gold beets, purple turnips. They are a rainbow from the dirt. Slicing them thin is key. A mandoline helps, but a sharp knife works too. Just be very careful with your fingers.
I keep each pile separate. It makes building the rows so much easier. This matters because each veggie cooks a tiny bit differently. Their colors stay bright and pretty. Fun fact: golden beets won’t stain everything pink like red beets do!
Butter, Herbs, and Patience
Now for the good part. We brown the butter. This means we cook it until it turns a nutty brown. It smells like toasted nuts and heaven. Then we add rosemary and thyme. My grandma grew these herbs. Their smell always brings me back to her garden.
You pour this over the veggie rows. This buttery bath is what makes everything rich and delicious. This matters because good food doesn’t need a hundred ingredients. Just a few, treated with care. What’s your favorite herb to cook with?
The Careful Flip
After baking, the hard part comes. We have to flip the whole hot pie. It can be scary! My first time, I was so nervous. I took a big breath and just did it. It worked, and I danced in my kitchen.
Use a board bigger than your pan. Do it over the sink. Be quick and confident. If a piece sticks, just pat it back on. No one will know. The reward is that stunning, caramelized veggie wheel. Share a kitchen disaster that turned out okay for you!
More Than Just Dinner
This is a show-stopper. It looks fancy but it’s just simple roots and pastry. It teaches us to see beauty in ordinary things. A carrot can be art. A turnip can be the star.
Making it slowly, with your hands, is a gift. You give your time to create something wonderful. That matters. Food made with patience always tastes better. It tastes like love. Slice it warm and share it with people you care about.

Ingredients:
| Ingredient | Amount | Notes |
|---|---|---|
| single pie crust | 1 | |
| large carrots | 2 (12 ounces) | |
| golden beets | 2 (12 ounces) | |
| purple top turnips | 2 (12 ounces) | |
| small sweet potato | 1 (12 ounces) | |
| unsalted butter | 4 tablespoons | |
| fresh thyme | 1 teaspoon | |
| fresh rosemary, chopped | 2 teaspoons | |
| kosher salt | 1/2 teaspoon | |
| plain flour | for dusting | if needed |
My Cozy Veggie Pie-Upside-Down
Hello, my dear. Come sit. Let’s talk about a cozy kitchen surprise. This is my savory tarte tatin. It’s a fancy name for a pie baked upside-down. Don’t let that scare you. It is just lovely, layered roots and a flaky crust. I first made it one chilly fall day. The colors of the vegetables made me so happy. Doesn’t that smell amazing? It tastes like a warm hug from the garden.
We will use carrots, beets, turnips, and a sweet potato. They look like a rainbow when sliced thin. I still laugh at that. My grandson called it “earth candy.” The trick is to take your time layering. It is like making a cozy vegetable blanket. Here is how we make our cozy pie.
Step 1: Heat your oven to 375º F. Get your pie crust ready. If it is in a roll, let it rest on the counter. We want it to be friendly and soft. Place your pie plate on the dough. Cut a circle around it. Pop the dough on a tray and into the fridge. A cold crust is a happy crust.
Step 2: Now, let’s play with vegetables. Peel all of them carefully. Then we slice. Use a mandoline if you have one. (Hard-learned tip: Use the guard! I learned about fast band-aids once). Slice them all about as thick as two pennies. Keep each kind in its own little pile. It keeps our rainbow organized.
Step 3: Grab a skillet for the magic butter. Melt 4 tablespoons over medium heat. Let it cook until it smells nutty and turns light brown. This takes about 3-4 minutes. Then add your fresh thyme, rosemary, and salt. Whisk it together. Oh, that herb smell! Take it off the heat. Set this golden sauce aside.
Step 4: Time to make our vegetable pattern. Use the same skillet. Start at the center and work out. Layer the slices, overlapping like roof shingles. Alternate the colors—carrot, beet, turnip, potato. Hold the first few rows. They need friends to stay put. Fill in any gaps with extra pieces. It is a patient puzzle. What’s your favorite colorful veggie? Share below!
Step 5: Carefully pour your butter herb mix over the veggies. It will sizzle nicely. Take your crust from the fridge. Lay it right on top, right in the center. Tuck the edges in a bit. Now, bake it for about 60 minutes. If the crust gets too dark, just tent it with foil. Your kitchen will smell wonderful.
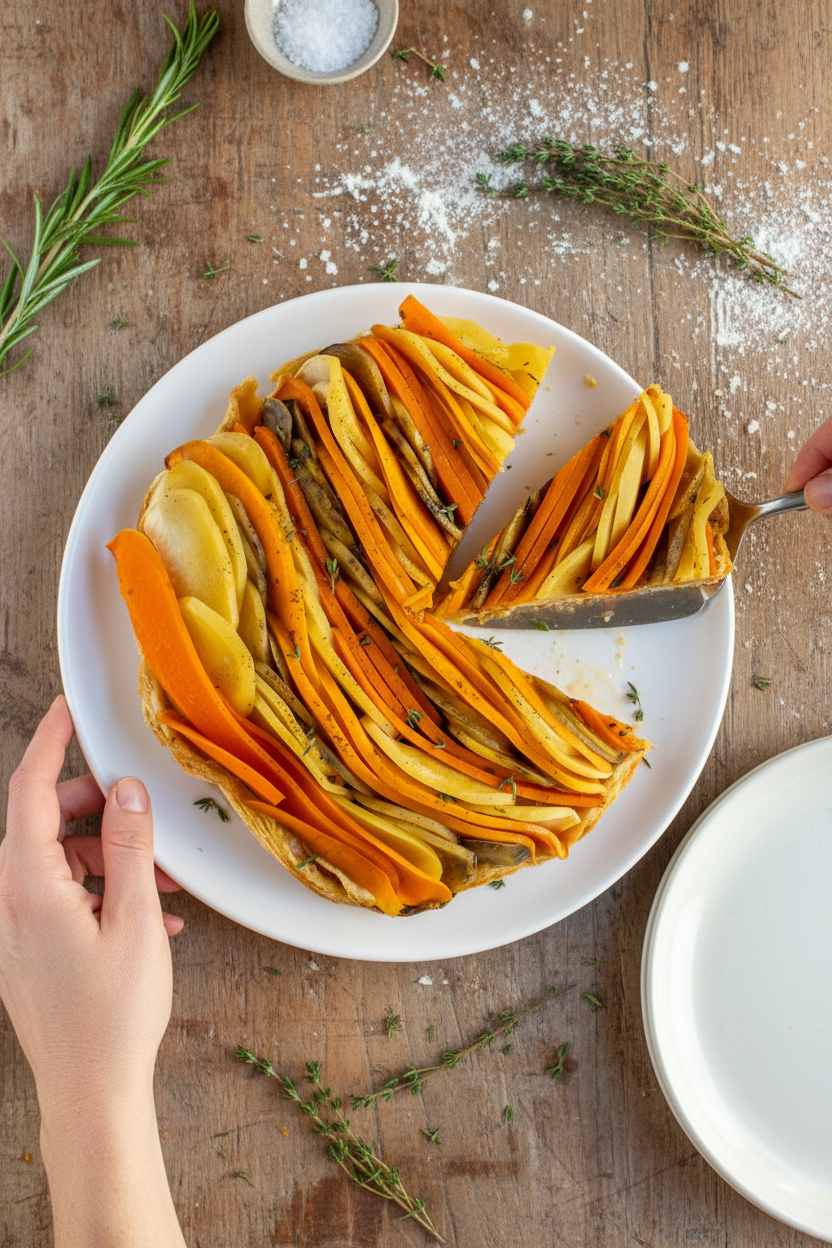
Step 6: The pie is done when the veggies are soft. Let it rest for just 3 minutes. Tip the skillet over a bowl. Catch any extra butter. We will use it later. Now, the fun flip! Place a cutting board on top. Hold tight and flip it all over. Be brave and quick. Lift the skillet off. Your beautiful pattern is revealed! Brush that saved butter on top. It makes everything shine.
Cook Time: About 60 minutes
Total Time: 1 hour 30 minutes
Yield: 8 slices
Category: Dinner, Side Dish
Make It Your Own
This recipe loves to play dress-up. You can change it with the seasons. Here are three of my favorite twists. They are all simple and fun.
Winter Squash Swap: Use thin slices of butternut squash and parsnips. It tastes like a sweet, toasty autumn day.
Cheesy Herb Dream: Sprinkle sharp cheddar cheese between the veggie layers. It gets all bubbly and golden. My grandkids adore this one.
Maple Mustard Glaze: Whisk a spoon of maple syrup and mustard into the butter. It adds a sweet and tangy kick. So good.
Which one would you try first? Comment below!
Serving Up Sunshine
This pie is a star on its own. But it loves good company. For a full meal, add a simple green salad. A handful of fresh arugula with a lemon dressing is perfect. A dollop of creamy goat cheese on the side is lovely too. It melts right into the warm veggies.
What to drink? For a cozy night, a glass of apple cider is just right. The fizzy kind feels festive. For the grown-ups, a glass of dry hard cider pairs beautifully. It tastes like the orchard. Which would you choose tonight?
Keeping Your Tarte Tatin Tasty
This tarte is best fresh and warm. But leftovers are a treat! Let it cool completely first. Then wrap it tightly in plastic wrap. It will keep in the fridge for about three days.
You can freeze it, too. Wrap the whole tarte or slices in foil. Then place them in a freezer bag. It will be good for up to two months. Thaw it overnight in your fridge before reheating.
To reheat, use your oven. Warm slices at 350 degrees for 10-15 minutes. This keeps the crust crisp. I once microwaved a slice. It turned the lovely crust soft and sad! The oven is worth the wait.
Batch cooking saves busy nights. Make two tartes at once. Eat one tonight, freeze one for later. This matters because a good meal is a gift to your future self. Have you ever tried storing it this way? Share below!
Fixing Common Little Problems
First, the veggies might slide when you arrange them. This is normal! Just hold the first few rows. They will lock together as you add more. I remember when my first row collapsed. I laughed and started again.
Second, the crust might brown too fast. If it looks dark, cover it with foil. This protects it while the veggies finish cooking. Getting this right matters. It gives you a perfect golden crust, not a burnt one.
Third, the big flip can be scary. Use a flat plate or board. Do it over the sink for confidence. A quick, confident motion works best. This matters because a good flip builds your cooking courage. Which of these problems have you run into before?
Your Questions, My Answers
Q: Can I make this gluten-free? A: Yes! Use your favorite gluten-free pie crust from the store.
Q: Can I prepare parts ahead? A: You can slice the veggies a day early. Keep them in water in the fridge.
Q: What if I don’t have turnips? A: Swap in more carrots or parsnips. Use what you have! *Fun fact: parsnips look like white carrots and taste sweet.*
Q: Can I make a smaller version? A: Absolutely. Just use a smaller pan. Reduce the cooking time a little.
Q: Any optional tips? A: A sprinkle of goat cheese on top after baking is lovely. Which tip will you try first?
From My Kitchen to Yours
I hope you love making this cozy tarte. It fills your kitchen with the best smells. Cooking is about sharing and trying new things. I would love to see what you create in your own kitchen.
Please share your photos with me. It makes my day to see your dishes. Have you tried this recipe? Tag us on Pinterest! You can find me there as The Cozy Kitchen Nook. Happy cooking!
—Anna Whitmore.

Savory Root Vegetable Tarte Tatin – The Schmidty Wife: Savory Root Vegetable Tarte Tatin Recipe
Description
Savory Root Vegetable Tarte Tatin recipe. A stunning upside-down tart with caramelized seasonal vegetables, perfect for a cozy dinner or impressive holiday centerpiece.
Ingredients
Instructions
- Preheat the oven to 375º F.
- If needed roll out the pie crust. Gently place the pie plate you are using upside down in the center of the pie crust. With a knife cut the pie crust to the size of the top of the pie plate. Transfer the pie crust to a sheet pan and let rest in the fridge until ready to use.
- Peel all the veggies. Mandoline slice the veggies 1/8 inch. Keep veggies in separate piles for ease.
- Place a skillet over medium heat. Add the butter to melt and cook stirring occasionally until the butter starts to brown 3 to 4 minutes. Once you have the butter browned add the spices and salt. Whisk together. Remove from heat and set aside.
- Alternating the different veggies carefully place one or two rows of each veggie by making a row of overlapping pieces. In the first few rows you will need to hold the rows in place until you have added enough rows for it to hold in place. Once you have finished making all the rows if you have extra pieces fill them into the rows if needed.
- Carefully pour the butter mixture over the veggies. Add the pie crust overtop directly in the center.
- Transfer to the oven for about 60 minutes. If at anytime if your pie crust looks like it is getting burnt go ahead and cover with aluminum foil.
- When the veggies appear softened remove from the oven and let rest 2-3 minutes. Carefully and gently tip the pie over a bowl to pour out any extra butter on the bottom. Reserve the butter.
- Place a cutting board or plate overtop the pie crust. VERY CAREFULLY but with quickness flip over the tarte tatin. Gently take off the pie plate. Use the reserved butter to carefully pour back over the top.
Notes
- Nutrition Information: Yield: 8, Serving Size: 1/8th the tarte, Calories: 229, Total Fat: 11g, Saturated Fat: 5g, Trans Fat: 0g, Unsaturated Fat: 5g, Cholesterol: 15mg, Sodium: 193mg, Carbohydrates: 28g, Fiber: 3g, Sugar: 4g, Protein: 4g


Leave a Reply