

A Sweet Start with a Crunch
Let’s start with the crust. It’s just Oreos and butter. I use the golden ones. They taste like vanilla. They make a pretty, light base.
Crush them up fine. I use my old food processor. It sounds like a happy little motor. Then mix in the melted butter. It smells so good. Press it into your dish. This part is fun. Use your fingers. The freezer firms it up nicely.
The Heart of the Matter
Now, the creamy layer. This is where the magic lives. You mix soft cream cheese with sugar and Cool Whip. Be gentle. You want it fluffy, not tough.
Here’s the fun part. Stir in those crushed candy canes. They bring the peppermint joy. *Fun fact: Candy canes were first given out at Christmas choirs to keep children quiet!* I still laugh at that. This layer matters. It holds the flavor. It ties the whole dessert together.
Layers of Love
Next comes the pudding. Just mix the powder with cold milk. Beat it for two minutes. Watch it thicken right before your eyes. Doesn’t that smell amazing?
You’ll spread this over the cream cheese. Then, a quick freeze. This step matters. It keeps the layers from mixing. You get a clean, pretty slice later. Do you like desserts with lots of layers or just one?
The Finishing Touch
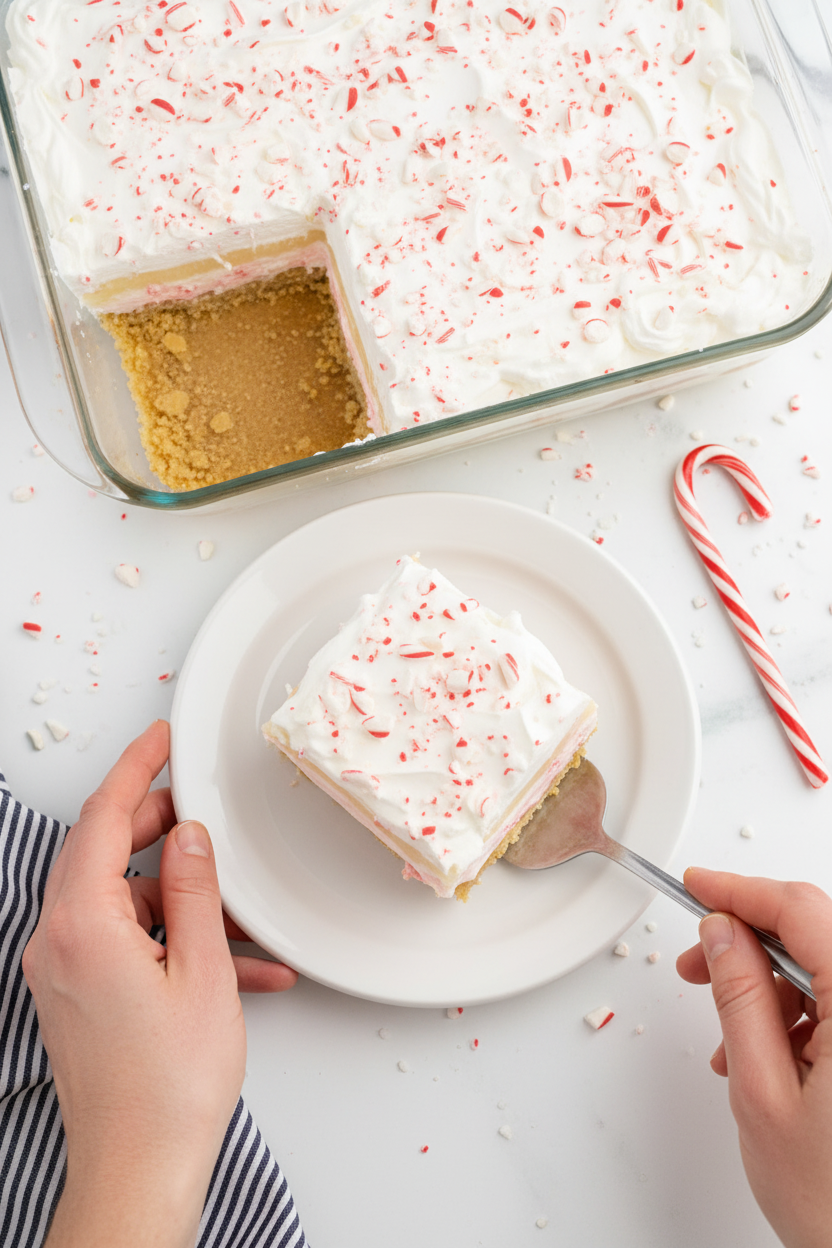
Finally, the topping. More fluffy Cool Whip goes on top. Then, a sprinkle of the last candy canes. It looks like a winter wonderland in a dish.
Now, the hard part. You must wait. Let it chill for hours. Overnight is best. The wait makes every layer set perfectly. It’s worth it, I promise. What’s the hardest dessert you’ve ever had to wait for?
Why We Make This
I first made this for my grandson. He loved the crunch and cream. Now, it’s our holiday tradition. Food becomes memory that way.
Sharing this dessert is a small act of love. It says, “I took time for you.” That’s the real recipe. The rest is just mixing. What’s a food that makes you think of someone you love?

Ingredients:
| Ingredient | Amount | Notes |
|---|---|---|
| Golden Oreos | 540 grams | 1 family-size package |
| Unsalted butter | ¾ cup | melted |
| Peppermint candy canes | ½ cup | crushed, for Cream Cheese Layer |
| Cream cheese | 8 ounces | softened |
| White sugar | ¼ cup | |
| Powdered sugar | 1 cup | |
| Cool Whip | 16 ounces | thawed and divided (2 cups for layer, remainder for topping) |
| Instant vanilla pudding mix | 2 boxes | 3.4-ounce boxes |
| Cold milk | 2¾ cups | |
| Peppermint candy canes | ¼ cup | crushed, for Whipped Topping |
My Magical Candy Cane Dessert
Hello, my dear! Come sit at the counter. Let’s make some magic. This dessert is pure joy in a dish. I remember making it with my grandkids every December. Their little hands loved crushing the candy canes. The layers look so pretty when you slice them. It’s like a sweet, chilly peppermint dream. Doesn’t that sound fun?
We will build it layer by layer. It’s easier than you think. Just follow these simple steps with me. I’ll tell you all my little secrets along the way. Are you ready? Let’s begin our kitchen adventure.
- Step 1: First, line your baking dish. Parchment paper is my best friend here. It makes lifting the dessert out so easy. Then, let’s crush those candy canes. Put them in a bag and use a rolling pin. Whack them until they are in little red and white bits. I still laugh at that sound.
- Step 2: Now for the crust. Twist apart those golden Oreos. Scrape the cream filling out with a butter knife. (Save it for a sneaky snack later!). Crush the cookies into fine, sandy crumbs. Mix them with the melted butter. Press it firmly into your dish. The freezer will firm it up nicely.
- Step 3: Time for the creamy layer. Beat the softened cream cheese until it’s smooth. Add both sugars and two cups of the Cool Whip. Gently fold it all together. Now, stir in half of your crushed candy canes. Doesn’t that smell amazing? Spread this over your cold crust. Pop it back in the freezer.
- Step 4: Let’s make the pudding layer. This is the quick part! Whisk the pudding mix with cold milk. Beat it for two full minutes. You will see it get thick and lovely. (A hard-learned tip: Use cold milk! It thickens perfectly). Smooth this right over the cream cheese layer. Back into the freezer it goes for ten minutes.
- Step 5: The final touch! Spread the rest of the Cool Whip on top. It’s like frosting a cake. Sprinkle the last of the candy cane pieces over everything. Those red bits make it so cheerful. Now, the hard part: waiting. It must chill in the fridge for hours. Do you think it’s better after six hours or overnight? Share below!
Cook Time: 6+ hours chilling
Total Time: 6 hours 30 minutes
Yield: 12 servings
Category: Dessert, No-Bake
Three Fun Twists to Try
This recipe is wonderful as it is. But you can play with it, too! Here are some ideas from my kitchen. Change it up for a different holiday or just because. Cooking should be fun, don’t you think?
- Chocolate Mint Swap: Use chocolate Oreos for the crust. Add mini chocolate chips to the cream cheese layer. It’s like a peppermint patty in a dish!
- Berry Merry Version: Skip the candy canes. Use crushed freeze-dried strawberries instead. Their sweet-tart flavor is so pretty and pink.
- Gingerbread Friend: Use gingersnap cookies for the crust. Add a pinch of cinnamon to the cream cheese. It tastes like Christmas morning.
Which one would you try first? Comment below!
Serving It Up With Style
This dessert is a star on its own. But a few little touches make it extra special. I love to serve it on a chilled plate. It keeps the slices neat. A tiny extra sprinkle of candy cane on top is lovely. You could add a fresh mint leaf, too. It looks so fancy!
What to drink with it? For the grown-ups, a small glass of peppermint schnapps hot chocolate is cozy. For everyone, a frosty glass of cold milk is perfect. It just goes together, like cookies and milk. Which would you choose tonight?
Keeping Your Candy Cane Dessert Perfect
This dessert needs a long, cold rest. The fridge is its best friend. Let it chill overnight for neat slices.
You can freeze it for up to a month. Just wrap the whole dish tightly. Thaw it in the fridge before serving.
I once tried to cut it after only two hours. The layers slid everywhere! Patience makes perfect layers.
You can make the whole dessert two days ahead. This is great for busy holiday parties. It lets the flavors get even better.
Storing it right matters. It saves you last-minute stress. You get to enjoy the party too. Have you ever tried storing it this way? Share below!
Fixing Common Candy Cane Dessert Troubles
First, a soggy crust. Press your Oreo mix firmly into the pan. Freeze it solid before adding the next layer.
This gives your dessert a strong, crunchy base. A good foundation makes every bite better.
Second, a lumpy cream cheese layer. Your cream cheese must be very soft. Let it sit on the counter first.
I remember when mine was too cold. My mixer danced across the bowl! Soft cheese mixes smoothly.
Third, runny pudding. Always use cold milk. Beat it for the full two minutes. It will thicken as it chills.
Getting these steps right builds your kitchen confidence. Your dessert will look and taste wonderful. Which of these problems have you run into before?
Your Candy Cane Dessert Questions, Answered
Q: Can I make this gluten-free? A: Yes! Use gluten-free sandwich cookies for the crust. Check your pudding mix labels too.
Q: How far ahead can I make it? A: You can assemble it two days before. The freezer keeps it for a month.
Q: What can I use instead of Cool Whip? A: You can use real whipped cream. Just sweeten it a little first.
Q: Can I make a smaller batch? A: Absolutely. Halve all the ingredients. Use an 8×8 inch pan instead.
Q: Any fun extras? A: A dash of peppermint extract boosts flavor. *Fun fact: Candy canes were once just straight white sugar sticks!* Which tip will you try first?
Share Your Holiday Creations!
I hope this recipe brings sweet joy to your table. It always reminds me of snowy days and laughter.
I would love to see your beautiful desserts. Sharing food is how we share our hearts.
Have you tried this recipe? Tag us on Pinterest! You can find me at @AnnasCozyKitchen. Let’s see those festive layers.
Thank you for cooking with me today. Wishing you a season full of sweet moments.
Happy cooking!
—Anna Whitmore.

Candy Cane Dessert: Candy Cane Dessert Recipes and Ideas
Description
Indulge in festive Candy Cane Dessert magic! Easy, no-bake recipes perfect for Christmas. Creamy, minty, and oh-so-pretty holiday treats everyone will love.
Ingredients
=== Oreo Crust ===
=== Cream Cheese Layer ===
=== Vanilla Pudding Layer ===
=== Whipped Topping ===
Instructions
- Line a 9×13-inch baking dish with parchment paper or spray with nonstick cooking spray.
- Use a food processor to crush the candy canes until coarsely crushed and ¾ cup in volume. Set aside.
- Use a food processor to turn the Oreos into fine crumbs. Add the melted butter and mix.
- Press the mixture into the baking dish. Store in the freezer while you prepare the next layer.
- In a large bowl, beat the cream cheese with an electric mixer.
- Add the white sugar, powdered sugar, and Cool Whip to the cream cheese and mix until combined. Make sure not to over-mix the cream cheese layer.
- Stir ½ cup of the crushed candy canes to the cream cheese mixture. Set aside the remaining ¼ cup for the topping.
- Use a spatula to smooth this layer over the prepared crust. Put the baking dish back into the freezer while you prepare the next layer.
- Combine the dry pudding mix and milk and beat for two minutes until it starts to thicken.
- Use a spatula to evenly smooth the pudding layer over top of the cream cheese layer. Put it back into the freezer for ten minutes.
- Smooth the remaining Cool Whip over the top of the dessert and sprinkle with the remaining crushed candy cane pieces.
- Place the dish into the refrigerator for at least six hours before slicing and serving. For the best layers, it should chill overnight.
Notes
- For the best results, ensure the cream cheese is fully softened and the Cool Whip is completely thawed before mixing to avoid lumps.


Leave a Reply