
My Kitchen Helper Had a Great Idea
My grandson, Leo, loves pizza. One day, he wanted a snack. He also wanted to help. We had biscuits and cheese. I still laugh at that day. We made a big, happy mess.
We put pepperoni inside the dough. We pinched them into little balls. They looked like tasty treasure. This matters because cooking together makes memories. It’s more fun than just eating.
Let’s Make Our Pizza Bombs
First, warm your oven to 375°F. Flatten each biscuit with your hands. Make a little circle. It’s like making a tiny plate for the filling.
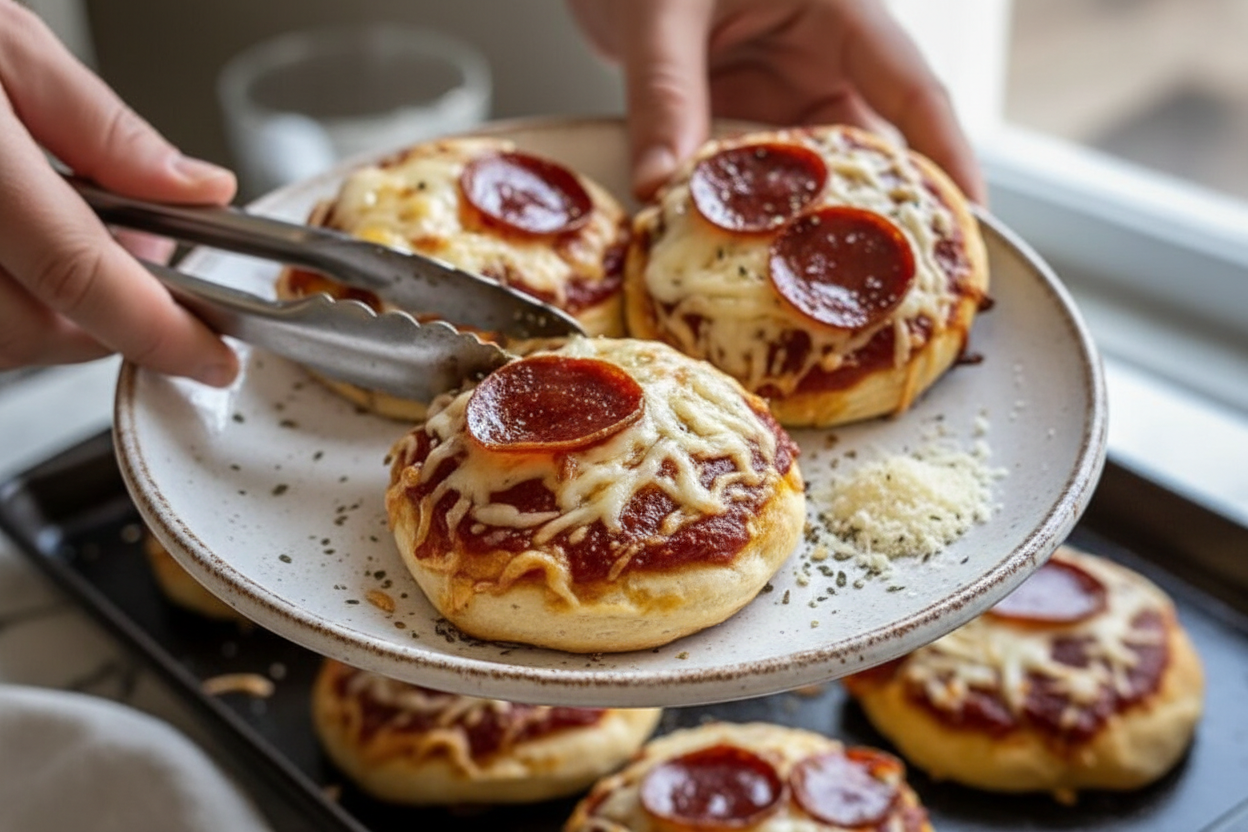
Now for the good part. Add a tiny spoon of sauce. Then two pepperoni slices. Then a big pinch of cheese. Pinch the dough shut tight. Roll it gently in your hands. No leaks allowed!
The Magic Butter Bath
This step is my secret. Mix melted butter with garlic powder. Brush it all over each little bomb. Doesn’t that smell amazing? Then sprinkle Italian seasoning and Parmesan.
*Fun fact*: The butter makes the tops crispy. It also helps the spices stick. This matters because flavor should be in every bite, not just the middle.
Watching Them Grow
Place them on a tray. Put them in the oven. Watch through the window. They will puff up like little pillows. They get golden brown. It takes about 15 minutes.
Be careful, they are hot inside! Let them cool for just a minute. Then pull one apart. See that stretchy cheese? What’s your favorite part of a pizza? Is it the cheese, the pepperoni, or the sauce?
Time to Share and Eat
Serve them warm with extra sauce for dipping. These are perfect for game night. Or for a hungry kid after school. They are little handfuls of joy.
I love seeing what families make. Did you try these pizza bombs? What other fillings would be fun? Maybe some chopped veggies or ham? Tell me about your kitchen adventures.
Ingredients:
| Ingredient | Amount | Notes |
|---|---|---|
| Refrigerated biscuit dough | 1 can (8 pieces) | |
| Pepperoni | 16 slices | |
| Shredded mozzarella cheese | 1 cup | |
| Pizza sauce | 1/4 cup | |
| Melted butter | 2 tbsp | For topping |
| Garlic powder | 1 tsp | For topping |
| Italian seasoning | 1 tsp | For topping |
| Grated Parmesan cheese | 2 tbsp | For topping |
My Cheesy Pepperoni Pizza Bombs
Hello, my dear! Come sit at the counter. Let’s make something fun. These pizza bombs are pure joy. They are little pockets of cheesy pepperoni goodness. My grandson calls them “pizza pillows.” I still laugh at that. They are perfect for a quick snack or a happy dinner. The best part is how simple they are. We use biscuit dough from a can. It makes everything so easy. Doesn’t that smell amazing already? Let’s get our hands a little messy. I promise it will be worth it.
Here is how we make them. Follow these steps with me. I will tell you a little story as we go. Remember, cooking is about feeling happy, not being perfect. If a little cheese sneaks out, that’s okay. It just gets crispy and tasty. Are you ready? Let’s start our step-by-step adventure.
Step 1: First, turn your oven on to 375 degrees. Get a baking sheet ready. I always line mine with parchment paper. It saves so much scrubbing later. (That’s a hard-learned tip from a messy day!). While the oven heats, open your can of biscuits. That pop always makes me jump! Flatten each one into a small circle. Use your hands, it’s fun.
Step 2: Now for the filling. Spoon a little pizza sauce in the middle. Then add two pepperoni slices. My grandkids always sneak an extra one. Next, a big pinch of mozzarella cheese. Don’t be shy with it! The cheese is what makes them gooey inside. Can you guess what happens if we forget the cheese? Share below!
Step 3: This is the important part. Pinch the dough edges together tightly. Make a little ball. You want to trap all that flavor inside. Place each ball seam-side down on your sheet. I think they look like little doughy packages. One time, I didn’t pinch well. We had a cheesy volcano! It was still delicious, though.
Step 4: Time for the magic topping. Melt some butter. Brush it over each bomb. Then sprinkle on garlic powder, Italian seasoning, and Parmesan. This makes the tops golden and fragrant. It smells like a pizza shop in here now. Doesn’t it?
Step 5: Slide your baking sheet into the oven. Bake for about 12 to 15 minutes. Watch them puff up and turn a beautiful gold. Let them cool just a minute before eating. The cheese inside is like molten lava! Serve them warm with extra sauce for dipping. Pure happiness on a plate.
Cook Time: 15 minutes
Total Time: 25 minutes
Yield: 8 pizza bombs
Category: Snack, Appetizer
Let’s Get Creative With Your Bombs!
Once you master the basic recipe, try a twist! It is so fun to play with flavors. Here are three of my favorite ideas. They are all simple and tasty. I love seeing what everyone creates in their own kitchen.
Veggie Lover: Skip the pepperoni. Use chopped bell peppers, black olives, and mushrooms instead.
Breakfast Bomb: Fill with scrambled egg, crumbled cooked sausage, and cheddar cheese. Perfect for a weekend morning.
Spicy Supreme: Add a slice of jalapeño with the pepperoni. Use a spicy cheese blend for an extra kick.
Which one would you try first? Comment below! I might just try your favorite next.
The Perfect Way to Serve Them
These little bombs are a meal all by themselves. But I love to make a cozy plate. A simple green salad with Italian dressing is perfect on the side. It adds a fresh crunch. For dipping, warm up a small bowl of extra pizza sauce. Maybe even a side of ranch dressing, too. My family fights over the last one!
What should we drink? For the grown-ups, a cold lager or pale ale is lovely. It cuts through the rich cheese. For everyone else, a fizzy lemonade or root beer is the best match. The bubbles are so refreshing. Which would you choose tonight?

Keeping Your Pizza Bombs for Later
Let’s talk about saving some for tomorrow. These pizza bombs are best warm. But they keep well. Let them cool completely first.
For the fridge, use an airtight container. They will stay good for three days. To reheat, use your oven or toaster oven. This keeps them crispy. I once microwaved one. It got a bit soggy. The oven is better.
You can freeze them too. Place unbaked bombs on a tray. Freeze them solid. Then put them in a freezer bag. Bake straight from frozen. Just add a few extra minutes. Batch cooking like this saves busy nights. It means a homemade snack is always ready. Have you ever tried storing it this way? Share below!
Fixing Common Pizza Bomb Problems
Sometimes our kitchen experiments need a little help. Here are easy fixes. First, if your filling leaks, you did not seal it tight. Pinch the dough edges very well. I remember when my first batch leaked. The cheese made a mess on the pan.
Second, if the top is pale, brush more butter. The butter helps the seasoning stick. It also makes the crust golden. A good color means good flavor. That matters for a happy meal.
Third, if the dough is raw inside, your oven was too hot. The outside cooked too fast. Use an oven thermometer to check. Cooking evenly builds your confidence. You know the food is safe and tasty. Which of these problems have you run into before?
Your Pizza Bomb Questions, Answered
Q: Can I make these gluten-free? A: Yes. Use a can of gluten-free biscuit dough. Check all your other labels too.
Q: Can I make them ahead? A: Absolutely. Assemble them the night before. Keep them covered in the fridge. Bake them the next day.
Q: What are easy ingredient swaps? A: Use cooked sausage instead of pepperoni. Try cheddar cheese instead of mozzarella. Use what you like.
Q: Can I double the recipe? A: You sure can. Just use two baking sheets. Switch their positions in the oven halfway through.
Q: Any optional tips? A: Add a tiny pinch of red pepper flakes inside. It gives a nice little kick. *Fun fact: The first pizza was likely just bread, cheese, and herbs.* Which tip will you try first?
From My Kitchen to Yours
I hope you love making these little bombs of joy. They remind me of cooking with my grandkids. The kitchen is full of laughter and cheese.
I would love to see your creations. Share a photo of your pizza bombs. It makes my day to see your kitchen adventures. Have you tried this recipe? Tag us on Pinterest! You can find me at @AnnasCozyKitchen.
Thank you for cooking with me today. Happy cooking! —Anna Whitmore.

Cheesy Pepperoni Pizza Bombs Recipe
Description
Bite-sized pepperoni pizza bombs packed with gooey cheese. The ultimate easy party snack or fun weeknight dinner the whole family will love.
Ingredients
Instructions
- Prepare the Dough: Preheat your oven to 375°F (190°C) and line a baking sheet with parchment paper for easy cleanup and to prevent sticking.
- Flatten the Dough: Take each biscuit dough piece and flatten it into a 4-inch circle to create a base for the filling.
- Fill the Pizza Bombs: Spread 1 teaspoon of pizza sauce in the center of each dough circle, layering in 2 slices of pepperoni and a generous sprinkle of shredded mozzarella cheese.
- Seal the Bombs: Carefully pinch the edges of the dough together to fully enclose the filling, forming a neat ball without any gaps.
- Arrange on Baking Sheet: Place each pizza bomb seam-side down on the prepared baking sheet to ensure they hold their shape during baking.
- Apply Toppings: Brush the tops of the bombs with melted butter, then sprinkle evenly with garlic powder, Italian seasoning, and grated Parmesan cheese for added flavor and a golden crust.
- Bake: Bake the pizza bombs in the preheated oven for 12 to 15 minutes, or until they are puffed up and golden brown on top.
- Serve Warm: Remove from the oven and serve hot with extra pizza sauce on the side for dipping pleasure.
Notes
- For added flavor, top with spicy Sriracha mayo, mango salsa, or use marinated tofu for a vegetarian option.


Leave a Reply