
The Story Behind My Chicken Cheesesteak
My grandson Leo loves a classic cheesesteak. But his mom wanted less red meat. So we got creative one rainy Tuesday. We tried it with chicken instead. I was a little nervous.
But oh, the kitchen smelled so good. The sizzle, the peppers, the melting cheese. Leo took one big bite. His eyes got wide. He just said, “Wow, Nana.” I still smile at that memory. It matters because cooking is about love and solving little problems together.
Why The “V” Cut is a Secret Trick
First, we cut the rolls. Don’t slice them all the way through! You want a bread boat. Cut a “V” shape along the top. Pull out that soft bread inside.
This does two great things. It makes a perfect pocket for all our filling. Nothing falls out the back! And it lets us butter and toast the inside. That toasted crunch is everything. Do you have a favorite bread for big, messy sandwiches? I’d love to know.
The Sizzle in the Pan
Now for the fun part. Get your chicken strips nice and seasoned. Toss them in that bowl. Hear the sizzle when they hit the hot pan. Doesn’t that sound amazing?
Cook the chicken until it’s done. Then set it aside. In the same pan, we cook the veggies. We use the tasty bits left behind. Fun fact: Those brown bits in the pan are called “fond.” They are pure flavor! Let the onions get sweet. Let the peppers get soft.
Bringing It All Together
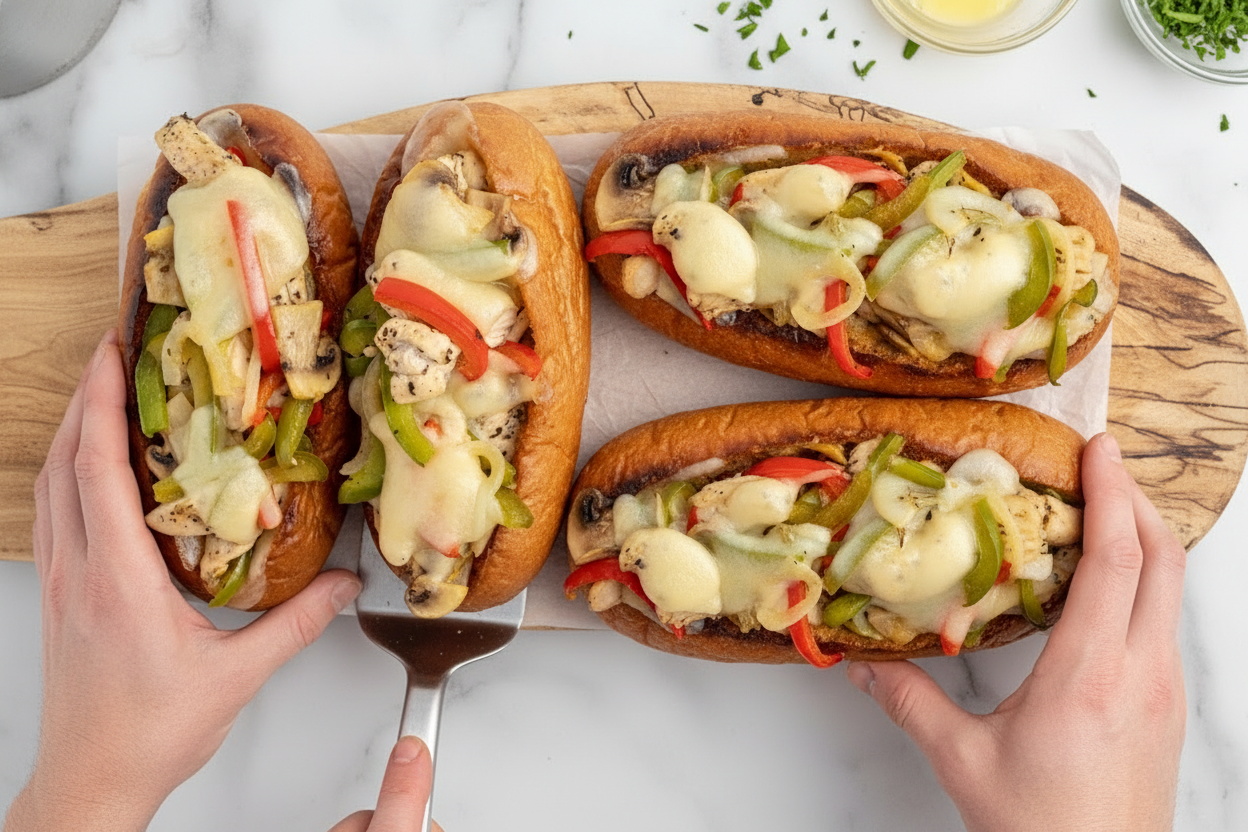
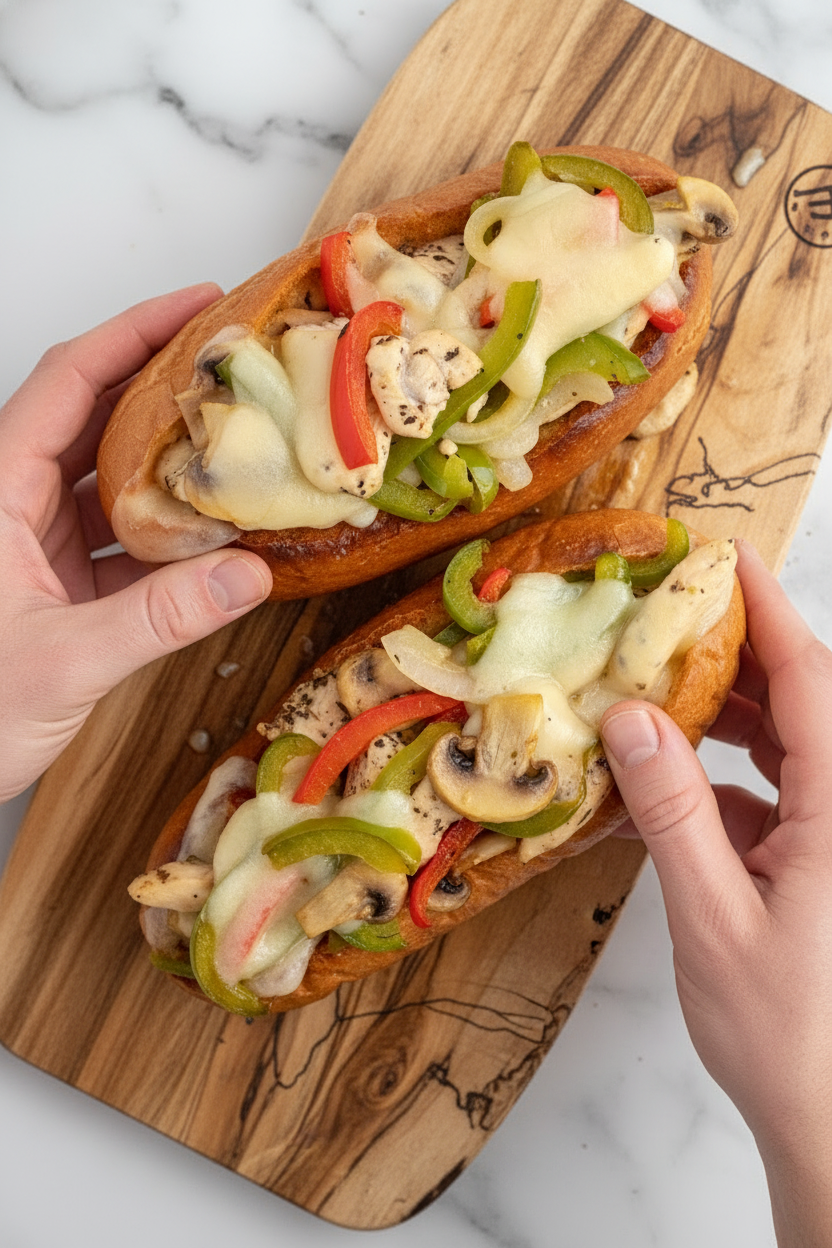
Now mix the chicken back with the peppers and onions. See how it all becomes one happy family? That’s the magic. We pile it high into our toasted bread boats.
Then comes the cheese. I use smoked provolone. It melts like a dream. A quick trip under the broiler makes it bubbly. The smell will bring everyone to the kitchen. I promise. What’s your go-to melting cheese? Is it provolone, or maybe something else?
Why This Sandwich Matters
This isn’t just food. It’s a lesson in making things work. We took an idea and made it our own. That matters in cooking and in life.
It’s also about sharing. A sandwich this big is meant to be cut in half. Share it with someone you love. Talk about your day. That’s the real recipe. Tell me, what’s a meal that always makes you think of family?

Ingredients:
| Ingredient | Amount | Notes |
|---|---|---|
| deli hoagie rolls | 4 (8-inch long) | |
| salted butter | 3 ½ tablespoons | divided into 1 tablespoon and 2½ tablespoons |
| boneless skinless chicken breasts | 1 pound | sliced into thin strips |
| dried Italian seasoning | 1 teaspoon | |
| kosher salt | 1 teaspoon | |
| fresh cracked black pepper | ½ teaspoon | |
| extra virgin olive oil | 2 tablespoons | divided in half |
| green bell pepper | 1 ½ cups | thinly sliced |
| sweet yellow onion | 1 cup | thinly sliced |
| garlic | 1 tablespoon | minced |
| white mushrooms | 1 ½ cups | thinly sliced, rinsed and dried |
| smoked provolone cheese | 12 slices |
My Favorite Chicken Cheesesteak Story
My grandson Leo asked for a “mountain of flavor” last Tuesday. I knew just the thing. This chicken cheesesteak is my go-to for hungry kids. It turns a regular dinner into a little party. The smell alone makes everyone gather in the kitchen. Doesn’t that smell amazing?
It’s simpler than it looks, I promise. We just cook everything in one big pan. You’ll slice some chicken and veggies nice and thin. Then we pile it all into a toasted, buttery roll. The best part is watching that cheese melt under the broiler. I still laugh at how fast it disappears.
Let’s get your hands busy. Here is how we build our flavor mountain, step-by-step.
Step 1
First, turn your oven to broil. Line a baking sheet with foil. Now, take your rolls. Carefully cut a V-shape out of the top. (A hard-learned tip: go slow so you don’t cut through the bottom!). Butter the inside of each roll. Toast them on the sheet until golden. That crunch is so important.
Step 2
Toss your chicken strips with Italian seasoning, salt, and pepper. Heat oil in your biggest skillet. Cook the chicken until it’s no longer pink. Move it to a clean bowl. See those yummy brown bits in the pan? That’s flavor for our veggies.
Step 3
Add more butter and oil to the skillet. Toss in your sliced peppers and onion. Let them sizzle for a few minutes. Stir them often so they don’t burn. Can you guess which veggie makes everything smell so good? Share below!
Step 4
Now add the mushrooms and garlic. Keep cooking until everything is soft. Your kitchen should smell wonderful now. Take the skillet off the heat. Stir the cooked chicken back in. Mix it all together like a happy family.
Step 5
Pile the mixture into your toasted rolls. Top it all with slices of provolone cheese. Slide them back under the broiler. Watch closely! It only takes a minute for the cheese to get bubbly. Then, your mountain of flavor is ready to climb.
Cook Time: 25 minutes
Total Time: 35 minutes
Yield: 4 hearty servings
Category: Dinner, Sandwiches
Three Tasty Twists to Try
This recipe is like a favorite sweater. You can dress it up different ways. Here are three fun ideas for next time. They are all so simple.
The Pizza Twist: Swap provolone for mozzarella. Add pepperoni with the veggies. Finish with a sprinkle of dried oregano.
The Spicy Kick: Use spicy Italian seasoning on the chicken. Add a sliced jalapeño with the peppers. Pick a pepper jack cheese instead.
The Garden Swap: Skip the chicken. Use thick slices of portobello mushrooms. Their meaty texture is just perfect.
Which one would you try first? Comment below!
What to Serve With Your Cheesesteak
This sandwich is a full meal by itself. But a little something on the side is nice. I love serving it with a simple pickle spear. The tangy crunch is perfect. A handful of potato chips or a small green salad works too. Keep it easy.
For drinks, I have two favorites. A cold root beer is a classic pairing. For the grown-ups, a crisp lager beer washes it all down beautifully. It just feels right.
Which would you choose tonight?
Keeping Your Chicken Cheesesteak Happy
Let’s talk about keeping your sandwiches tasty for later. First, let the filling cool completely. Then store it separate from the toasted rolls. This keeps the bread from getting soggy. Use an airtight container in the fridge for up to three days.
You can freeze the cooked chicken and veggie mix for a busy night. Just pack it flat in a freezer bag. It will be good for two months. Thaw it in the fridge before reheating. I once froze a whole sandwich, roll and all. The bread was never quite right again!
Reheating is simple. Warm the filling in a skillet over medium heat. Add a splash of water to keep it moist. Then pile it into a fresh, toasted roll. Batch cooking like this saves your future self time. It turns a weeknight into a treat. Have you ever tried storing it this way? Share below!
Simple Fixes for Common Hiccups
Sometimes our cooking needs a little help. Here are three common issues and easy fixes. First, soggy bread. Always toast your rolls first. This creates a butter barrier against the juicy filling. I remember when I skipped this step once. We had to eat our cheesesteaks with forks!
Second, chewy chicken. Slice it very thin against the grain. This breaks up the tough fibers. Your chicken will be tender every time. Third, bland veggies. Do not rush the sauté. Let those peppers and onions get soft and sweet. This builds deep, wonderful flavor.
Fixing these small things builds your cooking confidence. You learn how ingredients work together. It also makes the final meal so much more delicious. Good food should be a joy to eat. Which of these problems have you run into before?
Your Quick Questions, Answered
Q: Can I make this gluten-free? A: Yes! Use your favorite gluten-free rolls or wraps. Just toast them carefully.
Q: How far ahead can I prep? A: Chop veggies and slice chicken a day early. Keep them separate in the fridge.
Q: What if I don’t have provolone? A: Swiss, mozzarella, or white cheddar work beautifully. Use what you love.
Q: Can I double the recipe? A: Absolutely. Use two large skillets so everything cooks evenly. It’s great for a crowd.
Q: Any optional add-ins? A: A dash of Worcestershire sauce in the skillet adds a nice savory kick. Which tip will you try first?
From My Kitchen to Yours
I hope this recipe becomes a favorite in your home. It’s a meal that feels like a hug. Cooking for people is one of life’s sweetest joys. I love seeing your kitchen creations.
*Fun fact: The original Philly cheesesteak was made with beef, but chicken versions became popular for a lighter option.*
Please share your story if you make it. Did your family gobble it up? I would love to see. Have you tried this recipe? Tag us on Pinterest! Happy cooking!
—Anna Whitmore.

Chicken Cheesesteak: Best Chicken Cheesesteak Recipe Ever
Description
Creamy melted cheese & seasoned chicken piled high on a toasted roll. The ultimate easy & delicious dinner idea your family will love.
Ingredients
Instructions
- Preheat the oven to broil. Line a baking sheet with parchment paper or heavy-duty aluminum foil.
- Carefully use a sharp kitchen knife to slice a V to remove the top and center of the deli rolls. Be very careful not to cut the bottom of the roll.
- Divide the 2½ tablespoons of the butter between the 4 deli rolls. Spread the butter on the inside of the deli rolls. Place the buttered rolls onto the prepared baking sheet. Place the rolls in the oven to toast for 2-3 minutes or until the bread is golden and toasted to your liking. Remove the rolls from the oven.
- Add the sliced chicken breast to a medium-sized mixing bowl (2-3 quarts). Sprinkle the dried Italian seasoning, kosher salt, and cracked black pepper over the chicken. Toss to completely coat.
- Add 1 tablespoon of the extra virgin olive to a 10 to 12-inch skillet over medium-high heat.
- Add the seasoned chicken to the heated skillet. Cook for 4 to 5 minutes, turn the chicken strips, and cook for another 4 to 5 minutes or until the chicken is cooked through and no longer pink. Transfer the cooked chicken to a heat-safe medium-sized bowl.
- Return the skillet to the heat. Add the remaining extra virgin olive and the remaining butter. Once the butter is melted, add the sliced green bell peppers and sliced onion. Saute for 2 to 3 minutes, stirring often to keep the peppers and onions from burning.
- Add the sliced mushrooms and minced garlic. Continue sauteing the veggies for another 2-3 minutes or until the onion is opaque and the mushrooms are cooked through. Remove the skillet from the heat.
- Add the chicken back into the skillet and stir to combine.
- Divide the chicken and veggie mixture between the toasted deli rolls. Stagger the layer of chicken and veggie mixture, the cheese layer, and then the chicken and veggie mixture. Place the sandwiches back under the broiler for just 1 to 2 minutes or until the cheese is melted. If you prefer, you can divide the chicken and veggie mixture into 4 sections and top with the cheese in the skillet before adding to the deli rolls. Cover the topped chicken, veggies, and cheese to melt the cheese.


Leave a Reply