
My First Cheesy Bread Mistake
I once made this for a family picnic. I was in a big hurry. I forgot to wrap it in foil first.
The outside got too dark. The inside was still cold! I still laugh at that. Now I never skip the foil. It keeps everything cozy and even.
Why We Use Foil
That foil wrap matters. It steams the bread first. This makes it soft and warm all through.
Then you take the foil off. The last few minutes make the top perfect. The cheese gets bubbly. The edges turn a little crispy. Doesn’t that smell amazing?
Let’s Make It Together
First, get your butter mix ready. Let the garlic sit in the hot butter. This makes the flavor gentle and sweet.
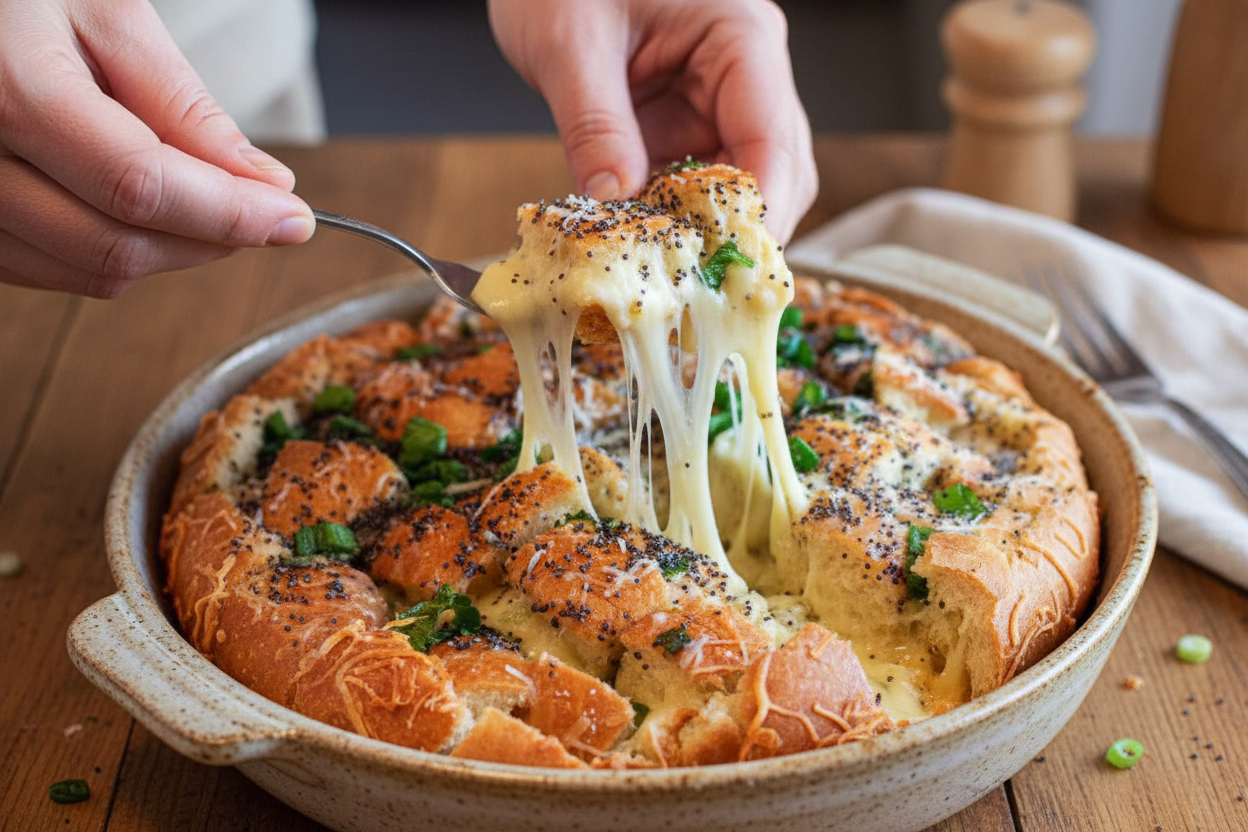
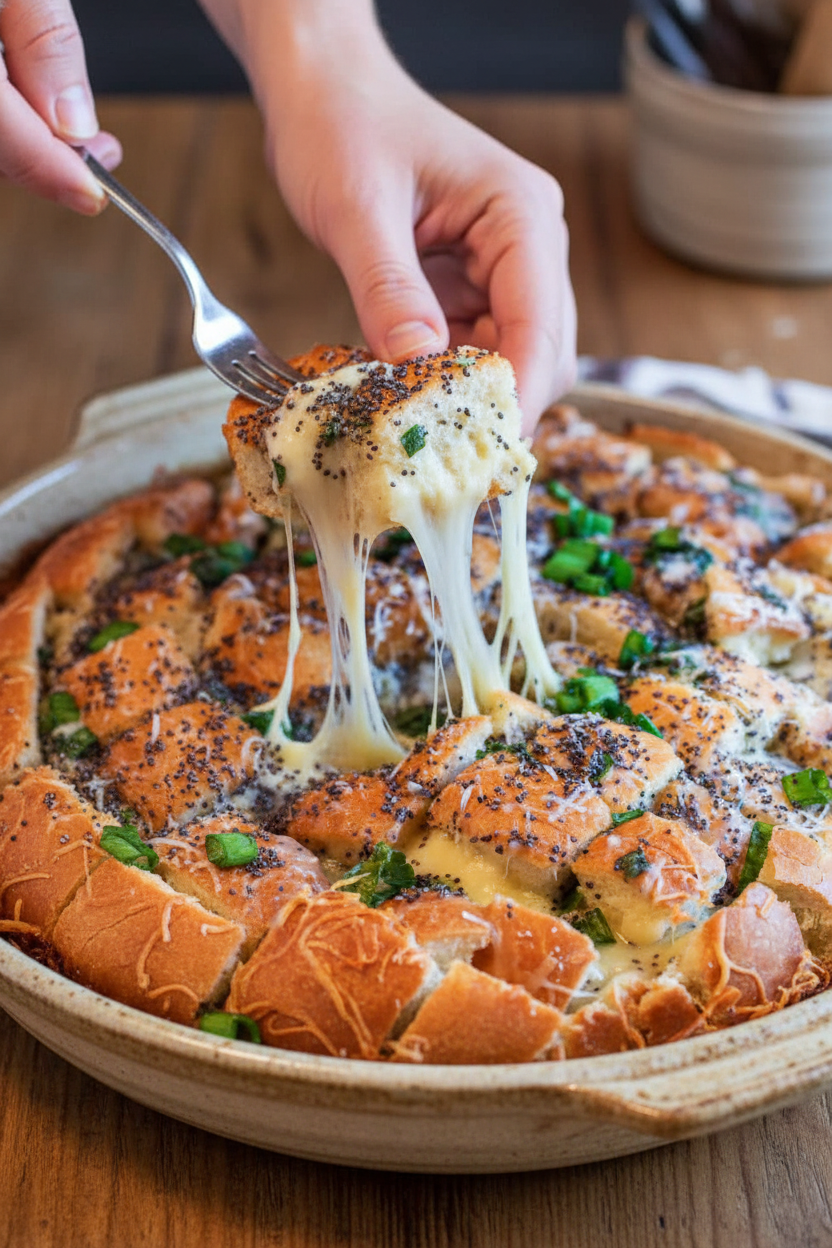
Now, cut your bread. Do not cut all the way through! You want a base to hold it together. Pour the butter slowly into all the cracks. Push most of the cheese down inside. It’s like tucking the bread into bed.
What’s your favorite cheese for melting? I use Swiss, but sometimes I mix in cheddar.
A Little Secret About Garlic
Garlic can be strong. Letting it rest in the warm butter is the trick. It takes away the harsh bite.
You get all the good flavor instead. This matters because food should hug you, not shout at you. The green onion adds a fresh little pop. It’s so good.
*Fun fact: Poppy seeds are optional. But they add a tiny crunch and a nutty taste. I think they make it special.
The Best Way to Serve It
Bring the whole loaf to the table. Let everyone pull apart their own piece. There is something so fun about that. It makes a meal feel like a party.
This is more than just bread. It’s a reason to gather. Sharing food from one plate connects us. Do you have a “shareable” food your family loves?
Your Turn in the Kitchen
This recipe is hard to mess up. Even my first foil-less try was still eaten! The key is to go slow with the butter and cheese.
Make it your own. Try different herbs or cheeses. What would you add to yours? Tell me if you give it a try. I love hearing your kitchen stories.

Ingredients:
| Ingredient | Amount | Notes |
|---|---|---|
| Italian Bread | 1 loaf | |
| Butter, melted | ½ cup | |
| Garlic, minced | 2 Tablespoons | |
| Green onion, diced | 4 Tablespoons | divided in half |
| Swiss cheese, shredded | 2 cups | |
| Poppy seeds | 2-3 Tablespoons | optional |
My Cheesy Garlic Pull-Apart Bread Story
Hello, my dear. Come sit at the counter. Let’s make something magical. This bread is pure happiness. I first made it for my grandson’s birthday. He said it was the best “present” there. I still laugh at that.
The secret is getting butter and cheese into every nook. It bakes into a warm, garlicky cloud. Your kitchen will smell amazing. Trust me, everyone will gather around. They’ll want to pull off the first piece.
Here is how we make it. Follow these simple steps. You really cannot go wrong.
Step 1: Warm your oven to 350 degrees. Melt your butter in a bowl. Stir in the garlic and half the green onions. Let it sit for a minute. This lets the flavors become friends.
Step 2: Take your loaf of bread. Slice it in a crisscross pattern. Do not cut all the way through! Leave about an inch at the bottom. It should look like a checkerboard. (My hard-learned tip: use a serrated bread knife. It glides right through without squishing.)
Step 3: Slowly pour your butter mix into all the cuts. Take your time here. Let it drip down deep. Then, stuff all that shredded Swiss cheese into the spaces. Really push it in there. Some cheese will peek out, and that’s perfect.
Step 4: Sprinkle the top with poppy seeds. Add the rest of your green onions. Now, wrap the whole loaf tightly in foil. This steams the bread so it gets soft inside. Pop it on a baking pan and into the oven for 15 minutes.
Step 5: Take it out and unwrap the foil. Be careful, it’s hot! Put the loaf back in, uncovered, for 5-10 more minutes. This makes the top golden and the cheese bubbly. What’s the best part of this recipe? The smell, the taste, or the pulling apart? Share below!
Cook Time: 20-25 minutes
Total Time: 30 minutes
Yield: 8 servings
Category: Appetizer, Side Dish
Three Fun Twists to Try
This recipe is like a blank canvas. You can paint it with different flavors. Here are three ideas I love. They are all so simple.
The Pizza Party: Use mozzarella cheese. Add tiny pepperoni pieces in the cuts. Finish with a brush of marinara after baking.
The Herby Garden: Mix fresh dill and chives into the butter. Use a sharp white cheddar cheese. It tastes like a summer picnic.
The Everything Bagel: Skip the poppy seeds. Use an everything bagel seasoning blend on top. It gives the best salty, crunchy bite.
Which one would you try first? Comment below!
How to Serve Your Masterpiece
This bread is the star of the table. I love to put it right in the middle. Let everyone dig in with their hands. For a meal, serve it with a big, simple salad. A cozy tomato soup is perfect for dipping, too.
What to drink? For a fancy night, a crisp glass of Chardonnay pairs nicely. For everyday joy, I love sparkling apple cider. Its sweet fizz cuts the rich cheese. Which would you choose tonight?
Keeping Your Pull-Apart Bread Perfect
This bread is best fresh from the oven. But leftovers are still a treat. Let the loaf cool completely first. Then wrap it tightly in foil. You can keep it in the fridge for two days.
To freeze it, wrap the cooled loaf in plastic wrap. Then add a layer of foil. It will keep for one month. Thaw it in the fridge overnight before reheating. This keeps the bread from getting soggy.
Reheating is simple. Wrap the loaf in foil. Warm it at 350°F for 10-15 minutes. I once reheated it without foil. The bread got too dry and hard. Wrapping it keeps the steam inside.
You can also make the butter mixture ahead. Store it in a jar in the fridge. This saves time when you have guests. Batch cooking matters because life gets busy. Having a ready-to-bake treat brings everyone together easily. Have you ever tried storing it this way? Share below!
Simple Fixes for Common Hiccups
First, the butter mixture might not go far enough. If your loaf is large, just add a bit of olive oil. This helps it coat every nook. I remember when I didn’t do this. Some pieces were dry and not as tasty.
Second, the cheese might not melt inside. Be sure to really push it down into the cuts. Use your fingers to stuff it in. This ensures every bite is cheesy. Getting the cheese inside matters for the best flavor experience.
Third, the bottom might get soggy. Always use a baking sheet under the foil. The foil can leak a little. This keeps your oven clean and your bread perfect. Solving small problems builds your cooking confidence. Which of these problems have you run into before?
Your Quick Questions, Answered
Q: Can I make this gluten-free? A: Yes! Use a sturdy gluten-free Italian loaf. Check that all other ingredients are gluten-free too.
Q: Can I prepare it ahead of time? A: Absolutely. Assemble the whole loaf. Wrap it tightly and refrigerate for up to 6 hours before baking.
Q: What cheese can I swap for Swiss? A: Mozzarella or Gouda work wonderfully. Use what you love or have on hand.
Q: Can I make a smaller version? A: Sure. Use a small baguette. Just cut the other ingredients in half.
Q: Are the poppy seeds important? A: They add a nice crunch, but are optional. *Fun fact: Poppy seeds come from the same plant as opium, but are perfectly safe to eat!* Which tip will you try first?
From My Kitchen to Yours
I hope you love making this cozy bread. It always makes my kitchen smell wonderful. The best part is sharing it with people you love.
I would be so delighted to see your creation. Did you add your own twist? Please share a photo with our community. Have you tried this recipe? Tag us on Pinterest!
Thank you for spending time in my kitchen today. I can’t wait to hear all about your cooking adventures.
Happy cooking!
—Anna Whitmore.
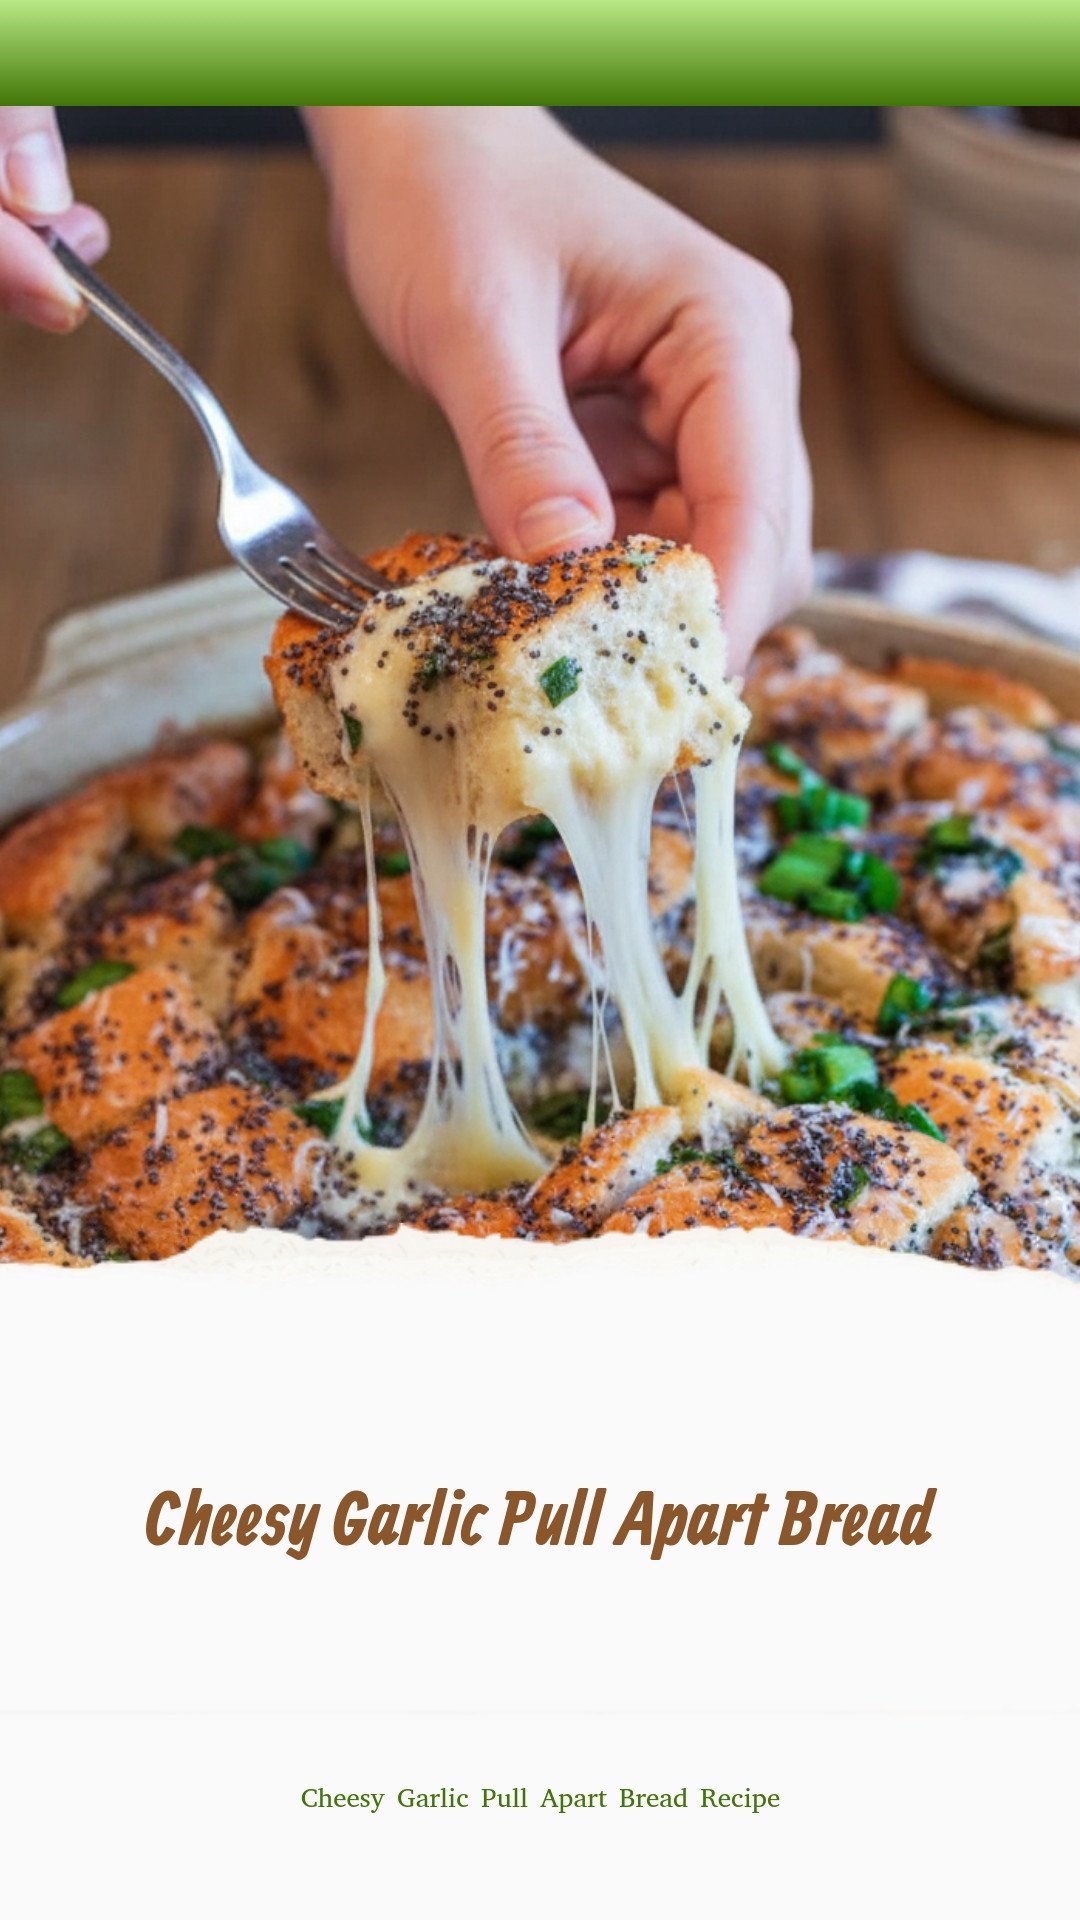
Cheesy Garlic Pull Apart Bread: Cheesy Garlic Pull Apart Bread Recipe
Description
Ooey-gooey Cheesy Garlic Pull Apart Bread is the ultimate shareable appetizer or side. Easy recipe with step-by-step photos!
Ingredients
Instructions
- Preheat your oven to 350 degrees F.
- In a bowl, combine the hot melted butter, garlic and diced green onion, stir and allow to sit for just a minute or two.
- Slice the bread in a crisscross pattern – do not cut all the way through – just to about the bottom inch or so of bread.
- Slowly pour the butter mixture into the crevices of the bread. If you have a very large loaf of bread, you can add some more butter or add olive oil to the mixture to make it go further. (about 1/4 cup). It goes pretty far though, so you should be okay with the original recipe, pour slowly to cover the most.
- Stuff shredded cheese down into the crevices. It’s fine to have some sticking out, but really try to push the majority down inside the crevices. Start at one end and work your way across the loaf.
- Sprinkle the poppy seeds across the top of the entire loaf.
- Add the rest of the diced green onion.
- Wrap the whole loaf in tinfoil and place on a baking pan.
- Put in the oven for about 15 minutes.
- Remove and unwrap foil. Pop it back into the oven for another 5-10 minutes or until cheese is melted through.
- Remove from oven and serve. You just pull the little pieces right out of there.
Notes
- Nutrition Facts (per serving): Calories: 224kcal | Carbohydrates: 2g | Protein: 8g | Fat: 21g | Saturated Fat: 12g | Polyunsaturated Fat: 1g | Monounsaturated Fat: 5g | Trans Fat: 0.5g | Cholesterol: 56mg | Sodium: 144mg | Potassium: 55mg | Fiber: 1g | Sugar: 0.2g | Vitamin A: 609IU | Vitamin C: 1mg | Calcium: 282mg | Iron: 0.3mg


Leave a Reply