

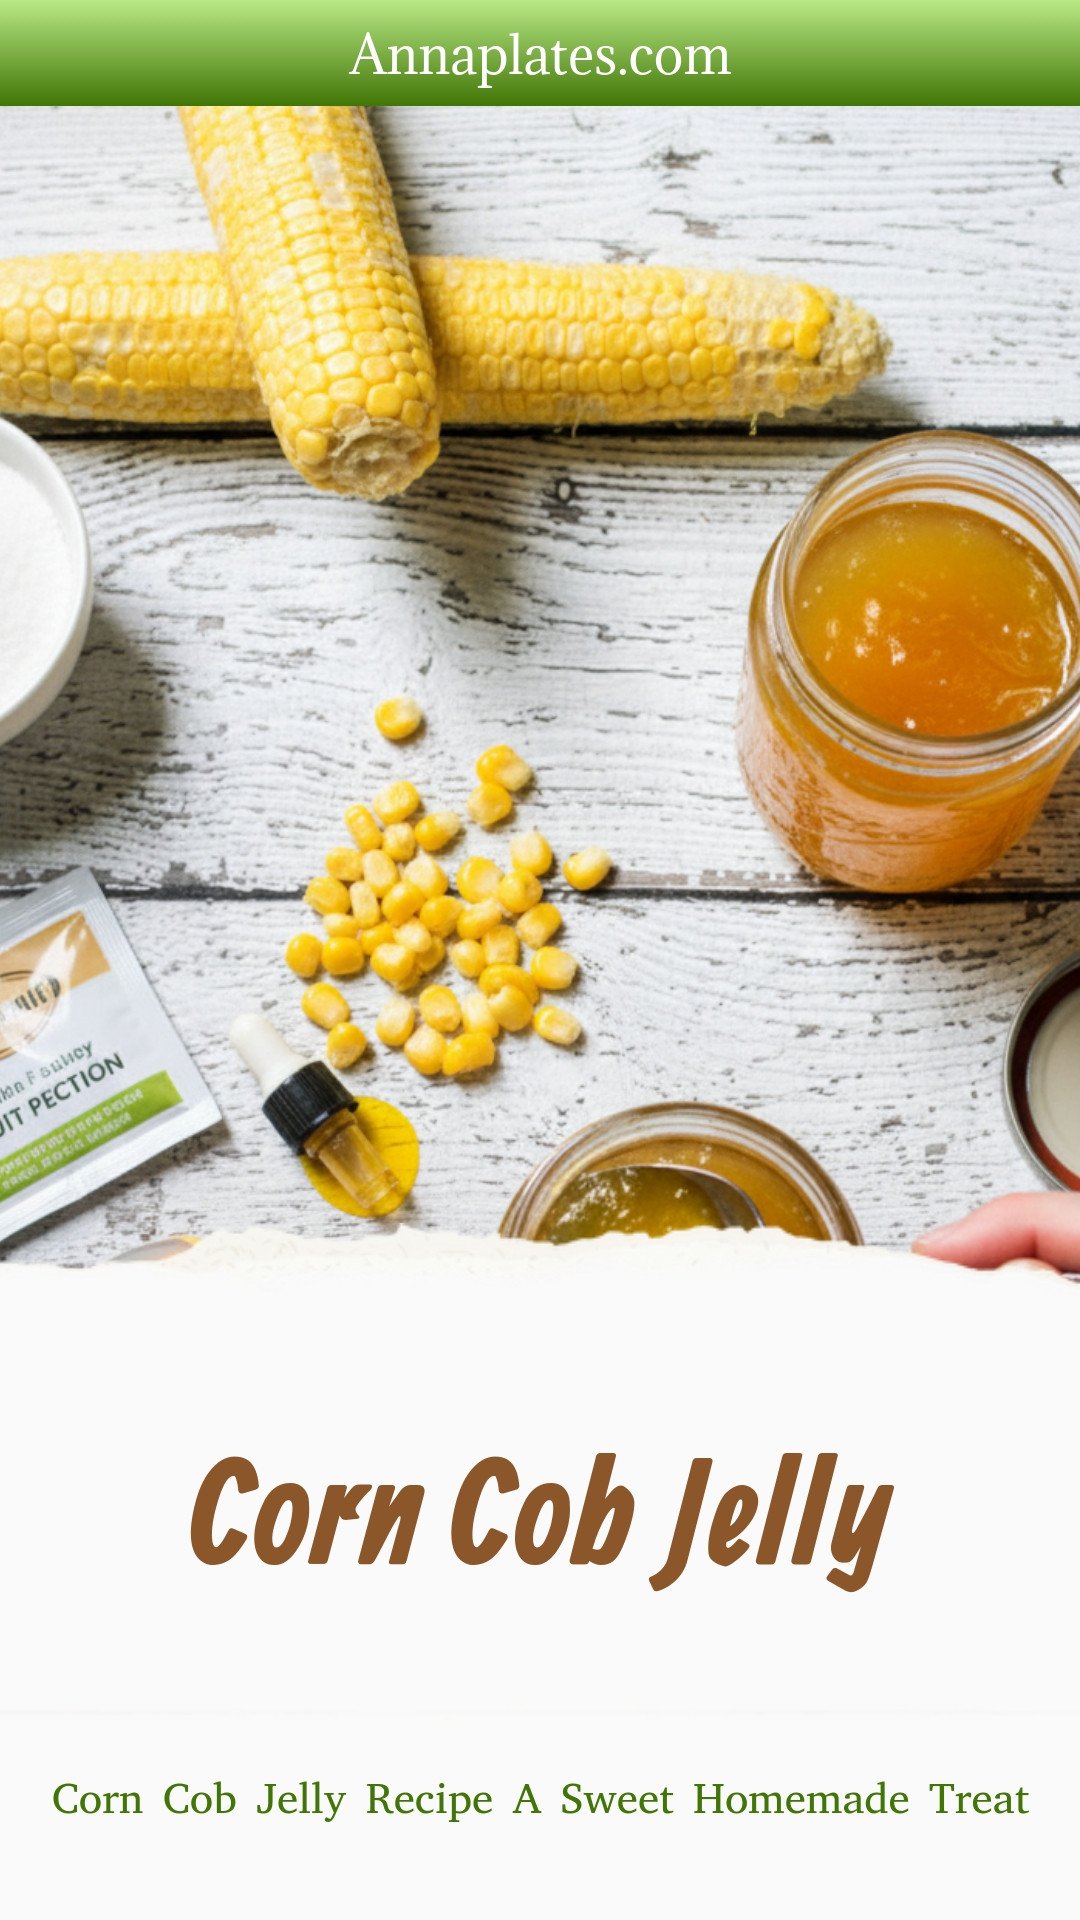
My Corny Discovery
Let me tell you about my corn cob jelly. I first made it years ago. I had a pile of bare cobs after a big family dinner. It felt wrong to just toss them. So I tried boiling them. The water turned a pale, milky color. It smelled sweet, like summer.
I thought, there must be flavor in there. I was right. That simple water became a lovely jelly. I still laugh at that. I turned scraps into something special. It taught me to look twice at what we throw away. That matters more than any recipe.
Why This Jelly Matters
This recipe is a little act of magic. You use what’s left. You honor the whole plant. That feels good. It connects us to the people who grew our food. They work hard to bring us that sweet corn.
Making jelly this way is a quiet thank you. It’s also a fun surprise. The taste is light and honey-like. You would never guess it came from cobs. Have you ever made something from kitchen scraps? I’d love to hear your ideas.
The Simple How-To
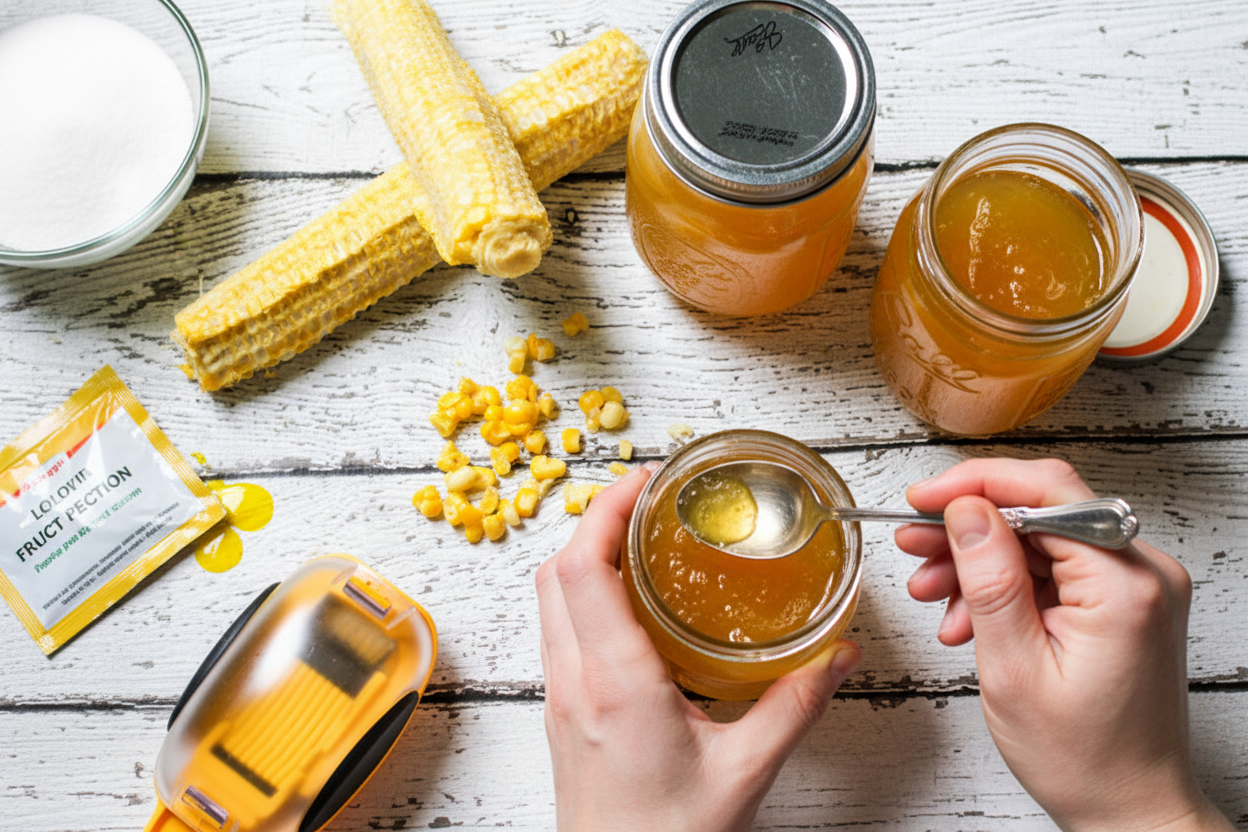
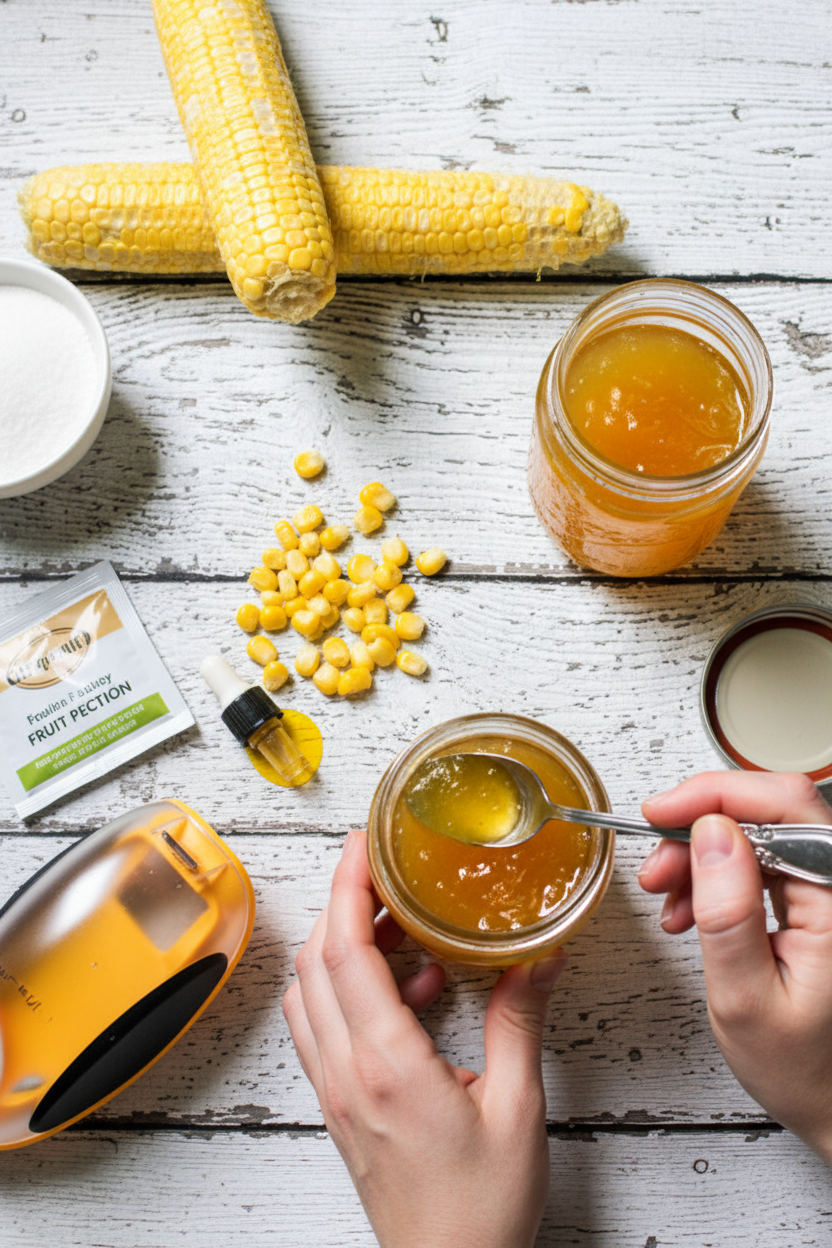
First, cut the kernels off your cobs. Save them for dinner. Now put the bare cobs in a big pot. Cover them with water and boil. Doesn’t that smell amazing? It’s a warm, starchy scent.
After ten minutes, take the cobs out. You only need the water. Stir in the pectin and sugar. It will bubble and foam. A drop of yellow food coloring makes it sunshiny. Then ladle it into clean jars.
Listening for the Pop
This is my favorite part. After the jars are processed, set them on the counter. Let them cool. Soon, you’ll hear it. Pop! Pop! That little sound means the jar sealed itself. It’s a tiny celebration.
If a jar doesn’t pop, don’t worry. Just put it in the fridge. Use it within two weeks. The sealed ones will last a year in your pantry. What’s the last thing you canned or preserved? Was it jam, pickles, or something else?
Serving Your Sunshine Jelly
This jelly is a gentle sweet. It’s wonderful on toast. It’s even better on a warm biscuit. Try it with peanut butter for a treat. It glows like captured sunlight in the jar.
Fun fact: Corn silk, those thin threads on the cob, can be used to make a calming tea! This jelly matters because it’s a story. It’s a story of summer, thrift, and a happy kitchen. Will you give corn cob jelly a try this season?
Ingredients:
| Ingredient | Amount | Notes |
|---|---|---|
| Corn cobs, kernels removed | 12 | |
| Fruit pectin (powdered) | 1 ¾ ounces | |
| Granulated sugar | 3 1/2 – 4 cups | |
| Yellow food coloring | 1 drop | |
| Water (from boiling the corn cobs) | 3 1/2 – 4 cups |
Corn Cob Jelly: A Sweet Summer Memory
Hello, my dear. Come sit at the table. Let me tell you about corn cob jelly. It tastes like sweet summer sunshine. My own grandma showed me this recipe. We never wasted a thing. After cutting off the kernels for supper, we used the bare cobs. Doesn’t that sound clever? The boiling water turns a lovely pale gold. It smells like the sweetest corn. I still laugh at that. Making jelly from something you’d normally toss! But trust me, it’s magical.
You’ll need just a few simple things. Gather your saved corn cobs, some sugar, and fruit pectin. A drop of food coloring makes it look like summer. Now, let’s begin. I’ll walk you through each step. It’s easier than you think. (My hard-learned tip: use a big pot. It boils up high and fast!). Ready? Let’s make some magic together.
Step 1:
First, get your corn cob water. Put those bare cobs in a big pot. Cover them with lots of water. Let it boil for about ten minutes. The water will become a pretty light yellow. It will smell so good and corny. Then take the cobs out and throw them away.
Step 2:
Now, strain that golden water. You want it nice and clear. Measure out three and a half cups. Pour it back into your clean pot. Stir in the fruit pectin powder. Now bring it to a strong, rolling boil. Stir it so nothing sticks. I always think of my grandma’s kitchen at this moment.
Step 3:
Next, add all the sugar. Stir it until it dissolves. Bring it back to a full boil again. A foamy scum will rise to the top. Just skim that off with a spoon. Add one tiny drop of yellow food coloring. This gives it a beautiful sunshine color. Doesn’t that look amazing already?
Step 4:
Carefully ladle the hot jelly into clean jars. Leave a little space at the top. Wipe the rims clean. Put on the lids and rings. Process them in a boiling water bath for ten minutes. This seals them safe for your shelf. What sound tells you the jar is sealed? Share below!
Step 5:
Take the jars out and let them cool. Listen for the happy “pop” sound. That pop means the seal is tight. If a jar doesn’t pop, just put it in the fridge. Use that one first within two weeks. The others can wait on your shelf. You made sunshine in a jar!
Cook Time: About 1 hour
Total Time: 1 hour 30 minutes
Yield: About 4 small jars
Category: Preserves, Condiment
Three Sweet Twists to Try
Once you know the basic jelly, you can play! Here are three fun ideas for next time. Each one adds a little special touch. Making it your own is the best part of cooking.
Vanilla Bean: Add a split vanilla bean pod while you boil the sugar. It makes the jelly taste like creamy, sweet corn pudding.
Hint of Spice: Drop two whole cloves into the pot with the cobs. Remove them before adding sugar. It gives a warm, mysterious flavor.
Rosemary Bloom: Tie a small sprig of fresh rosemary with string. Let it swim in the jelly pot for one minute. Then take it out. It adds a lovely garden note.
Which one would you try first? Comment below!
Serving Your Sunshine Jelly
This jelly is wonderful on warm buttered biscuits. I love it best that way. Try it on a simple piece of toast for breakfast. Or spoon a little over soft goat cheese on a cracker. That’s a fancy treat for guests. It’s also perfect with roasted chicken or pork.
For a drink, I’d pair it two ways. A cold glass of iced sun tea is perfect. For a grown-up treat, a crisp glass of chilled riesling wine is lovely. The sweetness matches so well. Which would you choose tonight?
Keeping Your Corn Cob Jelly Just Right
Let’s talk about keeping your jelly safe and tasty. Once your jars are sealed, store them in a cool, dark cupboard. They will last about a year there. If a jar didn’t seal, just put it in the fridge. Use that one within two weeks.
You cannot freeze this jelly. It will become watery when it thaws. I learned this the hard way. My first batch turned into a sweet, corn-flavored soup! Batch cooking is wonderful, though. Making many jars at once saves you a whole day of work later.
This matters because a full pantry is a happy heart. You made something special. Proper storing lets you enjoy it for months. Have you ever tried storing it this way? Share below!
Fixing Common Jelly Jumbles
Sometimes jelly does not set right. Do not worry. If it is too runny, you can re-cook it with a bit more pectin. I once made a batch that would not set. We just called it “corn cob syrup” for pancakes!
Too much foam can make your jelly cloudy. Just skim it off with a spoon. Also, always use a big pot. The jelly boils up high and fast. A small pot will make a big, sticky mess on your stove.
Fixing these small issues builds your cooking confidence. You learn that mistakes can often be saved. It also makes sure your jelly tastes and looks perfect. Which of these problems have you run into before?
Your Corn Cob Jelly Questions, Answered
Q: Is this jelly gluten-free?
A: Yes, it is naturally gluten-free. Just check your pectin label to be sure.
Q: Can I make it ahead?
A: Absolutely! That is the best part. The sealed jars last a whole year.
Q: What if I have less corn cobs?
A: You can scale the recipe down. Use 1 cup of sugar for every 1 cup of corn cob water.
Q: Can I skip the food coloring?
A: Of course! The jelly will be a pale, pretty gold on its own.
Q: Any special tip?
A: Listen for the “pop” as jars cool. That sound means you did it right! Which tip will you try first?
From My Kitchen to Yours
I hope you love making this old-fashioned treat. It turns simple corn cobs into something magical. Fun fact: This recipe was popular during the Great Depression when cooks wasted nothing.
I would love to see your beautiful jars. Sharing our creations makes the kitchen feel warmer. Have you tried this recipe? Tag us on Pinterest! Your pictures make my day.
Happy cooking!
—Anna Whitmore.
Corn Cob Jelly: Corn Cob Jelly Recipe A Sweet Homemade Treat
Description
Transform leftover corn cobs into a sweet, golden jelly! A surprising and delicious homemade treat that’s frugal and flavorful.
Ingredients
Instructions
- Remove corn kernels from cobs and save for another recipe or use as a side dish for dinner.
- In a large pot, drop corncobs with about 6-8 cups of water; bring to a boil. Boil uncovered for about 10 minutes.
- Throw away the cobs and strain the liquid to remove extra pieces, etc. Reserve 3 1/2 cups of liquid. You can throw out the rest.
- Place the corn cob water back into the large pot and stir in the pectin. Bring to a strong boil.
- Add the sugar and bring back to a boil. Skim the foam off the top and add a few drops of yellow food coloring if you’d like.
- Ladle the liquid into jelly jars, leaving about 1/2 to 1 inch head-space.
- Place the seal and rings on the jar and process the jelly in a water bath for about 10-15 minutes.
- Remove and set aside. As they cool, listen for the jars to pop. If for some reason they do not pop, just put that jar into the refrigerator and use it within 2 weeks.
Notes
- Nutrition Facts (per serving, 1 tablespoon): Calories: 90 kcal, Carbohydrates: 22 g, Protein: 1 g, Fat: 0.4 g, Saturated Fat: 0.1 g, Polyunsaturated Fat: 0.1 g, Monounsaturated Fat: 0.1 g, Trans Fat: 0.002 g, Sodium: 6 mg, Potassium: 70 mg, Fiber: 1 g, Sugar: 18 g, Vitamin A: 48 IU, Vitamin C: 2 mg, Calcium: 1 mg, Iron: 0.2 mg.


Leave a Reply