
A Sweet Little Project
Hello, my dear. Come sit at the kitchen table. I want to tell you about my favorite easy treat. They are marshmallow pops. They are so simple and fun to make. We can chat while we work.
This matters because cooking should be joyful. It is not about being perfect. It is about making something with your own two hands. I still laugh at the first time I made these. I got sprinkles everywhere. The floor looked like a party!
The Magic of the Stick
First, we dip the tip of a stick in melted chocolate. Then we push it into a marshmallow. This little step is very important. The chocolate acts like glue. It holds everything together so your treat does not slide off.
We let them chill in the fridge for a bit. This lets the “glue” get nice and hard. It is a good time for a little patience. What color of sprinkles are you dreaming of using? I always love rainbow jimmies myself.
The Dipping Dance
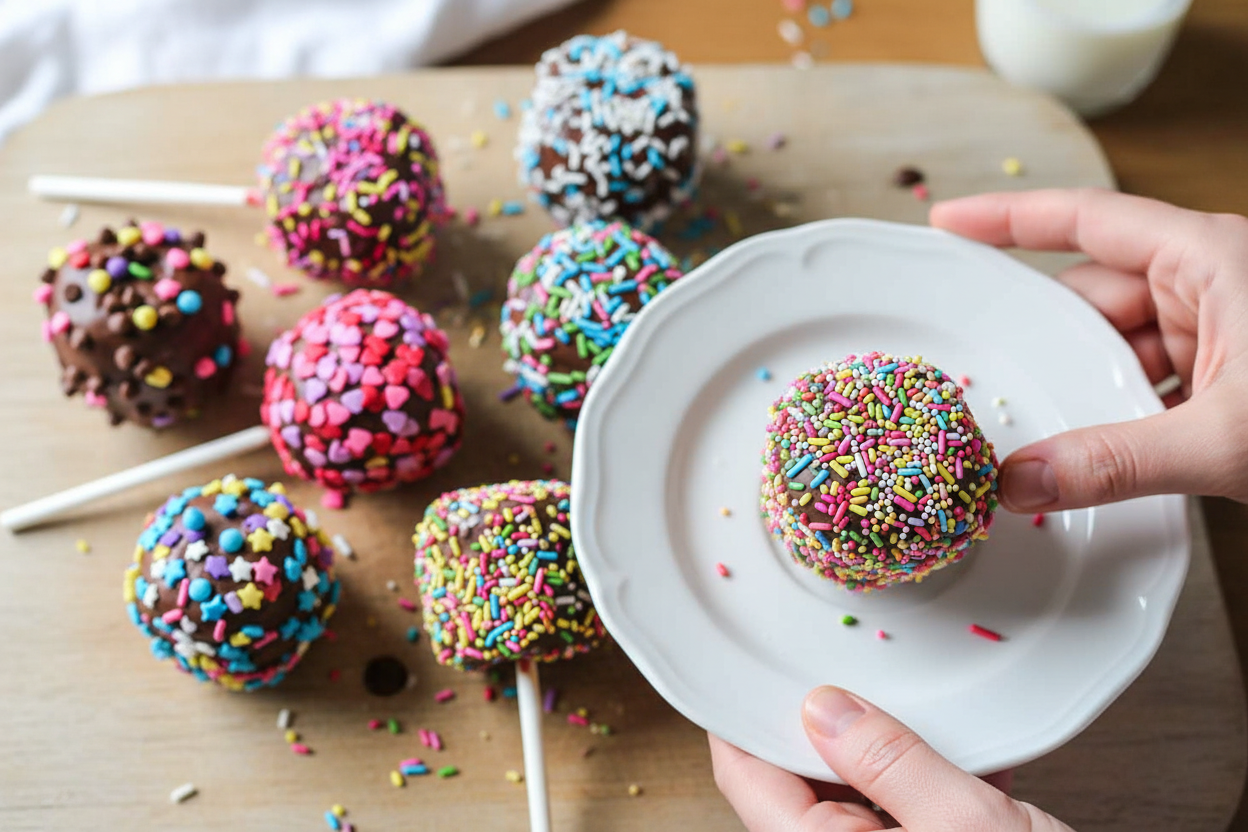
Now for the messy, wonderful part. We coat each marshmallow in chocolate. Use a spoon or a small spatula. Be gentle and turn it slowly. Doesn’t that shiny chocolate look amazing?
Fun fact: The word “sprinkle” is called a “nonpareil.” It means “without equal” in French. Fancy, right? Hold your pop over the bowl. Let the extra chocolate drip off. Then, quickly, roll it in your sprinkles. Do it fast before the chocolate sets!
Why We Do This
This matters more than just a sweet snack. Making these is about sharing. You can make them for a friend who feels sad. Or for a sister who helped you. Food made with love tastes better. I truly believe that.
It is also about being creative. There are no rules with toppings. You could use crushed cookies or tiny candies. What topping would you invent? I once used crushed peppermint at Christmas. It was so good.
Your Turn to Share
Finally, we stand our pops up to dry. A block of styrofoam works perfectly. The fridge is their final stop. Waiting is the hardest part, I know!
When you make yours, think of this kitchen. I hope you feel happy and proud. Tell me, what was the best part for you? Was it the dipping or the sprinkling? I would love to hear your story.

Ingredients:
| Ingredient | Amount | Notes |
|---|---|---|
| Jumbo marshmallows | 20 | |
| Chocolate (Wilton’s Melting Chocolate) | 3/4 cup | For dipping |
| Sprinkles (nonpareils, jimmies, or topping of choice) | 3 tablespoons |
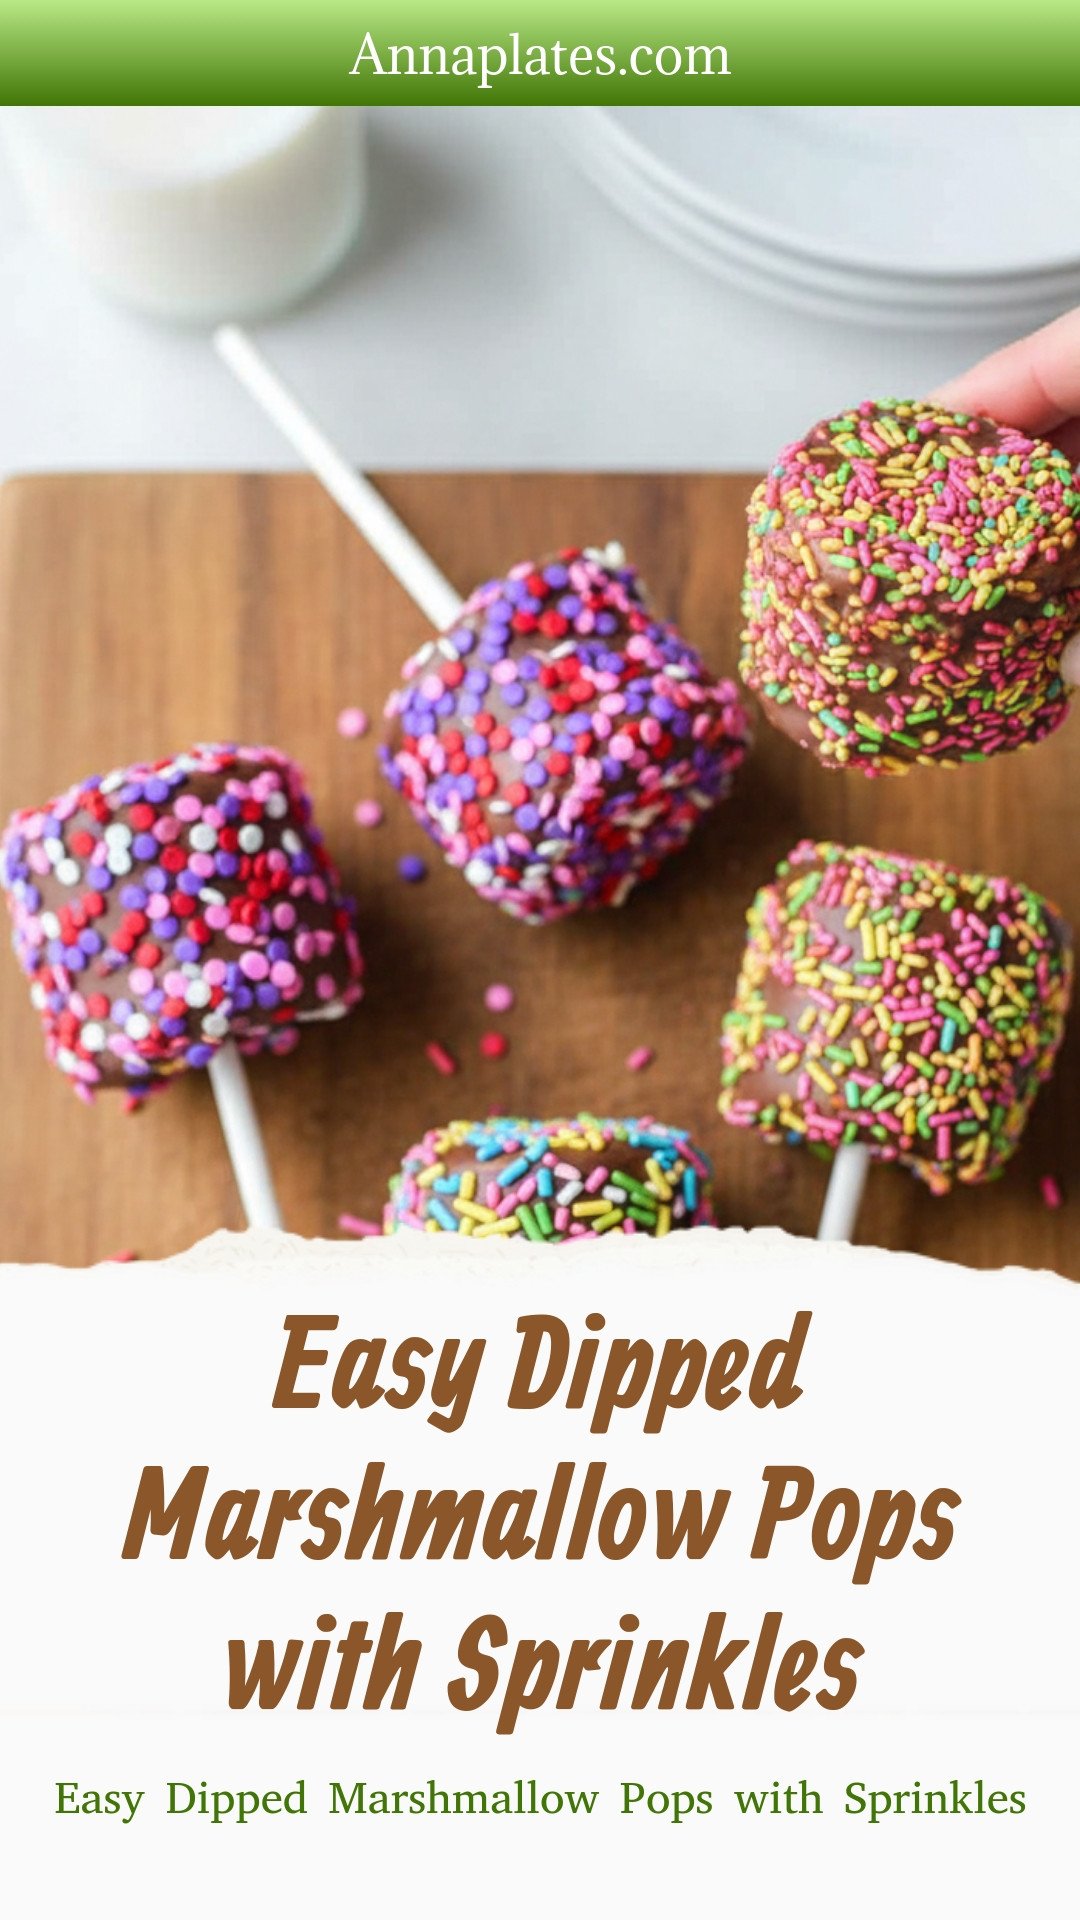
Easy Dipped Marshmallow Pops with Sprinkles
Hello, my dear! Let’s make something sweet and silly today. These marshmallow pops always remind me of my grandkids. They’d crowd around the kitchen table, eyes wide. We made these for birthdays and rainy afternoons. Doesn’t that sound like fun?
You just need marshmallows, chocolate, and sprinkles. The magic is in the dipping. I still laugh at the time I got sprinkles everywhere. The floor looked like a rainbow confetti party! But that’s part of the joy. Ready to start?
- Step 1: First, melt your chocolate in a microwave bowl. Follow the package directions. Stop when it’s mostly melted. Take it out and stir it well. The last bits will melt from the heat. (My hard-learned tip: don’t overheat it! Burnt chocolate smells sad.)
- Step 2: Now, grab a lollipop stick. Dip just the tip into the warm chocolate. Push it into the flat end of a marshmallow. Don’t push it all the way through. Let it dry with the stick pointing up. This chocolate glue holds everything together.
- Step 3: Pop the whole tray into the fridge for 15 minutes. This chills the chocolate glue. It makes the next step much easier. Use this time to pick your favorite sprinkles. Do you like rainbow jimmies or tiny nonpareils? Share below!
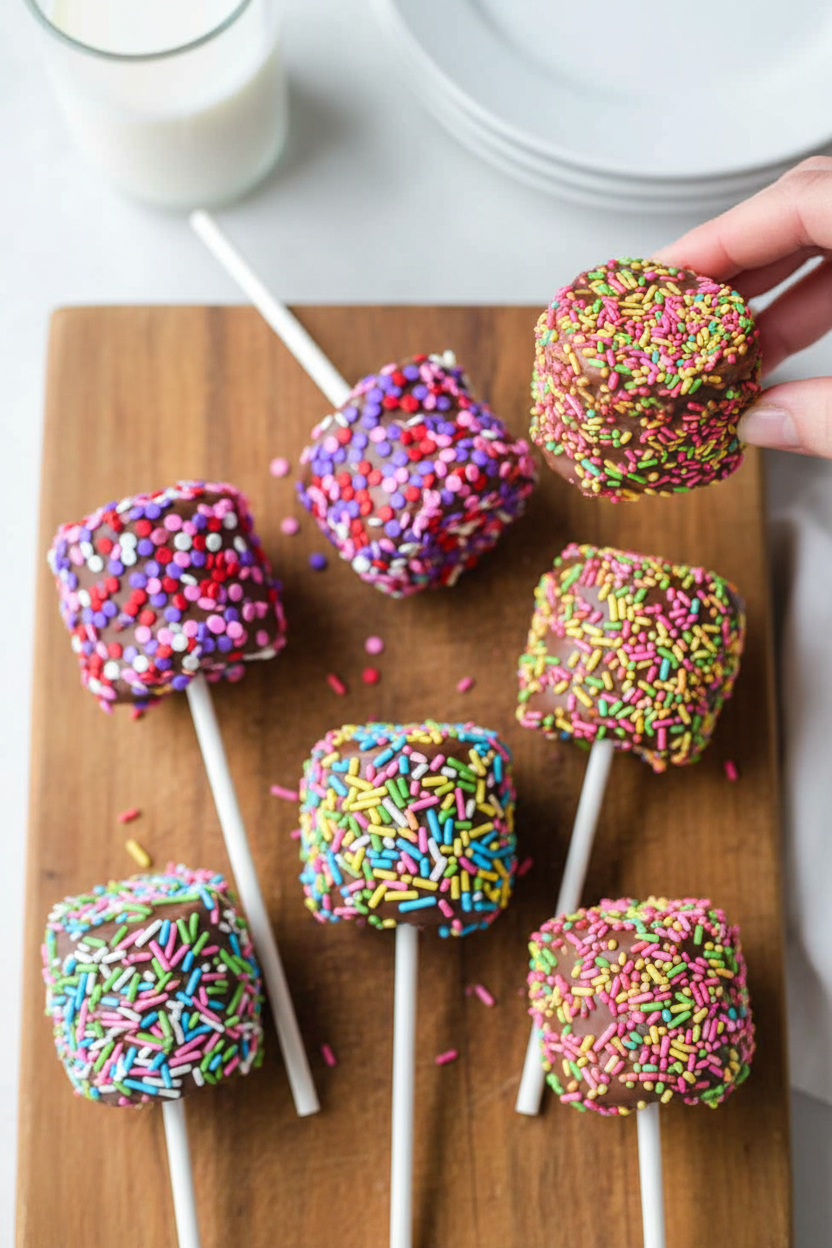
- Step 4: Time for the fun dip! Use a spatula to coat a marshmallow completely. Be slow and gentle. You don’t want to wiggle it off the stick. Turn it to cover every bit. Doesn’t that shiny chocolate look amazing?
- Step 5: Hold your pop over a bowl. Shower it with sprinkles right away. Then poke the stick into a foam block to dry. Refrigerate them for 30 minutes. The wait is the hardest part, I know. But it makes the chocolate nice and crisp.
Cook Time: 15 minutes active
Total Time: About 1 hour
Yield: 20 pops
Category: Dessert, Treat
Three Sweet Twists to Try
Once you master the basic pop, try a new flavor. It’s like dressing them up for a party. My grandkids loved inventing new kinds. Here are three of our favorites.
- Cookie Crunch: Roll the wet chocolate in crushed graham crackers or cookies. It adds a wonderful crunch.
- Peanut Butter Swirl: Mix a spoonful of peanut butter into the melted chocolate. It tastes like a candy bar!
- Fruity Fun: Use pink melting wafers instead of chocolate. Then roll them in freeze-dried strawberry dust. It’s sweet and tangy.
Which one would you try first? Comment below!
Serving Your Sweet Creations
These pops are a celebration all by themselves. But a little presentation makes them extra special. I’d stand them up in a mug filled with sugar or dried beans. It makes a cute centerpiece for your table.
You could also lay them on a plate lined with wax paper. Tie a little ribbon near the base of each stick. For a drink, I love a cold glass of milk. It’s the classic pairing. Grown-ups might enjoy a creamy coffee liqueur over ice.
Which would you choose tonight? The cold milk or the coffee drink? Either way, you have a perfect little treat. Enjoy every sweet, crunchy bite.
Keeping Your Marshmallow Pops Perfect
These pops are best kept in the fridge. They will stay fresh for about five days. Just place them in a single layer in a sealed container.
You can freeze them for a month, too. Wrap each pop in a little plastic wrap first. This stops the chocolate from getting a funny white coating.
I once left a batch on the counter overnight. The chocolate got soft and sticky! Now I always use the fridge. Storing them right keeps the treat special.
Making a big batch saves time for parties. Just dip and decorate all your pops at once. Then you have a sweet gift ready anytime someone visits.
Have you ever tried storing it this way? Share below!
Three Little Problems and Their Sweet Fixes
First, the marshmallow might spin on the stick. The fix is simple. Make sure the chocolate on the stick is dry before dipping the whole thing.
Second, your chocolate coating could be too thick. Thin it with a tiny bit of coconut oil. This makes for a smoother, prettier dip every time.
I remember when my sprinkles slid right off. The chocolate was not wet enough! You must sprinkle right after dipping. This matters for a beautiful finish.
Third, the pops might not dry evenly. Always use a foam block to hold them upright. This gives you perfect, round treats. Getting it right builds your kitchen confidence.
Which of these problems have you run into before?
Your Quick Questions, Answered
Q: Can I make these gluten-free?
A: Yes! Just check your marshmallow and sprinkles labels. Many are naturally gluten-free.
Q: How far ahead can I make them?
A: You can make them 2-3 days ahead. Keep them chilled in the fridge.
Q: What can I use instead of chocolate?
A: Candy melts or white chocolate work great. They come in so many fun colors.
Q: Can I make a smaller batch?
A: Of course. Just use fewer marshmallows. You need less chocolate and sprinkles too.
Q: Any optional tips?
A: Try rolling them in crushed cookies or nuts. *Fun fact: The first marshmallows were made from a plant root!*
Which tip will you try first?
From My Kitchen to Yours
I hope you have fun making these sweet pops. They always bring a smile. Cooking is about sharing joy with people you love.
I would love to see your creations. Did you use rainbow sprinkles or maybe some crushed candy? Your kitchen adventures make me so happy.
Have you tried this recipe? Tag us on Pinterest! You can find me at @AnnasCozyKitchen. I can’t wait to see what you make.
Happy cooking!
—Anna Whitmore.
Easy Dipped Marshmallow Pops with Sprinkles: Easy Dipped Marshmallow Pops with Sprinkles
Description
Easy Dipped Marshmallow Pops with Sprinkles! A fun, colorful, and quick treat perfect for parties, holidays, or a sweet snack. Kids love making these!
Ingredients
Instructions
- In a microwave safe bowl, melt your chocolate according to package directions.
- Once the chocolate is mostly melted, remove and stir to melt the remaining chocolate.
- Dip one end of the lollipop stick into the chocolate and then insert into one of the flat ends of the marshmallow, until almost all the way through and then place on a tray to dry. (stick pointing up)
- Once all the sticks have been inserted, place the tray of marshmallows on a pan in the refrigerator for about 15 minutes.
- Once the chocolate is dry on the stick, use a spatula to coat the entire surface of the marshmallow. You want to work slowly and gently so as not to loosen the marshmallow from the stick.
- Sprinkle whatever toppings you want onto the chocolate.
- Poke the stick into a styrofoam block and then refrigerate for at least 30 minutes.
Notes
- Nutrition Facts (per serving): Calories: 122 kcal, Carbohydrates: 27 g, Protein: 1 g, Fat: 2 g, Saturated Fat: 1 g, Polyunsaturated Fat: 0.1 g, Monounsaturated Fat: 1 g, Sodium: 22 mg, Potassium: 20 mg, Fiber: 0.4 g, Sugar: 20 g, Calcium: 2 mg, Iron: 0.2 mg


Leave a Reply