

The Best Kind of Messy
Let’s talk about dinner fun. A sandwich board is my favorite way to feed a crowd. Everyone gets to build their own perfect bite. It is a little messy, and that is the whole point.
I remember my grandkids making these. They piled on every topping. Their sandwiches were huge! I still laugh at that. The joy is in the choosing. What was your favorite sandwich topping as a kid? I would love to hear.
Grilling the Chicken
Now, for the star of the show. We use chicken thighs here. They stay juicy, even if you cook them a bit long. That matters a lot. Dry chicken makes a sad sandwich.
Salt them well. Let them get nice marks on the grill. Doesn’t that smell amazing? Cook them until they reach 180 degrees. Then let them rest under some foil. This keeps all the good juices inside.
Building Your Board
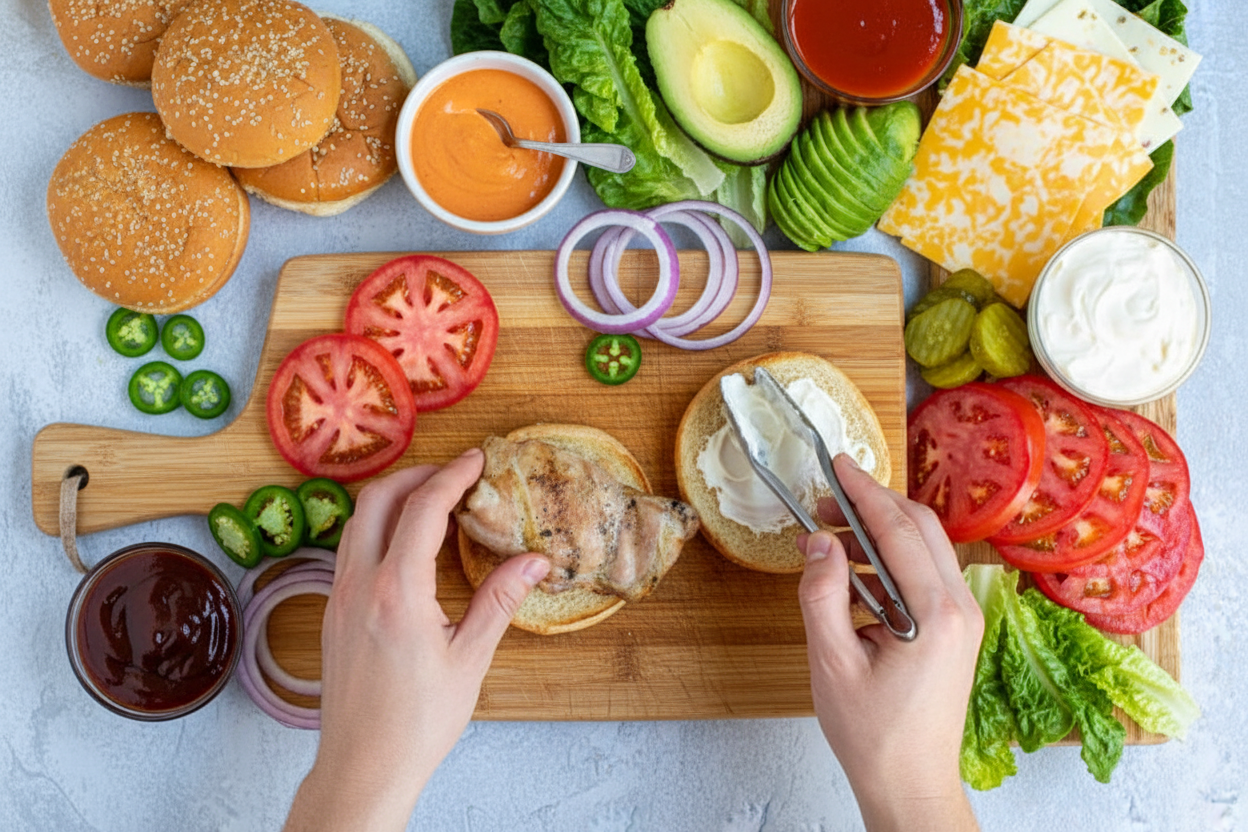
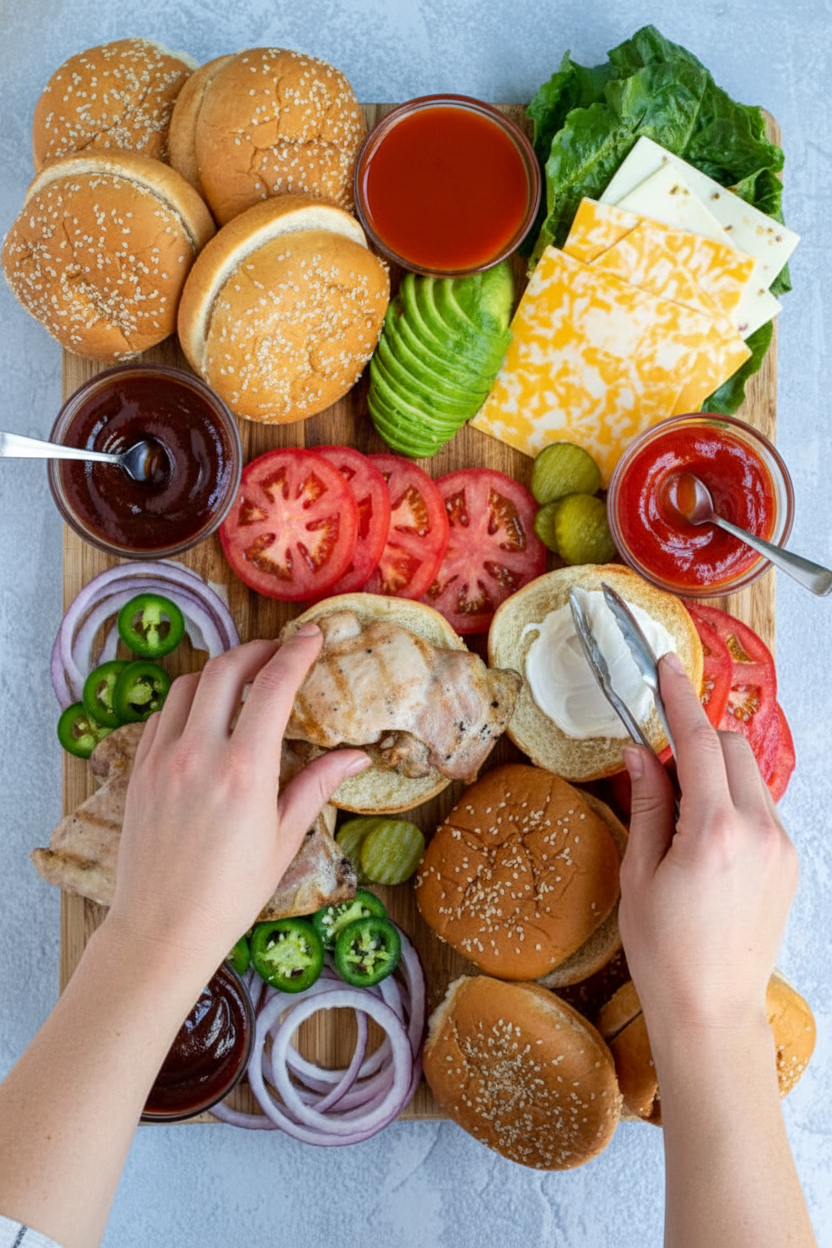
While the chicken rests, get creative. Use a big cutting board or a platter. Put your sauce bowls on first. Space them out. Then add the buns and all those colorful toppings.
Make it pretty. Green lettuce, red tomato, white onion. It is like a garden. Fun fact: This style of eating is sometimes called a “deconstructed” sandwich. Fancy name for a simple, fun idea! The final touch is the warm chicken right in the middle.
Why This Feels Special
This is more than just food. It is an experience. People talk and laugh while they build. They help each other pass the pickles. This matters. It turns a meal into a memory.
It also fixes the “picky eater” problem. Everyone finds something they like. Do you have a must-have sandwich topping? Mine is always extra pickles!
Your Turn to Share
I have shared my story. Now I want to hear yours. What meals bring your people together? Is it tacos, or maybe a big salad bar?
Try this board for your next easy dinner. Let everyone play with their food. It is a simple truth: food tastes better when you have a hand in making it. Will you give the sandwich board a try this week?
Ingredients:
| Ingredient | Amount | Notes |
|---|---|---|
| Boneless-skinless chicken thighs | 3-4 pounds | |
| ‘Hamburger’ buns | 1 package | |
| Mayo | 1/2 cup | |
| Barbecue sauce | 1/2 cup | |
| Ketchup | 1/2 cup | |
| Buffalo sauce | 1/2 cup | |
| Tomato | 1 large | Sliced thin |
| Heart of romaine | 1 | Leaves detached |
| Your favorite cheese | 8 slices | |
| Avocado | 1/2 | Sliced |
| Dill pickle slices | 1/2 cup | |
| Red onion | 1/2 | Thinly sliced |
| Jalapeño | 1 | Thinly sliced |
My Easy Grilled Chicken Sandwich Board
Hello, my dear! Come sit at the counter. Let’s talk about dinner fun. This isn’t just a recipe. It’s a build-your-own sandwich party. Everyone gets exactly what they love. I remember my grandkids fighting over toppings. Now, with this board, there are no fights. Just happy, messy hands and full bellies. Doesn’t that sound better?
You just need a big board or platter. We’ll put everything out beautifully. The secret is the grilled chicken thighs. They stay so juicy. I still laugh at that time I used breasts and they dried out. Thighs are much more forgiving for a busy cook. Let me walk you through it.
- Step 1: Get your grill nice and warm. A medium heat is perfect. Lightly grease the grates so nothing sticks. While it heats, pat your chicken thighs dry. Sprinkle them generously with salt. Add pepper if you like a little kick.
- Step 2: Place the chicken on the grill. Cook for about 5 minutes. You’ll see nice grill marks. Then flip them over. Cook for another 5 minutes. Flip one last time for a final 5 minutes. (A hard-learned tip: Use a meat thermometer! Chicken is done at 165°F, but thighs are best around 180°F. They get so tender.)
- Step 3: Move the chicken to a plate. Cover it tightly with foil. Let it rest for 5 minutes. This keeps all the juices inside. Trust me, it makes a world of difference. Doesn’t that smell amazing already?
- Step 4: Now, build your board! Put your sauce bowls on first. Space them out. Then add the buns in two piles. Next, artfully arrange all your toppings. Think about colors. Place the red onion next to the green lettuce. It looks so pretty. What topping is an absolute must-have for your perfect sandwich? Share below!
- Step 5: Finally, place the rested chicken in the center. Use a sharp knife to slice it if you like. Add serving spoons and knives. Then call everyone to the table. Watch them create their masterpieces. The joy is in the building.
Cook Time: 15–20 minutes
Total Time: 30 minutes
Yield: 8 servings
Category: Dinner, Main Course
Three Fun Twists to Try
This board is like a blank canvas. You can change it with the seasons or your mood. Here are a few ideas I love. They keep things exciting for my regulars.
- The Summer Garden: Swap the chicken for thick slices of grilled zucchini. Add a bowl of creamy pesto sauce. Use fresh mozzarella cheese instead.
- The Sweet & Smoky: Brush the chicken with maple syrup while grilling. Use crispy bacon and cheddar cheese. Offer a smoky chipotle mayo for spreading.
- The Tropical Escape: Top your chicken with a slice of grilled pineapple. Use a teriyaki glaze as a sauce. Add some crunchy cabbage slaw for texture.
Which one would you try first? Comment below! I’m always looking for new ideas myself.
Serving It Up Right
This board is a full meal. But a little something on the side is nice. I love serving it with a simple pasta salad. Or just a big bowl of potato chips for crunch. For a lighter touch, watermelon wedges are perfect in summer.
What to drink? For the grown-ups, a cold lager or pale ale pairs wonderfully. It cuts through the rich sauces. For everyone, homemade lemonade or sparkling water with lime is my go-to. So refreshing.
It’s all about making a memory around the table. The board invites everyone to join in. Which would you choose tonight: the cold beer or the fizzy lime water? I think I know my answer!
Keeping Your Sandwich Board Fresh and Ready
Let’s talk about leftovers. This board is perfect for making ahead. Grill the chicken and let it cool completely. Store it in the fridge for up to three days. Keep your sliced veggies and sauces in separate containers. This keeps everything crisp and fresh.
You can also freeze the cooked chicken. I slice it first for easy sandwiches. Place slices in a single layer on a tray. Freeze them solid, then pop into a bag. They will keep for two months this way.
To reheat, I use my toaster oven. It keeps the chicken from getting soggy. A microwave works in a pinch, but go slow. I once microwaved chicken too fast and it got tough. Now I use lower power for a gentler warm-up.
Batch cooking like this saves busy weeknights. It turns dinner into a simple, fun assembly job. This matters because it gives you more time with family. Have you ever tried storing it this way? Share below!
Simple Fixes for Common Grilling Hiccups
Grilling should be fun, not fussy. First, chicken sticking to the grill? Make sure those grates are hot and lightly oiled. I remember my first summer grill-out. I lost half a chicken thigh to the grate! A clean, hot grill is your best friend.
Second, is your chicken dry or chewy? You might be overcooking it. Use a simple meat thermometer. Pull it off around 180 degrees Fahrenheit. Let it rest covered for five minutes. This lets the juices settle back in.
Third, are your buns getting soggy? Toast them lightly on the grill. Just a minute per side adds crunch. It also keeps sauces from soaking in too fast. This matters for texture and flavor in every bite. Getting these small things right builds your cooking confidence. Which of these problems have you run into before?
Your Quick Questions, Answered
Q: Can I make this gluten-free? A: Yes! Use your favorite gluten-free buns. Check your sauce labels too.
Q: How far ahead can I prep? A: Cook chicken and chop veggies 1-2 days ahead. Store separately in the fridge.
Q: I don’t have barbecue sauce. A: Try mixing ketchup with a little honey and vinegar. It makes a sweet-tangy swap.
Q: Can I feed a bigger crowd? A: Absolutely. Just add more chicken and buns. Keep the sauce and veggie amounts similar.
Q: Any optional tips? A: Let people build their own sandwich. Fun fact: Letting everyone choose their own toppings makes the meal more fun! Which tip will you try first?
From My Kitchen to Yours
I hope you love this easy meal. It reminds me of summer evenings with my grandkids. The best meals are the ones we share. I would love to see your creations. Show me your beautiful sandwich boards.
Have you tried this recipe? Tag us on Pinterest! You can find me at @AnnasKitchenTable. Share your photos and your own tips. I always love hearing from you.
Happy cooking!
—Anna Whitmore.

Easy Grilled Chicken Sandwich Board – The Schmidty Wife: Easy Grilled Chicken Sandwich Recipe
Description
Create a stunning & easy grilled chicken sandwich board for your next gathering! Perfect for parties, meal prep, or a fun family dinner.
Ingredients
Instructions
- Preheat and lightly grease an outdoor grill to medium heat. Generously salt (and pepper, if you like pepper) the chicken thighs. Add thighs to direct heat on the grill.
- Cook for 5 minutes. Flip chicken, cook another 5 minutes. Flip chicken once more and cook about another 5 minutes for a total of 15 minutes or until fully cooked. Chicken needs to have an internal temperature to be at least 165ºF, because chicken thighs are higher in fat they taste better when cooked to roughly 180ºF. So I aim to take mine off the grill around 180ºF and then let them rest.
- Transfer chicken to a plate, cover tightly with aluminum foil and rest at least 5 minutes.
- While the chicken is cooking and resting prepare the rest of the garnishes for the board. And start to build your board.
- Start with the sauces. Use small bowls (pinch bowls) for the sauces, place the sauces on the board spread out and not too close together, aim to have one near each corner of the board.
- Add your buns, these take up a lot of room so add them in two separate piles on opposite sides of the board.
- Next start placing your garnishes around the sauce bowls and buns ensuring there is a spot for the chicken in the center of the board.
- Last add the rested chicken to the center of the board. Make any last minute adjustments to your board (like adding more garnishes or moving them around) and ensure there is serving wear available (spoon and knifes). Serve immediately!
Notes
- Nutrition Information: Yield: 8, Serving Size: 1 sandwich, Calories: 570, Total Fat: 31g, Saturated Fat: 8g, Trans Fat: 0g, Unsaturated Fat: 23g, Cholesterol: 286mg, Sodium: 1312mg, Carbohydrates: 17g, Fiber: 2g, Sugar: 11g, Protein: 57g.


Leave a Reply