
My First Sushi Adventure
I tried making sushi at home years ago. I was so nervous. My first roll looked more like a lumpy burrito. I still laugh at that.
But you know what? It still tasted wonderful. That’s the magic of homemade food. It doesn’t need to be perfect. It just needs to be made with your own two hands. That’s why this matters. The trying is the fun part.
Getting Your Rice Just Right
Let’s start with the rice. Rinse it in a colander first. The water will run clear. This washes off extra starch.
Cook it with the water in a pot with a lid. Once it boils, turn it way down. Let it cook quietly for 15 minutes. The smell is so cozy. While it cooks, mix the vinegar, sugar, and salt. Whisk until it’s all friends.
The Fun Part: Rolling!
This is where we play. Set up your station. You need a sushi mat, a bowl of water, and a sharp knife. Keep that water close. Wet fingers keep the sticky rice from sticking to you.
Spread one cup of rice on the seaweed sheet. Leave a little bare strip at the top. Add your lines of filling. I love the bright green avocado next to the pink crab. Doesn’t that look pretty?
Now, the roll. Use the mat to help you. Fold, tuck, and give it a gentle squeeze. It’s like giving your food a hug. What filling would you try first? Avocado, cucumber, or something else?
Why We Make It Ourselves
You can buy sushi anywhere. So why make it? Because you choose what goes inside. You make it just for you and your people.
That’s why this matters, too. Cooking connects us. It turns a regular Tuesday into a little party. Everyone gathers around to see the rolls get sliced. Fun fact: The seaweed paper is called nori. It’s made from dried sea vegetables!
Your Turn to Share
My grandkids love to help with the rolling. Their rolls are all shapes and sizes. We eat every single one. The kitchen gets messy and we all smile.
Have you ever had a kitchen adventure that went a bit funny? I’d love to hear your story. And tell me, do you dip your sushi in soy sauce, or do you like it plain?

Ingredients:
| Ingredient | Amount | Notes |
|---|---|---|
| Sushi rice | 1 ½ cups | |
| Water | 2 ¼ cups | |
| Seasoned rice vinegar | 2 tablespoons | |
| Salt | 1 teaspoon | |
| Sugar | 1 teaspoon | |
| Avocado | 1 | |
| English cucumber | ½ | |
| Imitation crab | 8 ounces | log/leg style works better than chunks |
| Toasted nori seaweed | 4 sheets |
My Kitchen Table California Rolls
My grandson loves these rolls. He calls them “inside-out” sushi. Making them feels like a fun craft project. We spread everything out on the big wooden table. The best part is eating them together right away.
Do not be nervous. Your first roll might be a little loose. Mine was! I still laugh at that. The secret is cool, sticky rice and a gentle squeeze. You can do this. Let’s get our hands a little wet and start.
- Step 1: First, rinse your sushi rice in a colander. Add it to a pot with the water. Bring it to a boil, then cover and simmer on low. Let it cook for 15 minutes. All the water will disappear.
- Step 2: Mix the vinegar, sugar, and salt in a small bowl. Whisk until they vanish into the liquid. Doesn’t that smell amazing? It’s the soul of the rice. Carefully spread the hot rice on a sheet pan.
- Step 3: Sprinkle your vinegar mix over the rice. Toss it gently to coat every grain. Now spread it thin to cool. This takes about 10 minutes. (A hard-learned tip: fanning it with a magazine helps it cool faster!).
- Step 4: While waiting, prepare your fillings. Slice the avocado thinly. Cut the cucumber in half and scoop out the seeds. Then slice it into long, skinny sticks. Imitation crab is already perfect to use.
- Step 5: Set up your station. You need your mat, a cup of water, and a knife. Keep that water bowl close! Wet hands keep the sticky rice from becoming a mess. Trust me on this one.
- Step 6: Place a nori sheet shiny-side down on the mat. Wet your fingers. Spread one cup of rice over the seaweed. Leave a one-inch strip bare at the top. Add a line of avocado, crab, and cucumber in the middle.
- Step 7: Use the mat to lift the edge over the filling. Tuck it in tightly, then roll it forward into a log. Give the wrapped roll a gentle, firm squeeze. Unroll the mat to see your beautiful creation! What’s the key to a tight roll? Share below!
- Step 8: Wet your serrated knife. Carefully slice the roll into eight pieces. Each cut should be one smooth motion. Repeat to make three more rolls. Then, the best step of all: take a bite.
Cook Time: 15 minutes
Total Time: 45 minutes
Yield: 4 rolls (32 pieces)
Category: Lunch, Appetizer
Three Fun Twists to Try
Once you master the basic roll, you can play! Change the fillings with what you love. It makes the recipe feel brand new every time. Here are my favorite simple twists.
The Garden Roll: Skip the crab. Add crisp carrot sticks and creamy mango slices instead. It’s sweet, fresh, and totally vegetarian.
The Spicy Kick: Mix a little sriracha mayo with the crab. Add a few thin slices of jalapeño. It has a nice little zing that makes you smile.
The Tropical Treat: Use cooked shrimp. Add a strip of ripe mango and a leaf of fresh mint. It tastes like a sunny beach day. Which one would you try first? Comment below!
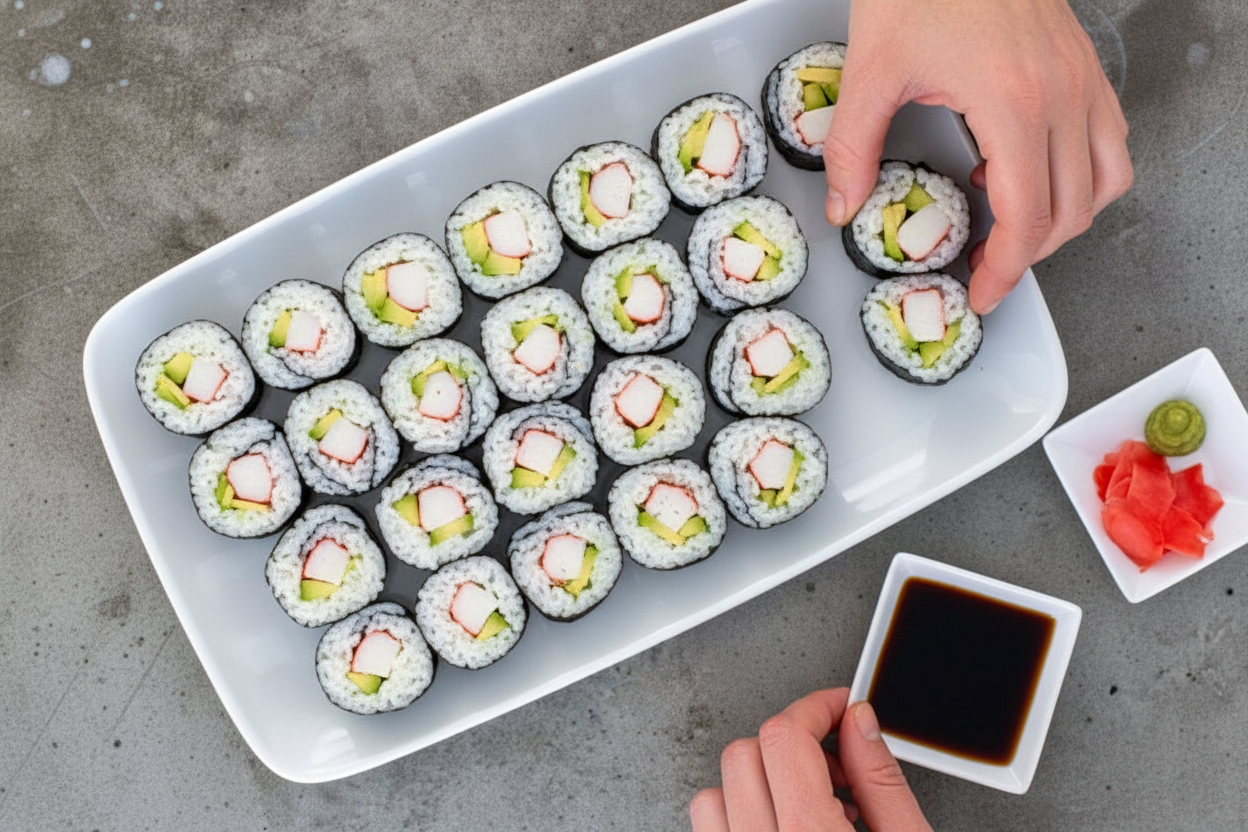
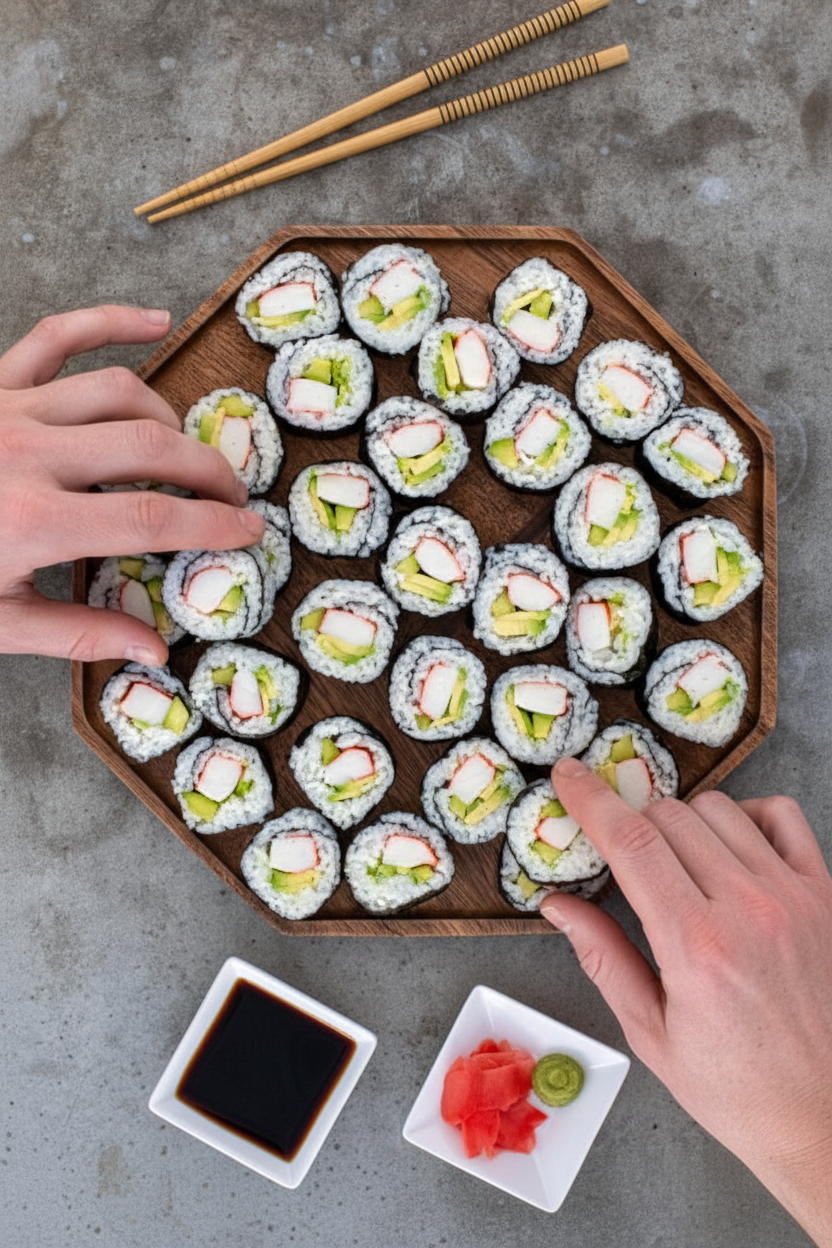
Serving Your Masterpiece
I love serving these on a big platter. Arrange the pieces in a sunburst pattern. Add little bowls of soy sauce for dipping. A small pile of pink pickled ginger looks so pretty. A dot of wasabi is there for the brave hearts.
For a drink, my husband likes a cold, crisp lager. It washes the flavors down nicely. My grandson always chooses fizzy ginger ale. The ginger taste is a fun friend for the sushi. Which would you choose tonight?
Keeping Your Sushi Fresh
These rolls are best eaten right away. But life happens! To store them, wrap each roll tightly in plastic wrap. Place them in a single layer in the fridge. Eat them within one day for the best taste and texture.
I do not recommend freezing them. The rice gets very hard and the vegetables turn mushy. I learned this the hard way! I once froze a beautiful roll for my grandson. It was a sad, soft mess when it thawed.
You can batch-cook the rice and prep the fillings ahead. Keep them separate in the fridge. Then assemble your rolls just before dinner. This makes a weeknight meal feel special and easy.
Why does this matter? A little planning saves time and reduces stress. It means you can enjoy homemade food even on your busiest days. Have you ever tried storing it this way? Share below!
Sushi Rolling Troubles? Let’s Fix That!
Is your rice too sticky? Keep a bowl of water nearby. Dip your fingers and knife often. This keeps the rice from sticking to everything. I remember when my hands were covered in rice. It was quite a funny sight!
Does your roll fall apart? You might be overfilling it. Use just a thin line of each ingredient. Also, press firmly when you make that first fold with the mat. A tight roll holds together better.
Is the seaweed tearing? Make sure your rice layer is not too thick. A heavy layer can crack the nori when you roll. A thin, even spread works best.
Fixing these small issues builds your kitchen confidence. It also makes your food look and taste better. You will feel so proud of your beautiful rolls! Which of these problems have you run into before?
Your Sushi Questions, Answered
Q: Is this recipe gluten-free? A: Check your soy sauce and imitation crab labels. Many contain wheat. Use tamari and real crab to be sure.
Q: Can I make it ahead? A: Prep parts separately. Cook rice and slice veggies a few hours early. Assemble right before eating for perfect texture.
Q: What if I don’t have cucumber? A: Try crisp carrot sticks or bell pepper strips. You can use real crab or cooked shrimp too. *Fun fact: The “California roll” was invented in Canada!*
Q: Can I double the recipe? A: Yes! Just use a bigger pot for the rice. You may need to work in batches for rolling.
Q: Any optional tips? A: A sprinkle of sesame seeds on the rice looks lovely. A dab of mayonnaise mixed with the crab is tasty too. Which tip will you try first?
From My Kitchen to Yours
I hope you love making these rolls as much as I do. It is a fun kitchen project. I still make them with my grandkids. We laugh and sometimes make a mess.
I would love to see your creations. Sharing food stories connects us all. It makes my heart so happy.
Have you tried this recipe? Tag us on Pinterest! You can find me at @AnnaWhitmoreKitchen. I cannot wait to see your beautiful sushi plates.
Happy cooking!
—Anna Whitmore.

Homemade California Sushi Rolls – The Schmidty Wife: Homemade California Sushi Rolls Recipe
Description
Learn to make fresh, vibrant California sushi rolls at home! Easy step-by-step recipe for delicious homemade sushi everyone will love.
Ingredients
Instructions
- Rinse the rice in a colander. In a lidded pot, add the rice and water. Bring to a boil over high heat, then cover and reduce to low for 15 minutes until water is absorbed. In a small bowl, whisk rice vinegar, sugar, and salt until dissolved.
- Transfer cooked rice to a sheet pan. Sprinkle the vinegar mixture over the rice and toss to coat. Spread rice into a thin, even layer to cool for 10 minutes.
- While rice cooks and cools, prepare fillings: thinly slice the avocado. Peel cucumber, cut in half, remove seeds, and cut into long thin strips.
- Set up your station: sushi mat, a 1-cup measuring cup for rice, a bowl of room-temperature water for your fingers, and a serrated knife.
- Place a nori sheet shiny-side down on the mat, bottom edge flush. Wet your fingers, measure 1 cup of rice, and spread it over the nori, leaving a 1-inch strip uncovered at the top.
- Add a line of avocado, crab, and cucumber in the center of the rice. Use the mat to fold the bottom edge over the fillings, roll tightly into a log, then squeeze gently to shape.
- Unwrap the mat. Wet a serrated knife and cut the roll into 8 pieces. Repeat with remaining ingredients to make 4 rolls total (32 pieces). Serve immediately with soy sauce, pickled ginger, and wasabi if desired.
Notes
- Eat immediately or keep in the refrigerator. For easier rolling, keep your hands and knife wet to prevent sticking.


Leave a Reply