
The Best Kind of Kitchen Mess
Hello, dear. Come sit. Let’s talk about ice cream. Not just a scoop in a bowl. I mean a big, glorious, messy dessert. This one is my favorite. It has layers of crunch and cold and fudge.
It reminds me of summer nights. My grandkids would help me make it. We always got cookie crumbs everywhere. I still laugh at that. The mess is part of the fun. What’s your favorite summer dessert memory?
Building Your Base
We start with the crust. Crush those chocolate cookies fine. You can put them in a bag and roll them. It’s a good way to get out a little frustration! Mix most of the crumbs with melted butter.
Press it into your pan. This crust is the foundation. It matters because it gives every bite a nice crunch. Without it, you’d just have a block of ice cream. We want texture! Now, pop it in the freezer.
The Heart of the Matter
Next, the ice cream. Let it soften on the counter. This is very important. If it’s too hard, you’ll tear the crust. If it’s soup, it won’t freeze right. We want it just soft enough to spread.
Spread it over your cold crust. Then cover it with wrap. Back in the freezer it goes. This patience part is hard. But it matters. It makes the layers stay separate and perfect. Fun fact: letting ice cream soften a little before scooping makes it taste creamier!
A Fudgy Secret Layer
Now for the magic. Warm up that hot fudge sauce. Pour two cups over the firm ice cream. Doesn’t that smell amazing? It will harden into a shiny, chewy layer.
This is my mini-anecdote. My grandson Sam calls this the “secret tunnel.” He says the fudge layer is like a tasty road through the dessert. I love that. Do you like your fudge sauce warm or straight from the jar?
The Grand Finale
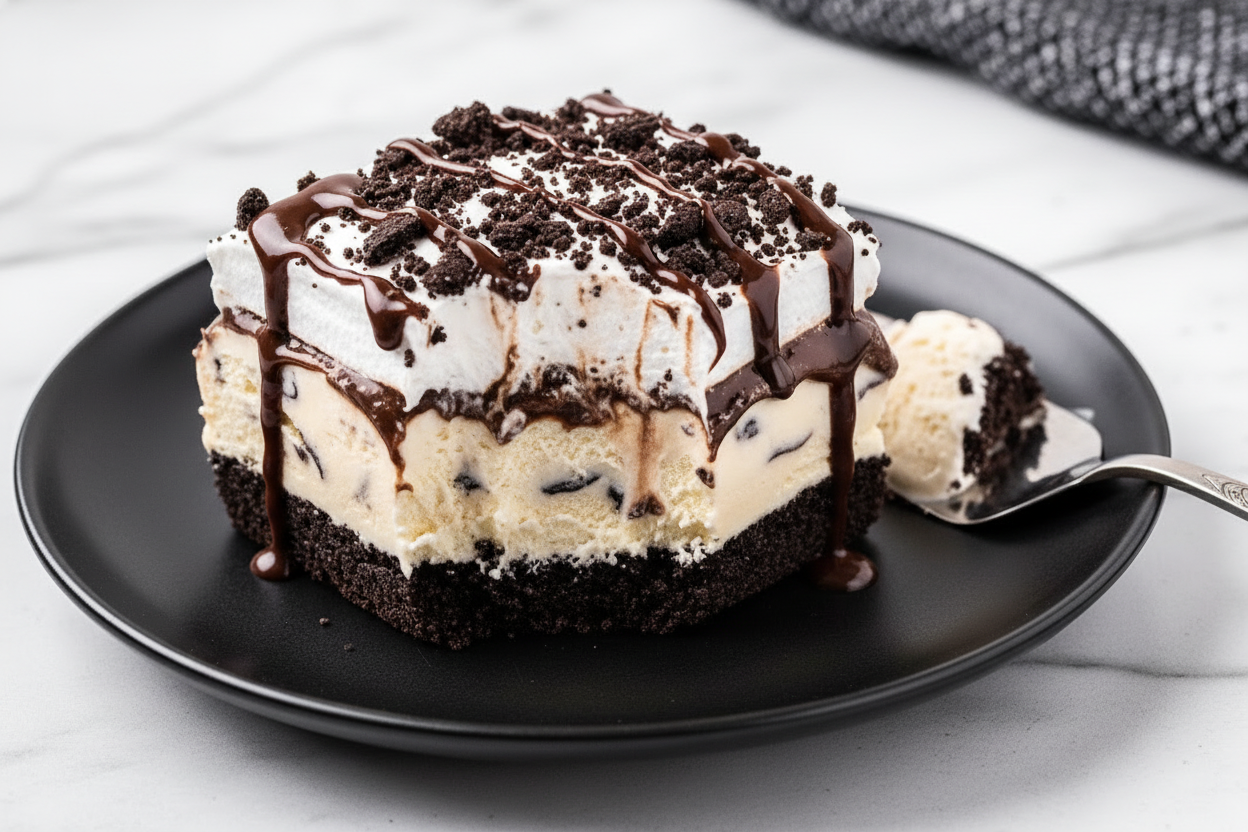
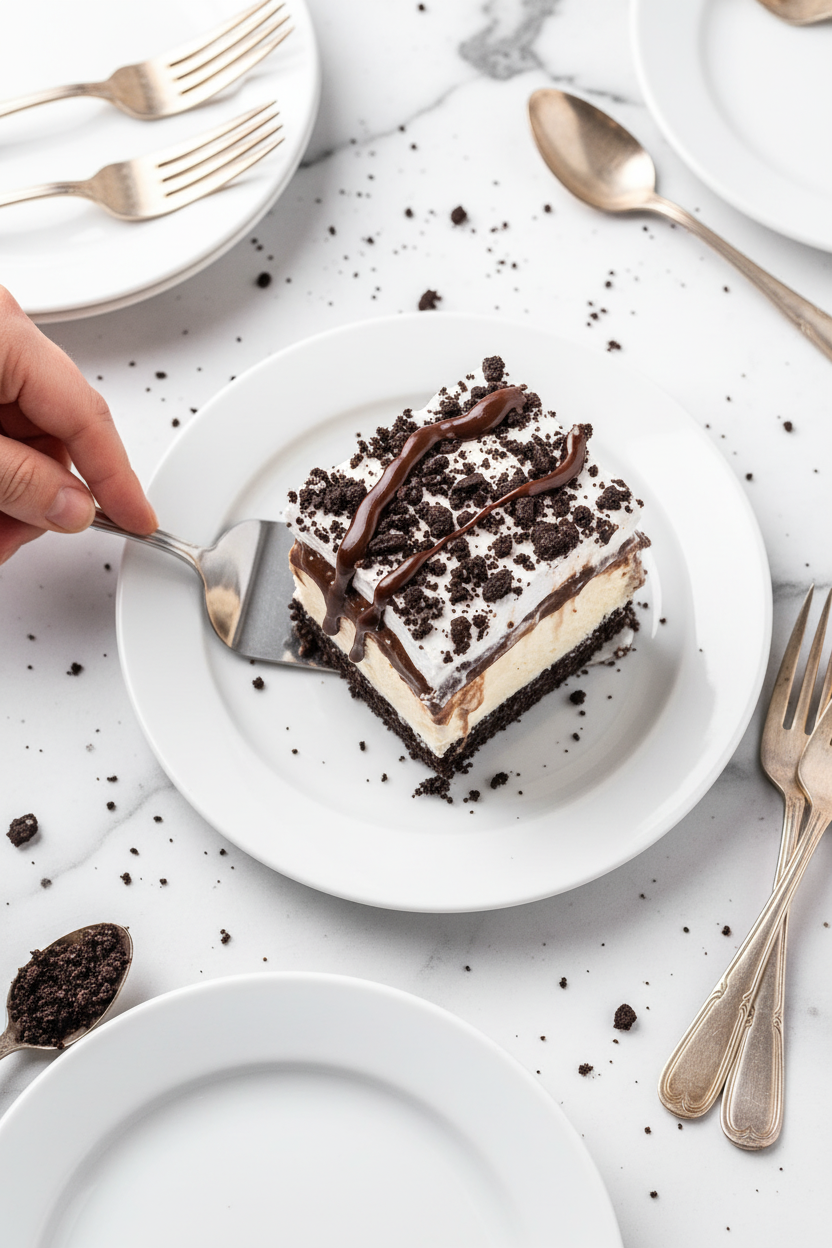
Last steps! Spread on the whipped topping. It’s like a fluffy cloud. Then, sprinkle your saved cookie crumbs on top. They look like little pieces of earth on the snow.
Freeze it one more time. Before serving, let it sit out for a bit. This makes it easy to cut. Drizzle with the last of the warm fudge. Now, share it with people you love. That’s the whole point. Tell me, who would you make this for first?

Ingredients:
| Ingredient | Amount | Notes |
|---|---|---|
| chocolate sandwich cookies | 15.5 ounces | crushed and divided into ¼ cup, and the remainder |
| butter | ¼ cup | melted |
| vanilla ice cream | 3 quarts | softened |
| hot fudge ice cream topping | 22 to 24 ounces | two 11 to 12-ounce jars, warmed and divided into 2 cups, and the remainder |
| frozen whipped topping | 8 ounces | thawed |
My Favorite Ice Cream Cake That’s a Snap to Make
Hello, my dear! Come sit at the counter. Let’s make my famous ice cream dessert. It’s not really a cake, you know. It’s more like a frozen dream.
My grandson calls it “Grandma’s Magic Layers.” I still laugh at that. It looks fancy, but it’s so simple. We just layer cookies, ice cream, and fudge. Doesn’t that sound amazing?
You’ll need a 9×13 pan. Let me walk you through it. I’ll share my little secrets along the way. Ready? Here we go.
- Step 1: First, crush those chocolate cookies. A food processor works best. Save a little pile of crumbs for later. Mix the rest with melted butter. This will be our crust. Press it firmly into your greased pan. Pop it in the freezer for a bit.
- Step 2: Now, let your ice cream soften. Just leave the lid off for ten minutes. (My hard-learned tip: don’t let it get soupy! Just soft enough to scoop.) Scoop big dollops onto your cold crust. Then spread it gently. Cover it with plastic wrap. Freeze it solid for two hours.
- Step 3: Warm up your hot fudge sauce. Pour two cups over the frozen ice cream. Spread it quickly before it sets. Back into the freezer it goes! This layer gets hard and chewy. Do you like more fudge in the middle or on top? Share below!
- Step 4: The fun part! Spread the whipped topping like fluffy clouds. Sprinkle your saved cookie crumbs on top. It looks so pretty now. Freeze it one last time. The waiting is the hardest part, I know.
- Step 5: Time to serve! Let it sit on the counter for 15 minutes. This makes slicing easier. Drizzle with the rest of your warm fudge. Then dig into your beautiful creation. You did so well.
Cook Time: 4–6 hours (freezing)
Total Time: 4 hours 30 minutes
Yield: 12 servings
Category: Dessert, Frozen Treat
Three Fun Ways to Mix It Up
This recipe is like a blank canvas. You can paint it with any flavors you love. Here are my favorite twists to try.
- Cookie Monster: Use mint chocolate chip ice cream. Add crushed mint Oreos to the crust. It tastes so fresh and cool.
- Berry Bliss: Swap vanilla ice cream for strawberry. Use a berry sauce instead of hot fudge. Top with fresh sliced strawberries.
- Salted Caramel Swirl: Use caramel ice cream. Drizzle salted caramel sauce between layers. Sprinkle a little sea salt on the whipped cream.
Which one would you try first? Comment below!
Serving It With Style
Presentation is half the fun. For a party, cut small squares. Place each on a little plate. Add a dollop of extra whipped cream. A single raspberry on top looks lovely.
At home, we just grab a bowl. Sometimes we add extra crushed peanuts. The crunch is wonderful. A maraschino cherry on top makes everyone smile.
For drinks, a cold glass of milk is perfect. Grown-ups might like a little coffee liqueur in their cup. It pairs so nicely with the chocolate. Which would you choose tonight?
Keeping Your Ice Cream Dessert Perfect
This dessert loves the freezer. Keep it covered tightly with foil. It will stay good for about two weeks. I once made one for a surprise party. I hid it in the back of the freezer for a whole week. It was still perfect.
You can make the whole pan ahead of time. This is called batch cooking. It saves you stress when guests come. Let it thaw a bit before serving. This matters because good food should bring joy, not last-minute worry.
To serve, let it sit on the counter for 15 minutes. This softens it just right. Use a hot knife to cut clean slices. Just run your knife under hot water first. Have you ever tried storing it this way? Share below!
Simple Fixes for Common Troubles
Is your ice cream too hard to spread? Let it soften on the counter. Ten minutes is usually enough. I remember when I didn’t wait. My crust crumbled everywhere! Patience makes a smoother layer.
Is the hot fudge too thick? Warm it up a little more. Stir it until it pours easily. A thin layer sets better. This matters for texture. You want a nice fudge ribbon, not a chewy block.
Is the whipped topping runny? Make sure it is fully thawed in the fridge. Do not stir it too much. Gentle folding keeps it fluffy. This matters for a pretty, cloud-like finish. Which of these problems have you run into before?
Your Questions, Answered
Q: Can I make this gluten-free?
A: Yes! Use gluten-free sandwich cookies for the crust. Check all your labels.
Q: How far ahead can I make it?
A: You can assemble it up to two weeks ahead. Just freeze it until party time.
Q: What can I use instead of hot fudge?
A: Caramel sauce or strawberry topping work wonderfully. Use what you love.
Q: Can I make a smaller batch?
A: Absolutely. Halve the recipe and use an 8×8 pan. It works great.
Q: Any optional tips?
A: Add a layer of sliced bananas or peanuts. Fun fact: Adding a salty peanut crunch is my grandson’s favorite trick. Which tip will you try first?
From My Kitchen to Yours
I hope this recipe becomes a favorite in your home. It holds so many happy memories for me. I love seeing your kitchen creations. Sharing food is how we share love.
Please show me what you made. I would be so delighted to see. Have you tried this recipe? Tag us on Pinterest! Your photos inspire our whole community.
Happy cooking!
—Anna Whitmore.
Ice Cream Dessert: Delicious Ice Cream Dessert Recipes and Ideas
Description
Indulge in dreamy ice cream desserts! Discover easy recipes, stunning sundaes, and no-churn treats to create and share. Perfect for any celebration.
Ingredients
Instructions
- Place the cookies into a food processor and pulse until a crumb texture. Remove ¼ cup of cookie crumbs to be used as a sprinkle topping. For the remaining crumbs, run the food processor and drizzle in the melted butter, and run for about 15 seconds.
- Press the cookie crumbs into the bottom of a greased 9×13 pan. Place the pan in the freezer for about 10 minutes while you let the ice cream soften. To soften the ice cream, remove the lid from the ice cream and let it sit at room temperature for about 10 minutes.
- Remove the pan from the freezer, and using an ice cream scoop, place scooped ice cream all over the crust and then spread the softened ice cream over the cookie crust. Lay a piece of cling wrap on top of the ice cream and place it in the freezer to freeze until solid again (about 2 hours).
- Warm the jars of hot fudge ice cream topping per the instructions on the jar. Measure out 2 cups of the warmed topping, and reserve the remaining fudge to pour over the finished dessert. Pour the warmed fudge over the top of the frozen ice cream and spread it into an even layer. Freeze again until solid (about one hour).
- Remove the dessert and spread the thawed whipped topping evenly on top of the dessert. Sprinkle with the reserved ¼ cup of crushed cookies. Place back into the freezer for two hours or until ready to serve.
- When ready to serve, remove the dessert from the freezer and thaw in the refrigerator for 30 minutes or on the countertop for 15 minutes. Drizzle with remaining warmed fudge topping as desired.
Notes
- For best results, use a hot knife to cut clean slices. You can customize this dessert by using different ice cream flavors or cookie types.


Leave a Reply