
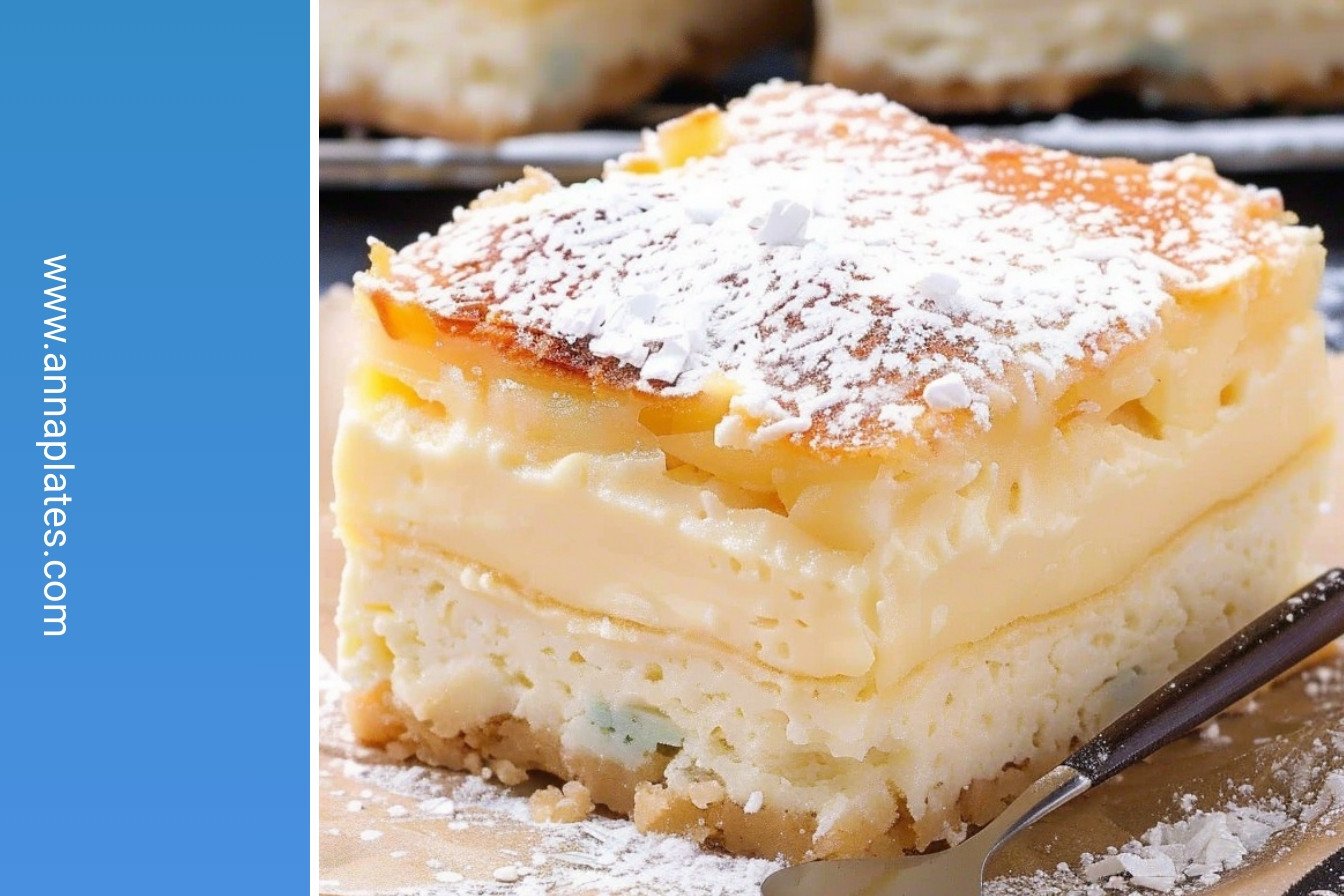
The Magic in the Middle
This cake is a little bit of kitchen magic. It makes its own custard layer while it bakes. I still shake my head in wonder every time I pull it from the oven. You get a fluffy cake on top and a creamy custard on the bottom. It’s like two desserts in one.
The secret is in the egg whites. We fold them in gently. This creates the two different layers. Isn’t that a fun trick? Have you ever made a recipe that surprised you like this?
A Story from My Kitchen
The first time I made this, I was sure I messed it up. The batter was so thin and runny. I almost poured it right down the sink. But I trusted the recipe and baked it anyway.
When I took it out, the magic had happened. The top was golden and the middle had a gentle wiggle. I learned something important that day. Sometimes, things that look wrong at the start turn out just right. This matters in baking and in life.
Getting Your Ingredients Ready
Let’s gather our things. Make sure your eggs and milk are not cold. Room temperature ingredients are friends. They like to mix together better.
Melting the butter first lets it cool down. We don’t want to cook our egg yolks! This careful prep makes the magic work. Fun fact: superfine sugar dissolves faster, which helps make the custard layer super smooth. What is your favorite baking ingredient to work with?
The Gentle Folding Part
This is the most important step. Your egg whites should be stiff and fluffy. Now, use a big whisk or a spatula. Gently fold them into the thin batter.
Do not mix it too much. Little white streaks and clumps are just fine. The batter will look a bit messy and separated. That is exactly what you want. It might seem strange, but trust the process.
Patience is a Sweet Ingredient
The cake needs to cool completely. Then it needs to sit for a few more hours. This is the hardest part. Waiting makes the custard set perfectly.
Cutting into it too early makes a mess. Good things come to those who wait. This matters because it teaches us patience. The reward is a beautiful, layered slice. What is the hardest recipe you’ve ever had to wait for?

Ingredients:
| Ingredient | Amount | Notes |
|---|---|---|
| large eggs, separated | 4 | at room temperature |
| baker’s sugar (superfine sugar) | 1 cup | |
| salted butter | ½ cup | melted and cooled |
| vanilla extract | 2 teaspoons | |
| all-purpose flour | 1 cup | |
| whole milk | 1 ½ cups | lukewarm |
| heavy cream | ½ cup | lukewarm |
My Magic Custard Cake
Hello, my dear! Let’s bake my Magic Custard Cake. It’s a little bit of kitchen wizardry. The cake makes its own creamy custard layer as it bakes. I still laugh at the first time I saw it happen. I thought I had done something wrong! But it turned out perfectly. It’s creamy, cheesy-tasting, and simply irresistible. Doesn’t that sound wonderful? Let’s get our bowls ready.
Step 1
First, turn your oven on to 325°F. Grease your 8×8 inch pan with butter. I like to use my fingers for this. It reminds me of baking with my own grandma. This simple step makes sure our cake won’t stick. A little butter makes everything better, don’t you think?
Step 2
Now, separate your eggs. Put the yolks in a big bowl. Keep the whites for later. Add the sugar to the yolks. Beat them until they turn a lovely pale yellow. It should look thick and creamy. This is the sweet, sunny heart of our cake.
Step 3
Pour in your melted butter and vanilla. Mix it all together. The smell of vanilla is just heavenly. Now, beat in the flour. It will get very thick. That’s exactly what we want. (A hard-learned tip: make sure your butter isn’t too hot. We don’t want to cook our egg yolks!)
Step 4
Here comes the magic part. Slowly add the warm milk and cream. The batter will look very thin and runny. Don’t worry! This is how it’s supposed to be. I always take a deep breath here. Trust the recipe, it knows what it’s doing.
Step 5
Now, wash your beaters well. We need to beat the egg whites in a clean bowl. Beat them until they form stiff, fluffy peaks. They should look like soft clouds. This is what makes our cake light. What’s the trick to fluffy egg whites? Share below!
Step 6
Gently fold the fluffy whites into the thin batter. Don’t mix too much! Just fold until mostly combined. You’ll see little white specks floating. That’s perfect. Pour this funny-looking batter into your prepared pan.
Step 7
Bake for 40 to 45 minutes. The top will be golden. The center will still jiggle a little when you move the pan. Let it cool completely on the counter. Then wait a few more hours. This is the hardest part, waiting! But it’s worth it.
Cook Time: 45 minutes
Total Time: 4 hours
Yield: 9 servings
Category: Dessert, Cake
Three Fun Twists to Try
This cake is wonderful on its own. But sometimes, it’s fun to play with your food. Here are a few ideas I love. They make the cake feel new every time. I hope you like them.
Lemon Sunshine
Add the zest of one lemon to the batter. It gives a fresh, sunny taste.
Berry Burst
Scatter a handful of fresh raspberries on top before baking.
Cinnamon Swirl
Mix one teaspoon of cinnamon with two tablespoons of sugar. Swirl it into the batter with a knife.
Which one would you try first? Comment below!
Serving Your Masterpiece
This cake is a dream to serve. I love dusting the top with powdered sugar. It looks like a light snowfall. For a special treat, add a few fresh berries on the side. A dollop of whipped cream never hurts either. It’s pure comfort on a plate.
What to drink with it? A cup of hot tea is my favorite. It’s so cozy. For a festive night, a little glass of sweet dessert wine is lovely. The cake isn’t too sweet, so they balance perfectly. Which would you choose tonight?

Keeping Your Magic Custard Cake Perfect
This cake is magic even after baking. It keeps its lovely layers best in the fridge. Just cover the pan tightly with plastic wrap.
I do not suggest freezing this delicate treat. The custard can become watery when it thaws. It is best enjoyed fresh from the fridge.
You can enjoy a slice cold. Or warm it for ten seconds in the microwave. I once tried to freeze a whole cake for a surprise visit. The texture was never quite the same.
Storing food well saves you time and money. It means a sweet treat is always ready for you.
Have you ever tried storing it this way? Share below!
Easy Fixes for Common Cake Troubles
Is your cake too runny in the middle? It might need a few more minutes in the oven. The center should jiggle, not slosh.
I remember when I pulled my first one out too early. We ate it with spoons like pudding. It was still delicious.
Are the layers not distinct? You might have over-mixed the egg whites. Gently fold them in to keep the magic.
Did the top brown too much? Tent it with a piece of foil. Fixing small problems builds your cooking confidence. It also makes the final flavor and texture just right.
Which of these problems have you run into before?
Your Magic Custard Cake Questions
Q: Can I make this gluten-free? A: Yes. Use a one-to-one gluten-free flour blend. It works wonderfully.
Q: Can I make it ahead? A: Absolutely. Bake it a day before you need it. The flavors settle in nicely.
Q: What if I don’t have heavy cream? A: You can use all whole milk. The cake will be a bit less rich.
Q: Can I double the recipe? A: For a bigger crowd, use a 9×13 inch pan. The baking time may be a little longer.
Q: Is the powdered sugar necessary? A: No, but it adds a sweet, pretty finish. It is a lovely touch.
Which tip will you try first?
A Little Note From My Kitchen
I hope you love making this magic cake. It is a recipe that always feels special. Sharing food is one of life’s great joys.
Fun fact: The cake makes its own layers while it bakes. It truly is a little bit of kitchen magic! I would be so happy to see your creation.
Have you tried this recipe? Tag us on Pinterest! I love seeing your beautiful bakes. Happy cooking!
—Anna Whitmore.

Magic Custard Cake: Creamy, cheesy, and irresistible.
Description
Discover the magic of this one-batter cake that bakes into three delicious layers! A stunning, easy dessert that will amaze everyone.
Ingredients
Instructions
- Preheat oven to 325°F. Butter an 8”x8” square baking pan.
- In a mixing bowl, beat the egg yolks and sugar until pale yellow and creamy, about 1 to 2 minutes.
- Add the melted and cooled butter and vanilla extract and beat to combine fully.
- Beat in the flour.
- Combine the milk and cream together and slowly pour into the batter, mixing to combine.
- Beat egg whites in a standing mixer with the whisk attachment until stiff peaks form.
- Use a large whisk to lightly incorporate egg whites into the batter. Add in 2 to 3 additions and only whisk slightly. The batter will have two distinct textures – a very thin, runny batter with the lightly incorporated egg whites floating on the top of the batter.
- Pour batter into the prepared baking pan.
- Bake for approximately 40 to 45 minutes. The cake is done when the center is still jiggly, but the batter does not slosh in the pan. The top will be lightly browned.
- Remove from the oven and allow to cool completely.
- Allow the cake to sit for 2 to 3 hours before dusting with powdered sugar and cutting into 9 pieces. It is best to remove the pieces from the pan one at a time rather than trying to remove the entire cake at once.


Leave a Reply