
My First Marbled Mess
I remember my first try at these brownies. I was so excited. I swirled that knife like I was painting. It looked like a muddy puddle! I still laugh at that. But you know what? They tasted perfect. That’s the magic here. It doesn’t have to be perfect to be wonderful.
So please, don’t worry about your swirls. Just have fun with it. The taste is what counts. What’s your funniest kitchen mess story? I’d love to hear it.
Why We Swirl
Let’s talk about that marbling. It’s not just pretty. It’s smart. The cream cheese mixture is rich and tangy. The brownie batter is deep and chocolatey. Swirling lets you get both in every single bite.
*Fun fact: The cream cheese layer bakes up like a little pocket of cheesecake right inside your brownie!* This matters because it turns a simple treat into a special event. Two favorite desserts become one happy surprise.
Let’s Make Them Together
First, make your cream cheese filling. Beat the cheese and sugar until smooth. Add the egg, milk, and vanilla. Doesn’t that smell amazing? Set this bowl aside. Now, make your brownie mix just like the box says.
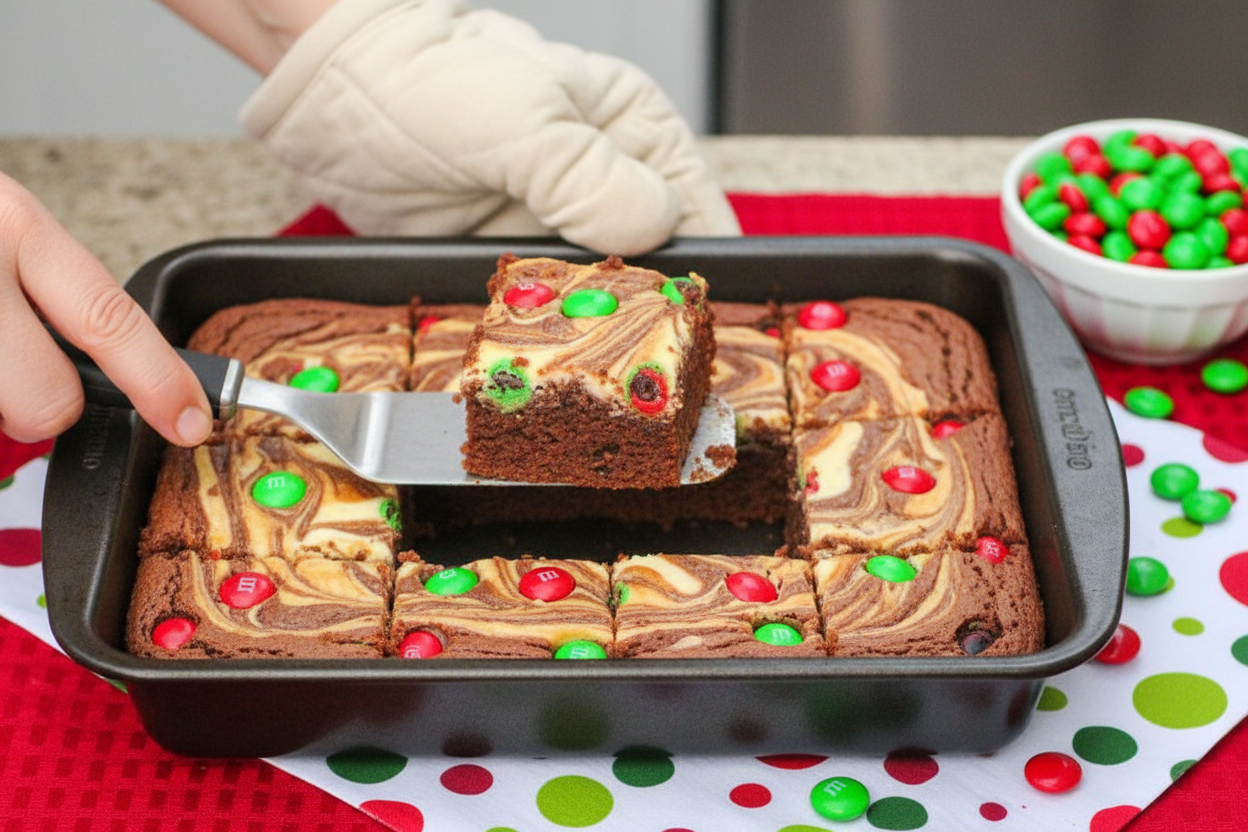
Spoon most of the brownie batter into your pan. Dollop the cream cheese mix on top. Then, add the last bits of brownie batter. Take a knife and swirl it all gently. Now for the best part: press those colorful M&M’S right into the top. Do you like more candies or less?
The Waiting Game
Bake them until the center is just a little bit wobbly. This is the hard part. You must let them cool completely. I know, the smell is torture! But if you cut them warm, they’ll fall apart.
Letting them cool matters. It lets everything set up just right. You’ll get those beautiful, clean squares. It teaches us a little patience makes things better. What’s your trick for waiting on a warm treat?
A Treat for Sharing
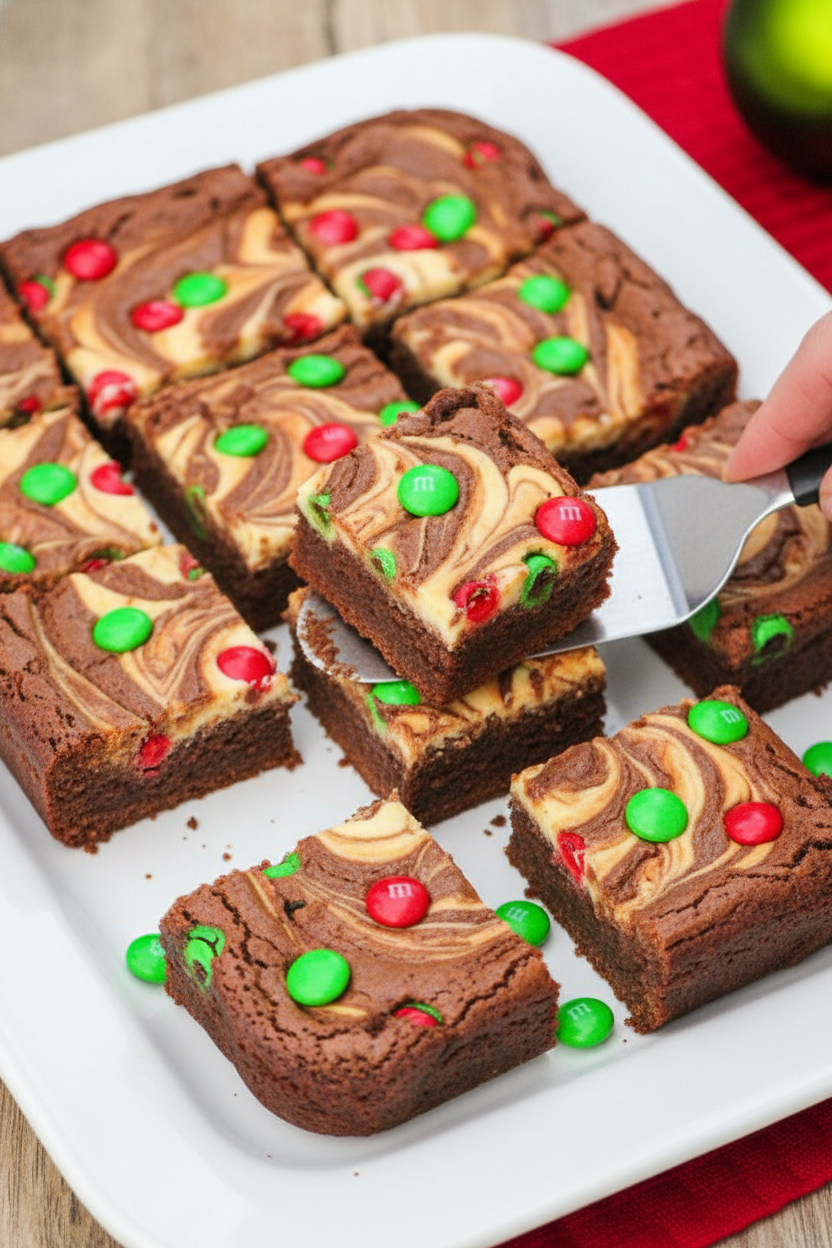
These brownies are for sharing. The recipe makes a nice big pan. That’s no accident. Food shared with family or friends just tastes sweeter. It’s about the smiles, not just the sugar.
Bring them to a neighbor. Pack them for a picnic. Leave a few for your family. See how a simple baked good can make someone’s day brighter. That’s the real recipe, my dear.

Ingredients:
| Ingredient | Amount | Notes |
|---|---|---|
| Cream cheese | 8 ounces | Softened |
| Granulated sugar | ⅓ cup | For the cheesecake mixture |
| Egg | 1 | For the cheesecake mixture |
| Milk | ⅛ cup | For the cheesecake mixture |
| Vanilla extract | ½ teaspoon | For the cheesecake mixture |
| Brownie mix | 1 package | Plus ingredients listed for a cake-like brownie |
| M&M’S® Brand Chocolate Candies | 1 cup |
My Marbled Cheesecake Brownies
Hello, dear! Let’s make something special today. These brownies are like a party in a pan. They combine fudgy brownie and creamy cheesecake. My grandson calls them “confetti brownies” because of the M&M’S. Doesn’t that sound fun? I love how the two batters swirl together. It reminds me of painting at my kitchen table. Every batch turns out a little different. That’s the beauty of it.
Here is how we make them. Just follow these simple steps. I’ll tell you a little story as we go.
Step 1: First, let’s make the creamy cheesecake swirl. Beat the cream cheese and sugar together until smooth. It should look like fluffy clouds. Add the egg, milk, and vanilla. Mix it all until it’s one happy, creamy family. Set this bowl aside for now. (A hard-learned tip: Let your cream cheese sit out first. Cold cream cheese is so lumpy to beat!) Step 2: Now, prepare your brownie mix. Follow the directions on the box for a “cake-like” style. This gives us a sturdier base. I use my favorite wooden spoon for this. It was my mother’s. Stirring batter is a good time for thinking. Quick quiz: What’s your favorite brownie mix brand? Share below! Step 3: Time to build our layers! Line your pan with parchment paper. Spoon about two-thirds of the brownie batter in first. Spread it gently. Next, dollop all that lovely cream cheese mixture on top. Try to cover most of the brownie layer. It’s okay if it’s not perfect. Step 4: Here comes the magic. Spoon the rest of the brownie batter over the cream cheese. Now, take a knife. Swirl it through the layers in big, lazy loops. Don’t overmix! We want beautiful marble patterns. Finally, press the M&M’S right into the top. I still laugh at how fast the red ones disappear from the bowl. Step 5: Bake it in your preheated oven. It needs about 45 to 50 minutes. The center should look just slightly moist. The smell will be amazing! Let the pan cool completely on a rack. This is the hardest part—waiting! Cutting warm brownies makes a mess. Trust me, I’ve learned. Cook Time: 50 minutesTotal Time: 1 hour 20 minutes (with cooling)
Yield: 32 squares
Category: Dessert, Baking
Three Fun Twists to Try
Once you master the basic recipe, try a twist! It’s fun to play with flavors. Here are three of my favorites. They make an ordinary day feel like a celebration.
Seasonal Swirl: Use holiday M&M’S colors. For fall, try butterscotch chips instead of candies. Berry Surprise: Fold a handful of fresh raspberries into the cream cheese mix. It adds a lovely, tangy pop. Cookie Dough Dream: Sprinkle chunks of refrigerated cookie dough over the top before baking. Which one would you try first? Comment below!Serving Them Up Right
These brownies are wonderful all on their own. But you can dress them up! For a fancy touch, dust them with powdered sugar. Serve them slightly warm with a scoop of vanilla ice cream. The contrast is heavenly. You could also add a dollop of whipped cream and a single berry.
What to drink? A cold glass of milk is always the classic choice. It’s perfect for a young baker. For the grown-ups, a nice cup of coffee or a glass of dessert wine pairs beautifully. The coffee cuts through the sweetness just right. Which would you choose tonight?
Keeping Your Brownies Fresh and Ready
Let’s talk about keeping these treats yummy. Cool them completely first. Then, store them in a sealed container. They will stay good on the counter for three days. For longer storage, the freezer is your friend. Wrap squares tightly in plastic wrap. Then, pop them into a freezer bag. They will keep for two months. To reheat, just warm a square in the microwave for 15 seconds. It will taste like it just came out of the oven.
I once sent a whole batch to my grandson. I froze them solid for the trip. He said they arrived perfect. Batch cooking matters because life gets busy. Having a sweet treat ready is a little gift to yourself. You can make a double batch and freeze half. It saves so much time later. Have you ever tried storing it this way? Share below!
Simple Fixes for Common Brownie Troubles
Even grandmas have baking days that go sideways. Here are some easy fixes. First, if your cream cheese layer sinks, your batter was too thin. Make sure your brownie mix is the “cake-like” style. This gives the cheesecake something sturdy to sit on. Second, a dry brownie means it baked too long. Check it five minutes before the timer ends. The center should look just slightly moist.
Third, a messy swirl can happen. I remember when I swirled too much. The two batters mixed into one! Use just a few gentle figure-eight motions with a knife. This matters because pretty food brings extra joy. Fixing small problems builds your kitchen confidence. You learn that mistakes are just lessons. Which of these problems have you run into before?
Your Quick Questions, Answered
Q: Can I make these gluten-free? A: Yes! Simply use a gluten-free brownie mix. Check all your other labels too.
Q: Can I make them ahead? A: Absolutely. Bake them a day before you need them. They taste even better the next day.
Q: What can I use instead of M&M’S? A: Chocolate chips work great. So do chopped nuts or even rainbow sprinkles.
Q: Can I make a smaller batch? A: You can halve the recipe. Use an 8×8 inch pan. Just reduce the baking time a bit.
Q: Any optional tips? A: A pinch of salt in the cheesecake mix is lovely. Fun fact: Salt makes sweet flavors taste sweeter! Which tip will you try first?
From My Kitchen to Yours
I hope you love making these marbled brownies. Baking is about sharing joy and making memories. I would love to see your beautiful creations. Your swirl might be better than mine! Share a picture of your kitchen success. Have you tried this recipe? Tag us on Pinterest! You can find me at @AnnasCozyKitchen. I can’t wait to see what you bake up next in your own cozy kitchen.
Happy cooking!
—Anna Whitmore.
Marbled Cheesecake Brownies: Marbled Cheesecake Brownie Recipe
Description
The ultimate dessert mashup! Rich, fudgy brownies swirled with creamy cheesecake for an irresistible marbled treat. Perfect for any occasion.
Ingredients
Instructions
- In a mixing bowl, beat the cream cheese with the sugar. Add the egg, milk and vanilla extract. Set aside.
- Prepare the brownie mix according to the package directions.
- Spoon 2/3 of the brownie batter into a parchment-lined 9 x 13-inch baking pan. Spoon the reserved cream cheese mixture over the brownie batter. Now scrape the remaining brownie batter over the cream cheese mixture.
- Swirl the tip of a knife through the batter to make a marbled effect. Press M&M’S Brand Chocolate Candies into the batter.
- Bake for 45-50 minutes in a preheated, 350-degree oven until slightly moist in the center. Cool completely before cutting 8×4 into 1½-inch squares.
Notes
- Nutrition Facts per serving: Calories: 167kcal, Carbohydrates: 22g, Protein: 3g, Saturated Fat: 2g, Cholesterol: 22mg, Sodium: 107mg, Fiber: 1g, Sugar: 6g.


Leave a Reply