

The Secret in the Sugar
My grandson calls these my magic cookies. They never spread out in the oven. They stay perfectly round. The secret is a little chill time.
You let the dough rest in the fridge overnight. This lets the flour get to know the butter. I think it makes the flavor better, too. It matters because a little patience makes a better cookie.
A Little Kitchen Helper
I still laugh at that. The first time I made these, I forgot the cream of tartar. My cookies were a bit flat. Now I measure everything into little bowls first.
It feels like being a scientist. A tasty scientist. Do you have a baking mistake that turned out okay? I love hearing those stories.
The Fun Part
Rolling the dough balls is my favorite step. I make them the size of a small plum. Then you press them down with a cup.
You see the little circles form. Fun fact: pressing them down helps them bake evenly. It gives them a nice, even surface for the sugar.
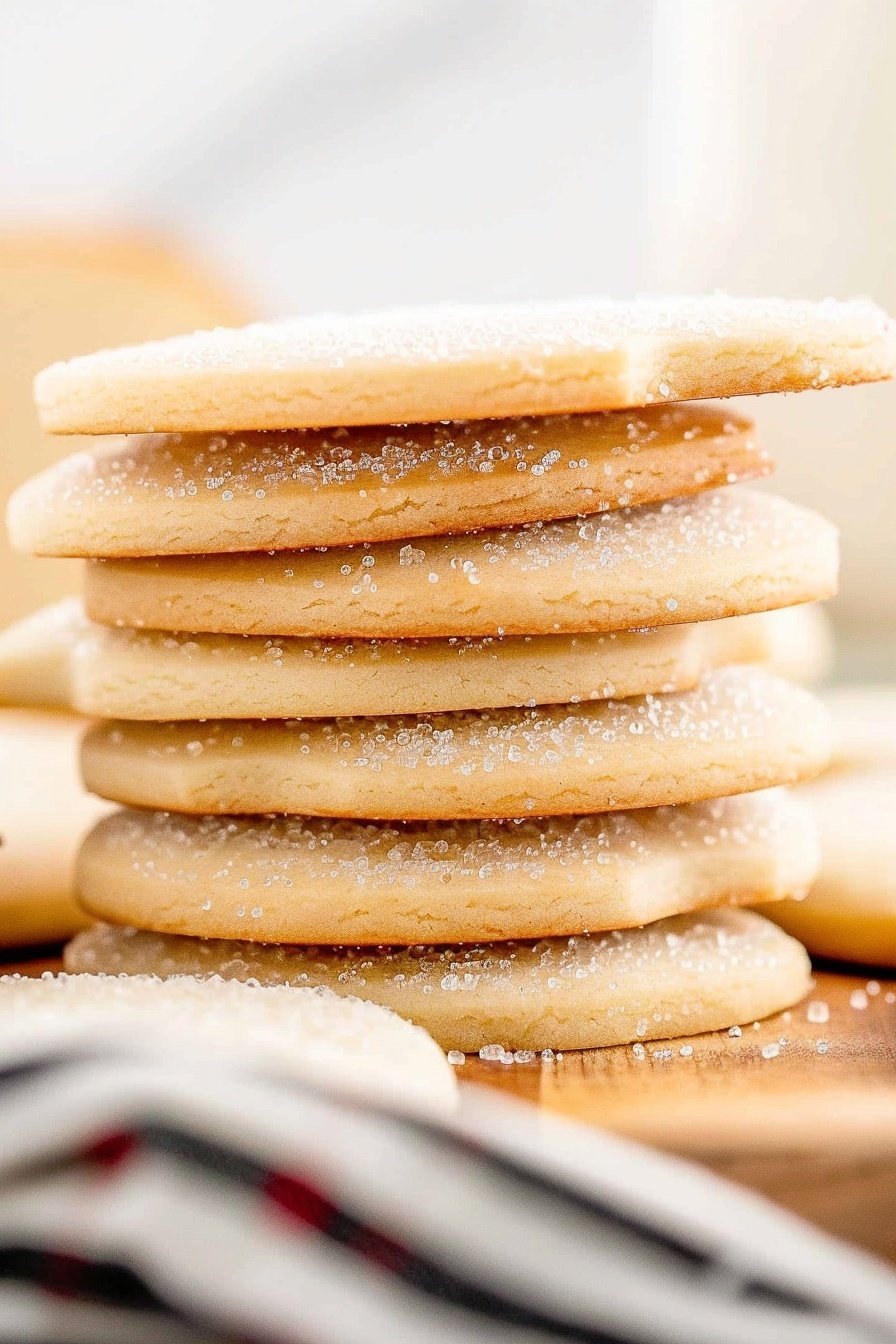
That Sweet Sparkle
The best part happens right when they come out. You sprinkle sugar on the hot cookies. Doesnt that smell amazing? The heat makes the sugar stick just right.
It gives them a lovely sparkle. It also adds a tiny crunch. This matters because the little details make food special. What is your favorite cookie topping?
Sharing the Warmth
These cookies are best shared. I always pack some for my neighbors. A simple cookie can make someones whole day brighter.
It is a small way to show you care. Who would you share a batch of these with? I would love to know.

Ingredients:
| Ingredient | Amount | Notes |
|---|---|---|
| Cake Flour | 2 cups | |
| All-Purpose Flour | ½ cup | |
| Sugar | 1 cup | |
| Salted Butter | ½ cup | softened |
| Egg | 1 whole + 1 white | |
| Butter Flavored Shortening | ¼ cup | softened |
| Baking Powder | 1½ tsp | |
| Cream of Tartar | ¼ tsp | |
| Vanilla Extract | 3 tsp | |
| Sugar | ⅓ cup | for dusting the top of the cookies after they bake |
My No-Spread Sugar Cookie Secret
Oh, these cookies bring back such happy memories. I used to make them with my grandkids every Christmas. The secret is letting the dough rest in the fridge. It makes the cookies hold their shape so nicely. They come out looking just perfect, like little puffy clouds.
These are the best cookies for decorating. They never spread out and lose their shape. You can press them down with a cup or use your favorite cookie cutter. I still have the little star cutter my grandson loved so much. Doesn’t that smell amazing when they bake?
Ingredients
- Cake flour
- All-purpose flour
- Baking powder
- Cream of tartar
- Sugar
- Butter
- Shortening
- Vanilla extract
- 1 whole egg
- 1 egg white
Instructions
Step 1: First, we mix our dry friends together. Grab a big bowl for the cake flour and all-purpose flour. Add the baking powder and cream of tartar too. Just whisk it all up until it’s one happy family. Then we set it aside for a little while.
Step 2: Now, let’s make things creamy. In another bowl, mix the sugar, butter, and shortening. Use your mixer to beat it until it’s light and fluffy. Then add the vanilla, the whole egg, and the egg white. (My hard-learned tip: scrape the bowl sides with a spatula. No ingredient gets left behind that way!).
Step 3: Time to bring everything together. Turn your mixer on low. Slowly add the dry ingredients to the wet ones. Mix until you see no more white flour spots. Now, cover the bowl and put it in the fridge. I always do this overnight. It feels like a sweet little secret waiting for tomorrow.
Step 4: The next day, preheat your oven to 375 degrees. Line your baking sheets with parchment paper. This keeps the cookies from sticking. It makes cleanup so much easier, too. I love a simple cleanup, don’t you?
Step 5: Take the dough out of the fridge. Scoop it into balls about the size of a walnut. Place them on your baking sheet. Now, press them down with the bottom of a cup. You want them about half an inch thick. What’s your favorite cookie cutter shape? Share below!
Step 6: Bake one sheet at a time for 10-12 minutes. The edges should be firm but not brown. As soon as they come out, sprinkle them with sugar. That sugar makes them sparkle like morning frost. Let them cool for a few minutes on the sheet.
Cook Time: 10-12 minutes per batch
Total Time: 2 hours 40 minutes (includes chilling)
Yield: 12 cookies
Category: Dessert, Cookies
Three Fun Twists to Try
Once you master the basic recipe, you can get creative. I love adding little changes to make them new again. It’s like giving an old friend a new hat. Here are a few of my favorite ideas.
- Lemon Sunshine: Add the zest of one lemon to the dough. It makes the cookies taste so fresh and bright.
- Almond Dream: Swap the vanilla for almond extract. It gives them a lovely, cozy flavor.
- Confetti Party: Mix in a handful of colorful sprinkles. Perfect for a birthday celebration!
Which one would you try first? Comment below!
The Perfect Pairings
These cookies are wonderful all on their own. But I think everything is better with a good partner. A simple treat can feel like a real occasion. Here is how I like to serve them.
For a real treat, I love them with a scoop of vanilla ice cream. The warm cookie and cold ice cream are magic. You could also dip them in a little chocolate glaze. For a drink, a cold glass of milk is the classic choice. For the grown-ups, a sweet dessert wine pairs beautifully.
Which would you choose tonight?
Keeping Your Cookies Perfect
These sugar cookies keep beautifully. Store them in a tin at room temperature. They will stay soft for about five days.
You can also freeze the dough for later. Just scoop the dough balls onto a tray. Once frozen, pop them into a bag. I once forgot I had dough in the freezer. It was a happy surprise for unexpected guests.
This matters because a ready treat brings joy. Batch cooking saves you time on busy days. You can have fresh cookies anytime you want.
Have you ever tried storing it this way? Share below!
Cookie Troubles and Easy Fixes
Sometimes cookies spread too much. Make sure your butter is just softened. If it is melted, the cookies will run.
Your cookies might be too tough. This happens if you mix the dough too long. I remember my first batch was like little rocks. I learned to mix just until combined.
A dry, crumbly dough is another problem. This means you need a bit more moisture. Try adding a teaspoon of milk. This matters because small fixes build your confidence. Getting the texture right makes the flavor perfect.
Which of these problems have you run into before?
Your Cookie Questions Answered
Q: Can I make these gluten-free? A: Yes! Use a gluten-free flour blend. I find the cup-for-cup kinds work best.
Q: How far ahead can I make the dough? A: You can make it up to three days ahead. Just keep it wrapped in the fridge.
Q: What can I use instead of shortening? A: You can use all butter. The texture will be a little different but still good.
Q: Can I double this recipe? A: Absolutely! It doubles very well. Just use a bigger bowl.
Q: Any fun add-in ideas? A: A little lemon zest is lovely. Fun fact: My grandkids love it when I add a drop of food coloring to the dough!
Which tip will you try first?
Bake Some Sweet Memories
I hope you love baking these cookies. They always fill the kitchen with a wonderful smell. It is a simple joy to share with family.
I would be so happy to see your creations. Please share a picture of your beautiful cookies. It makes my day to see your baking adventures.
Have you tried this recipe? Tag us on Pinterest!
Happy cooking!
—Anna Whitmore.

No Spread Sugar Cookies: Creamy, dreamy, cheesy perfection.
Description
Bake perfect No Spread Sugar Cookies every time! This easy recipe creates thick, soft, and beautifully decorated cookies that hold their shape. Ideal for cookie cutters and holiday baking.
Ingredients
Instructions
- In a large mixing bowl add the cake flour, all-purpose flour, baking powder, and cream of tartar. Whisk together then set aside.
- In a large mixing bowl add the sugar, butter, and shortening. Use a hand mixer to beat together until light and fluffy. Add vanilla extract, almond extract, and the whole egg. Beat together until combined. Add egg white and continue beating until well combined. Turn off the mixer and use a rubber spatula to scrape the sides of the mixing bowl.
- Turn the hand mixer on low and gradually add dry ingredients to wet ingredients. Mix until no flour pockets remain. Cover the mixing bowl with saran wrap and place in the refrigerator overnight.
- Preheat the oven to 375 degrees and line 2 baking sheets with parchment paper. Set aside.
- Remove cookie dough from the refrigerator and use a cookie scoop to create balls of dough (about the size of 2-3 tbsp depending on how large you want your cookies). Place the balls of dough on the cookie sheet and use the bottom of a cup to flatten into a ½ inch thick round cookie.NOTE: An alternative method would be to roll the dough out on a flat surface to about ½ inch thick, and then use a round cookie cutter to cut out the circles. Place 6 cookies on one baking sheet, and 6 on another.
- Place one cookie sheet in the oven and cook for 10-12 minutes. You want the edges to be firm without turning brown. Remove the baking sheet from the oven and immediately sprinkle sugar on the tops of the cookies. Let the cookies cool for 2-3 minutes on the baking sheet. Place the other baking sheet in the oven and cook for 8 minutes.
- Repeat sugar and cooling steps for the second baking sheet.
- Serve and enjoy!
Notes
- For perfectly shaped cookies that don’t spread, chilling the dough overnight is crucial.


Leave a Reply