
My First Icebox Cake
My grandma taught me this recipe. She made it for every summer picnic. I still laugh at that.
We had no fancy mixers back then. We used a big bowl and a whisk. Our arms would get so tired from whipping the cream. But the result was always magical.
Why This No-Bake Trick Works
You do not even need to turn on the oven. The secret is waiting. The cookies get soft from the cream.
They turn cake-like in the fridge overnight. This matters because anyone can make it. You do not have to be a baking expert. What is your favorite no-bake dessert?
Let’s Build Our Cake
First, make your cream sweet and fluffy. Doesn’t that smell amazing? Then, stir the cream cheese until it is perfectly smooth.
Now for the fun part. We build our cake layer by layer. You place the cookies and spread the cream. It is like building a delicious tower. Do you like to build things with your food?
The Hardest Part
You must wait for it to chill. I know, it is so hard. But this wait matters a lot.
It lets all the flavors become friends. The cookies become soft and perfect. *Fun fact: This kind of cake is called an “icebox” cake because old refrigerators were called iceboxes.*
Time to Share
When you slice it, you will see beautiful layers. Everyone will be so impressed. It looks like you worked for days.
This cake is best shared with people you love. That is the real secret ingredient. What special treat does your family ask you to make?
Ingredients:
| Ingredient | Amount | Notes |
|---|---|---|
| Heavy whipping cream | 4 cups | |
| Powdered sugar | 1/2 cup | |
| Vanilla | 2 teaspoons | |
| Cream cheese | 2 (8-ounce) packages | softened |
| Oreo Thins cookies | 4 (10.1-ounce) packages |
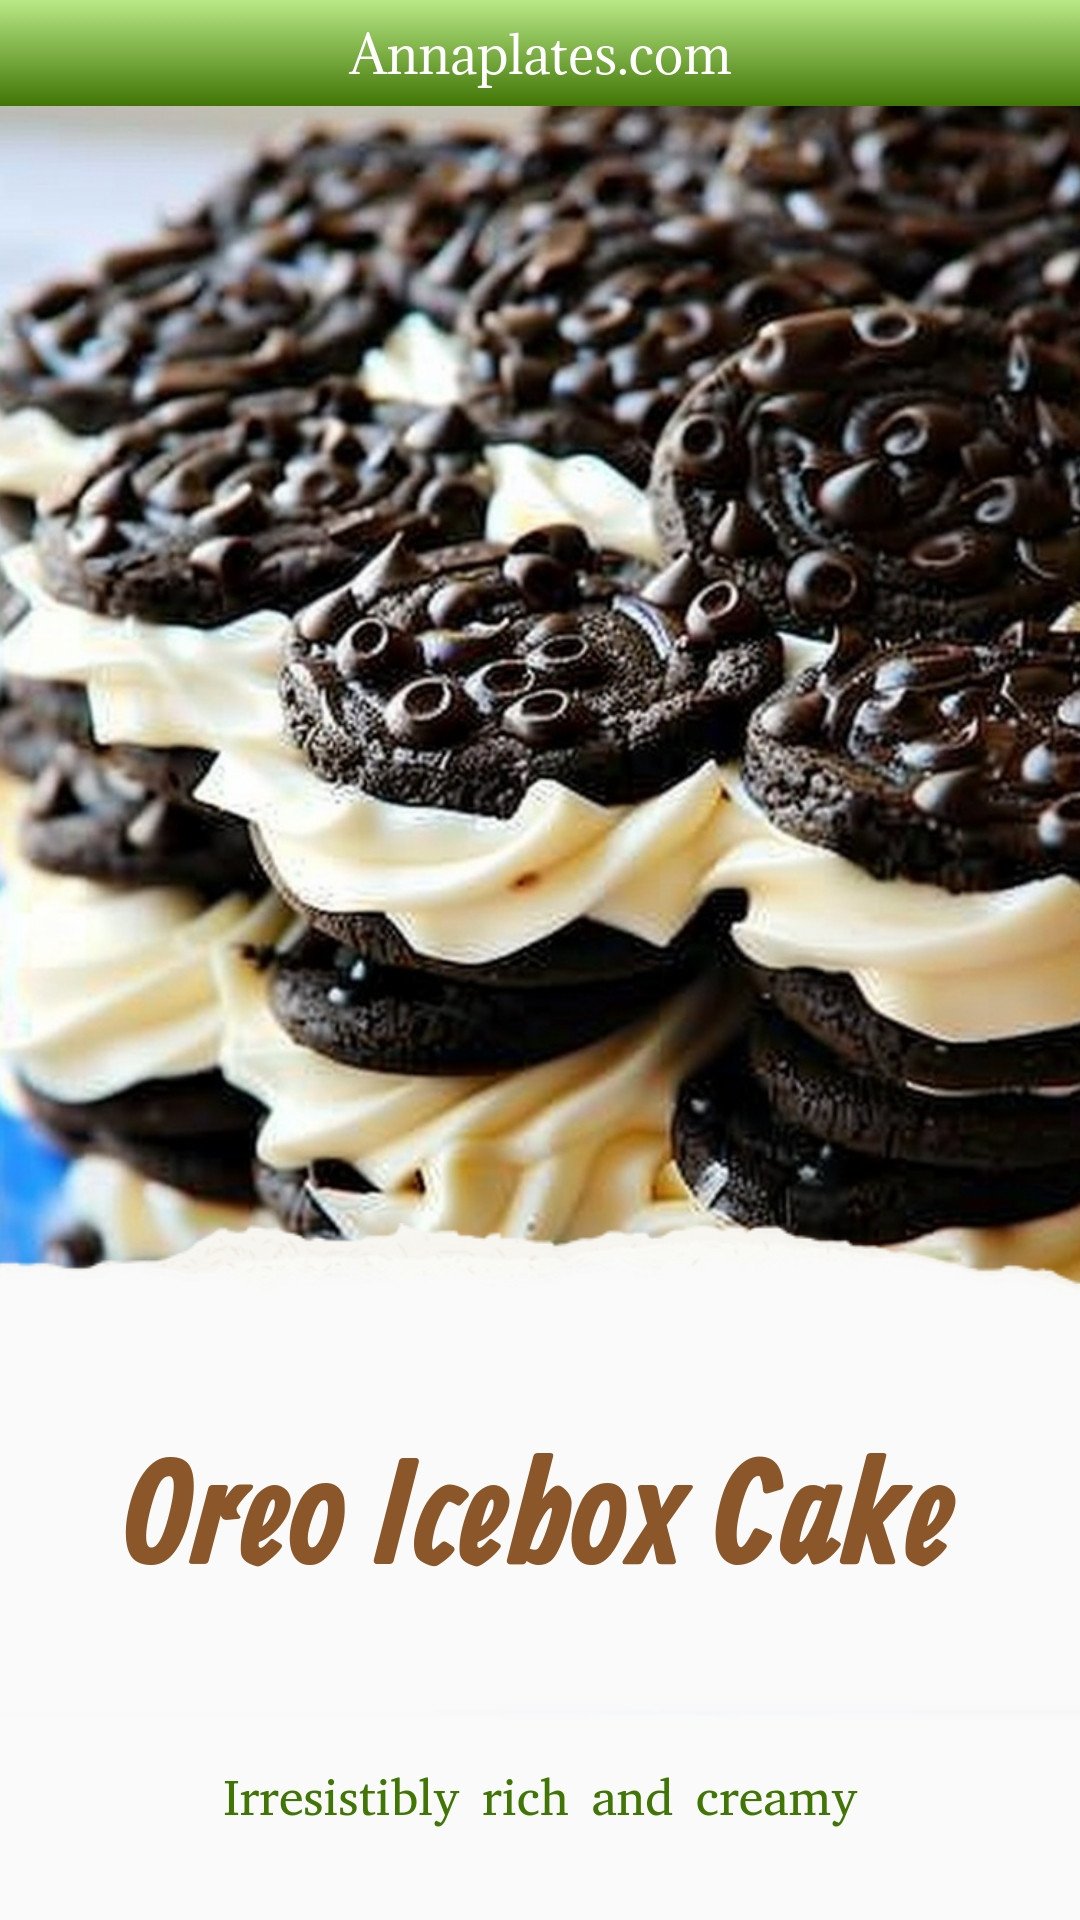
My No-Bake Oreo Icebox Cake
Hello, my dear! Let’s make a cake that doesn’t need an oven. This is my Oreo Icebox Cake. It is magically creamy and rich. I first made this for my grandson’s birthday. He still asks for it every summer.
The secret is letting time do the work. It sits in your fridge overnight. The cookies get soft like cake layers. It always feels like a special treat. Doesn’t that sound wonderful?
Step 1: Let’s make the fluffy cream. Pour the heavy whipping cream into a big bowl. Whip it until it forms soft, pretty peaks. Then, add the powdered sugar and vanilla. Mix it all together until it’s sweet and smooth.
Step 2: Now for the cream cheese. Make sure it is very soft. Stir it in a small bowl until it’s smooth. (A hard-learned tip: if you warm it in the microwave, let it cool completely!). Slowly add it to your whipped cream. Mix it gently until everything is combined.
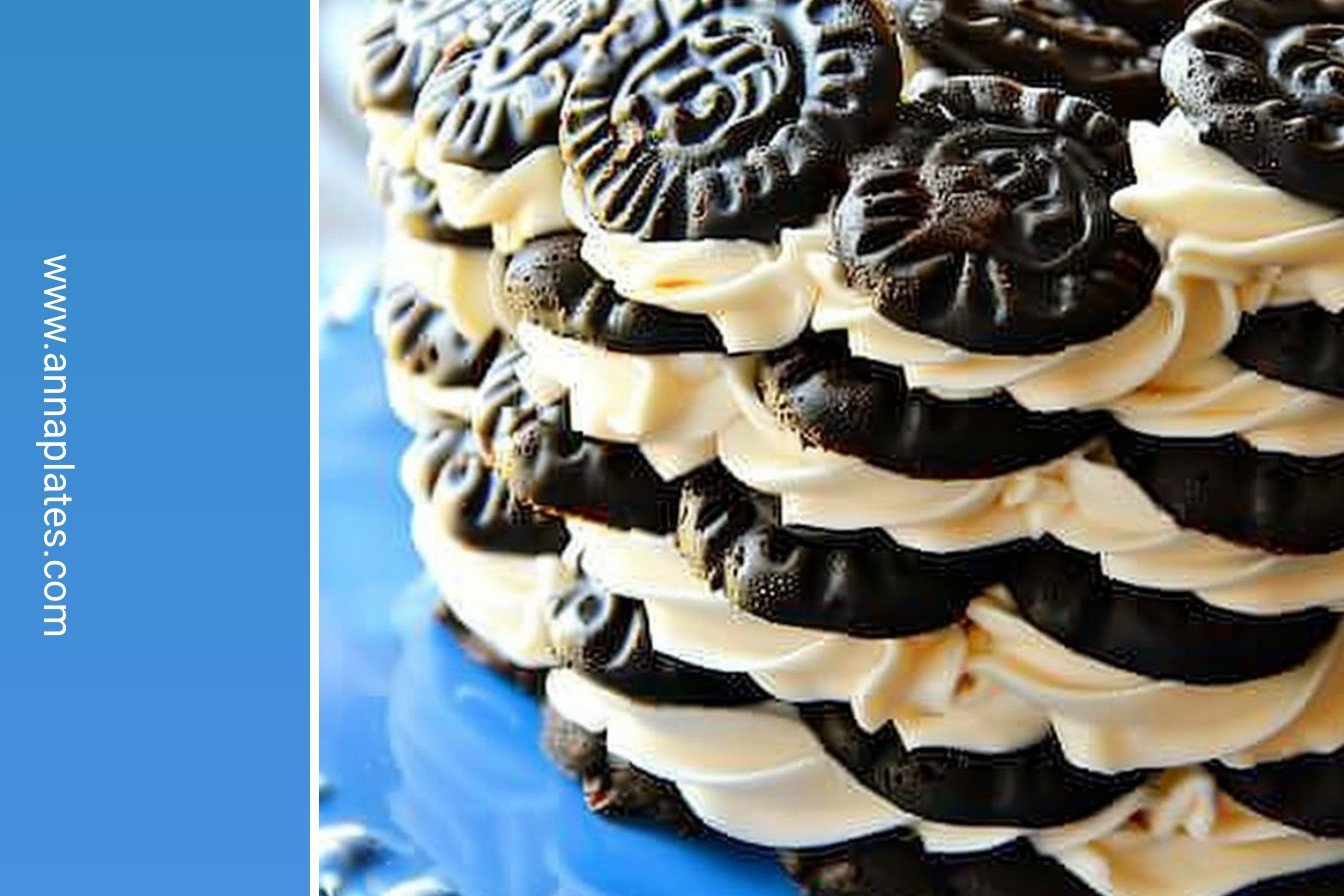
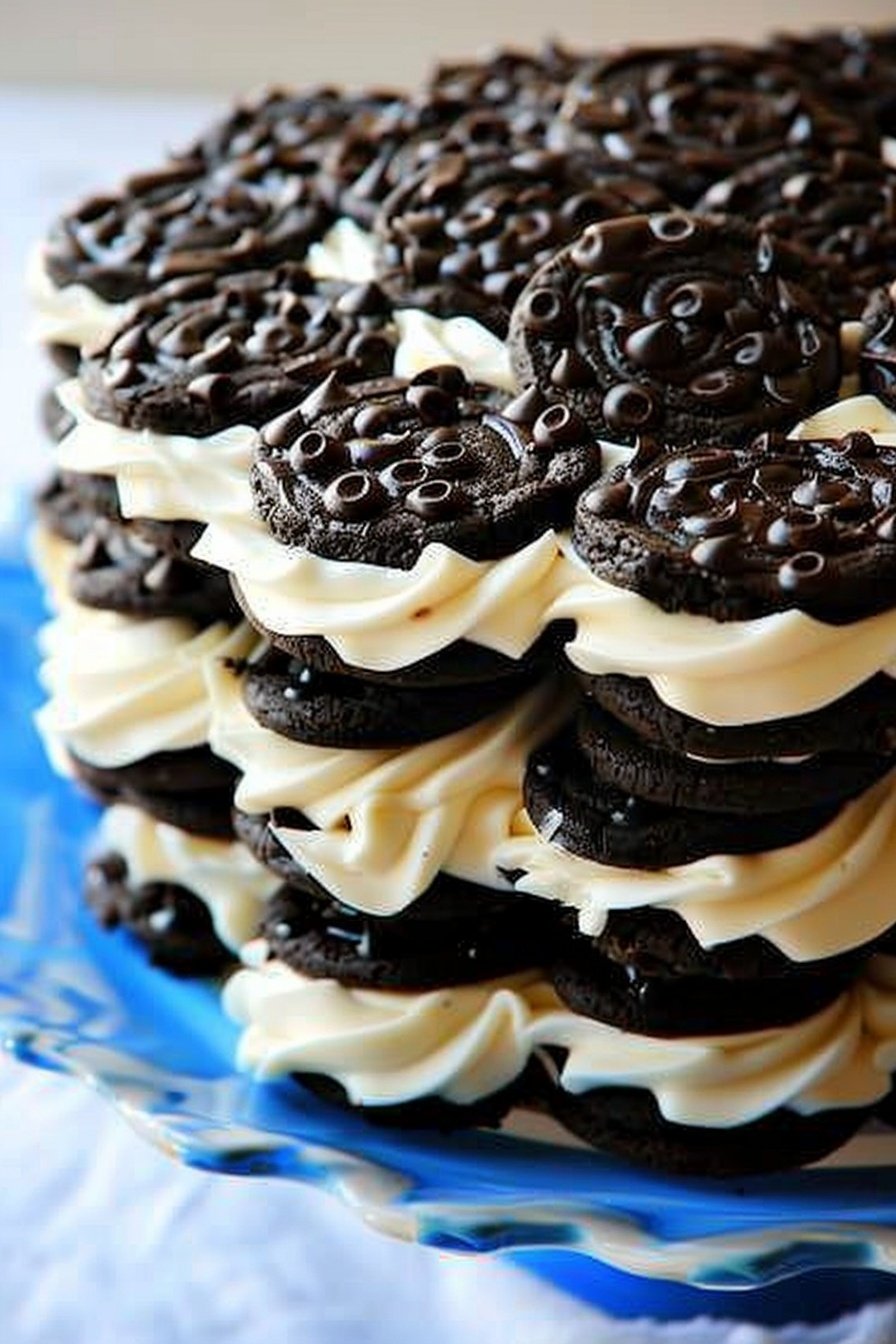
Step 3: Time to build our cake! On a plate, make a circle with 9 cookies. Put 3 more in the middle. This part is fun, like a puzzle. Lift each cookie and put a tiny bit of cream underneath. This little glue keeps everything in place.
Step 4: Spread about half a cup of cream over the cookie layer. Let the cookie edges peek out. Then, add another layer of cookies. Don’t stack them right on top. Stagger them, like bricks in a wall. This makes the cake stronger. I still laugh at the time I didn’t stagger them.
Step 5: Keep going with the layers. You will use all the cookies and cream. Finally, cover the cake gently with plastic wrap. The hardest part is next. You must wait! Chill it for at least four hours. Overnight is even better. What’s the hardest part of waiting for a dessert? Share below!
Cook Time: 4–6 hours (chilling)
Total Time: 4 hours 35 minutes
Yield: 10 servings
Category: Dessert, No-Bake
Three Fun Twists to Try
This cake is wonderful as it is. But you can also dress it up. Here are a few of my favorite ideas. They are all so simple and fun.
Mint Chocolate Chip: Use mint Oreos. Add a few drops of peppermint extract to the cream. It tastes so fresh and cool.
Peanut Butter Cup: Spread a little peanut butter on each cookie before layering. It adds a yummy, nutty surprise in every bite.
Summer Berry: Add a layer of sliced strawberries or raspberries between the cookies. The fruity taste is just perfect for a picnic.
Which one would you try first? Comment below!
Serving Your Masterpiece
When it’s time to serve, use a sharp knife. Slice it just like a real cake. The layers will look so beautiful. I love to see everyone’s faces when I bring it out.
For a fancy touch, add some extra crushed Oreos on top. A few fresh raspberries look lovely, too. It makes the whole plate look special. Doesn’t that smell amazing?
This rich cake pairs nicely with a cold glass of milk. For the grown-ups, a little cup of cold coffee is wonderful. It cuts through the sweetness perfectly. Which would you choose tonight?

Keeping Your Icebox Cake Happy
This cake must live in the fridge. Cover it well with plastic wrap. This keeps it creamy and fresh for up to four days.
You can also freeze it for a sweet surprise later. Wrap the whole cake tightly. It will keep for about two months in the freezer.
I once forgot to cover a slice. It dried out and made me sad. Now I always press that wrap right to the cream.
Storing food well saves money and time. You get to enjoy your hard work later. It is a simple act of kindness for your future self.
Have you ever tried storing it this way? Share below!
Easy Fixes for Common Cake Troubles
Is your cream cheese lumpy? Make sure it is very soft first. I remember when my grandson used cold cream cheese. We had to stir for a very long time.
Are your cookie layers sliding? Always put a dab of cream under each one. This acts like a tasty glue for your cake.
Is the cream not getting fluffy? Your bowl and beaters must be completely clean and dry. Even a little grease can stop the cream from whipping.
Fixing small problems builds your cooking confidence. You learn that mistakes are just lessons. Getting the layers right also makes every bite taste perfect.
Which of these problems have you run into before?
Your Icebox Cake Questions, Answered
Q: Can I make this gluten-free?
A: Yes! Just use your favorite gluten-free chocolate sandwich cookies. The recipe works exactly the same way.
Q: How far ahead can I make it?
A: You should make it the day before you serve it. It needs that long in the fridge to get soft and cake-like.
Q: Can I use a different cookie?
A: You can try golden oreos or mint ones. Fun fact: This no-bake cake was popular during the Great Depression.
Q: Can I make a smaller version?
A: Of course. Just use one package of cookies. Then use half of the cream mixture for your layers.
Q: Any extra tips for success?
A: Be patient. Letting it chill overnight is the real secret. It turns cookies and cream into magic.
Which tip will you try first?
A Sweet Note From My Kitchen
I hope you love making this simple cake. It always reminds me of summer nights with my family. The best recipes are the ones we share.
I would love to see your creation. Your cake might be even prettier than mine. Have you tried this recipe? Tag us on Pinterest!
Happy cooking!
—Anna Whitmore.
Oreo Icebox Cake: Irresistibly rich and creamy
Description
No-bake Oreo Icebox Cake! Layers of cookies & creamy filling set overnight for an easy, crowd-pleasing dessert. Perfect for hot summer days.
Ingredients
Instructions
- In a large bowl, whip the heavy cream until soft peaks form. Add the powdered sugar and vanilla and mix well to combine.
- In a small bowl, stir the softened cream cheese until smooth. The cream cheese can be softened in the microwave, but allow it to cool completely before adding it to the whipped cream. Gradually add the softened cream cheese to the whipped cream and mix well to combine.
- On a cake plate, arrange 12 cookies in a layer with 9 in the outer circle and 3 in the middle. Once arranged, lift each cookie and add a little whipped cream to the bottom then stick it back to the plate. Repeat until all the cookies have been secured. Top with 1/2 to 3/4 cup of the whipped cream spread to the edges but allowing the edges of the cookies to be exposed. Add another layer of cookies on top of the whipped cream being sure to stagger the cookies on top of the ones below – don’t stack them right on top of one another. Repeat the layers until all the cookies have been used.
- Gently cover and chill in the refrigerator for at least 4 hours, but preferably overnight. Slice and serve as you would any other cake. Keep chilled.
Notes
- No-bake Oreo Icebox Cake! Layers of cookies & creamy filling set overnight for an easy, crowd-pleasing dessert. Perfect for hot summer days.


Leave a Reply