

The Secret to a Happy Cheesecake
We must keep our cheesecake calm. Too much fussing makes it crack. That is why we use a water bath.
I know it seems like a funny step. Wrapping the pan in foil feels like a craft project. But that warm water helps it bake gently. I still laugh at the first time I tried it. I felt like a scientist in my kitchen.
A Crust with a Little Spice
Gingersnaps make the best crust. They have a little kick all their own. Mixing the crumbs with butter is my favorite part.
You get to use your hands. Press the mixture into the pan firmly. This matters because a good crust holds everything together. It is the strong foundation for our creamy dream.
Mixing with a Gentle Hand
Now for the creamy filling. Blend the cream cheese and sugar just until smooth. We do not want to whip in too much air.
Too much air makes the cheesecake puff up. Then it falls and cracks. So we fold in the eggs with a spoon at the end. This gentle touch keeps it happy. What is your favorite part of mixing? I love watching the color change.
The Long, Patient Wait
The baking is done, but we are not. The cheesecake must rest in the turned-off oven. This is the hardest part for me. I just want to peek!
Then it rests on the counter. Then it chills in the fridge. This slow cooling matters. It helps the cheesecake relax and settle. Rushing it can cause a big crack right down the middle.
Why We Make This
This cheesecake is more than a dessert. It is a hug on a plate. The pumpkin and spice taste like a cozy autumn day.
Making it for someone shows you care. You took your time. You followed all the steps just for them. Fun fact: The water bath method is called a bain-marie. It has been used for centuries. Does your family have a special dessert that says I love you?
Your Turn in the Kitchen
I hope you try this recipe. Do not be scared of the steps. They are all there to help you.
Tell me, what song do you like to listen to while you bake? I always hum an old tune. And what is your favorite spice? Mine will always be cinnamon. Share your stories with me.
Ingredients:
| Ingredient | Amount | Notes |
|---|---|---|
| Gingersnap cookies | 32 whole | finely crushed into crumbs |
| Sugar | 1 ¾ cups | divided |
| Unsalted butter | ½ cup | |
| Butter | ¼ cup | |
| Cream cheese | 24 ounces | softened |
| Canned pumpkin puree | 15 ounces | |
| All-purpose flour | ¼ cup | |
| Cornstarch | 1 tbsp | |
| Pumpkin pie spice | 1 tbsp | |
| Eggs | 4 large | lightly beaten |
| Heavy cream | ½ cup | |
| Vanilla extract | 1 tsp |
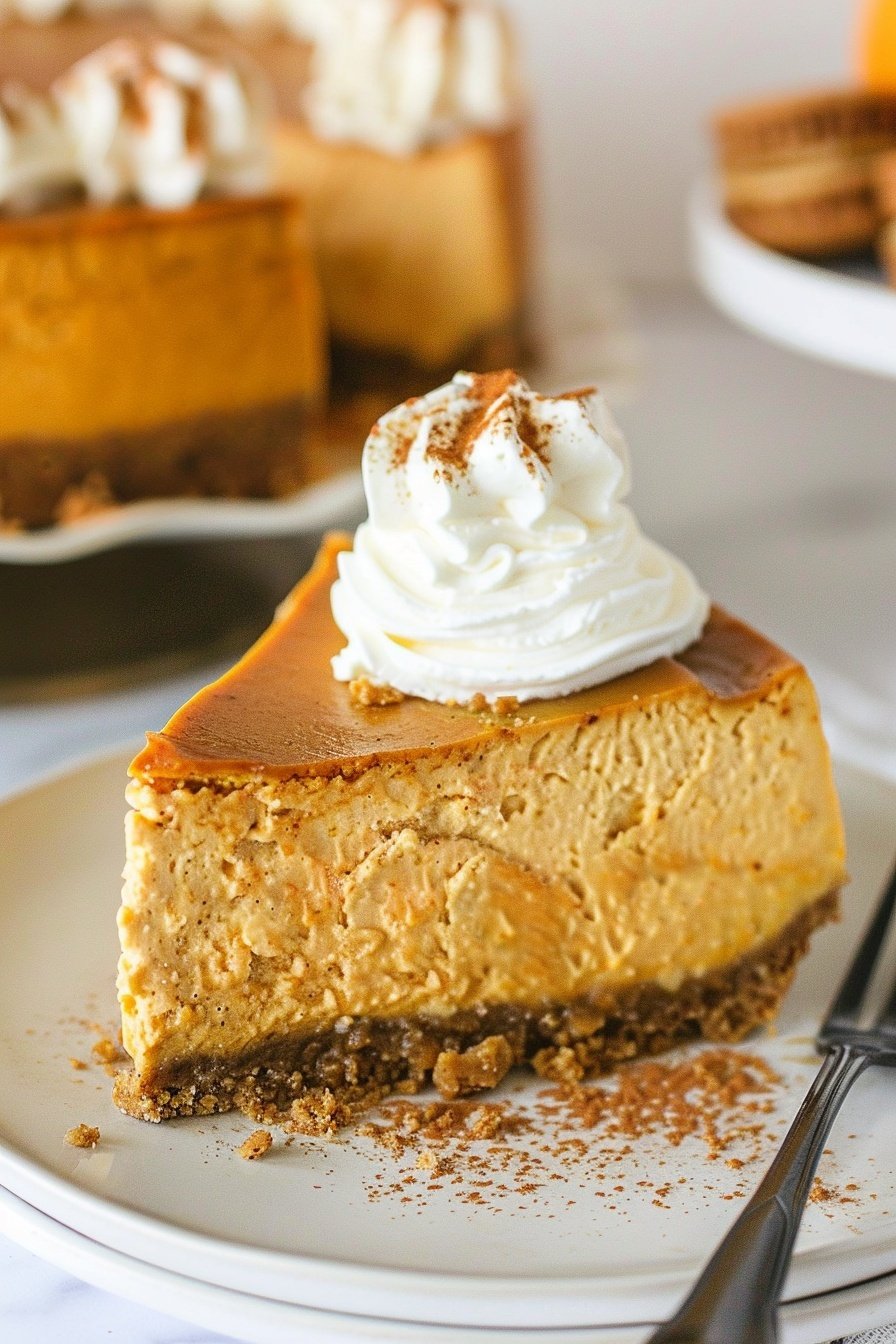
A Cheesecake That Tastes Like a Cozy Sweater
This cheesecake always reminds me of crisp autumn days. The leaves are turning gold outside my window. Inside, the smell of pumpkin and spice fills my kitchen. It feels like wearing a favorite cozy sweater. I love making this for my family on a cool weekend.
It might look fancy, but it’s really quite simple. We just need to take our time. The secret is a water bath. It keeps our cheesecake creamy and prevents cracks. (My first one looked like a little island! I still laugh at that). Let’s get started.
- Step 1: First, get your oven ready at 325 degrees. Now, we must protect our cheesecake. Wrap the outside of your springform pan with two layers of foil. This keeps the water bath from sneaking in. Fill a big roasting pan halfway with water.
- Step 2: Let’s make the crust. Crush those gingersnap cookies until they are fine crumbs. I use a rolling pin. It’s a great way to get out any little frustrations! Mix them with a quarter cup of sugar and the melted butter. Press this into your pan. Go halfway up the sides.
- Step 3: For the filling, beat the cream cheese and butter with the rest of the sugar. Just mix it for about a minute. (Too much air causes cracks, a hard-learned tip!). Blend in the pumpkin, cream, flour, cornstarch, spice, and vanilla. Doesn’t that smell amazing?
- Step 4: Here is the gentle part. Use a wooden spoon to fold in the eggs. Stir until you see no more yellow streaks. Be patient and kind to the batter. Then pour it into your waiting crust. Carefully place the pan into the water bath.
- Step 5: Bake it for one hour. Then, turn the oven off. Do not open the door! Let the cheesecake sit inside for another 30 minutes. This slow cooling is so important. It keeps our beautiful dessert smooth and happy.
- Step 6: After it rests, run a knife around the edge. This helps it let go of the pan as it cools. Let it sit for a whole hour more. Then, it’s time for the fridge to chill completely. What’s your favorite season for baking? Share below!
Cook Time: 1 hour 30 minutes
Total Time: 2 hours 15 minutes
Yield: 12 servings
Category: Dessert
Let’s Shake Things Up!
This recipe is wonderful as it is. But sometimes, a little change is fun. Here are a few ideas to make it your own. I love hearing what you creative cooks come up with.
- Chocolate Swirl: Melt some chocolate chips. Swirl it into the batter with a knife before baking.
- Nutty Topping: Sprinkle chopped pecans or walnuts on top right after it comes out of the oven.
- Maple Dream: Use real maple syrup instead of some of the sugar. It adds a lovely, deep flavor.
Which one would you try first? Comment below!
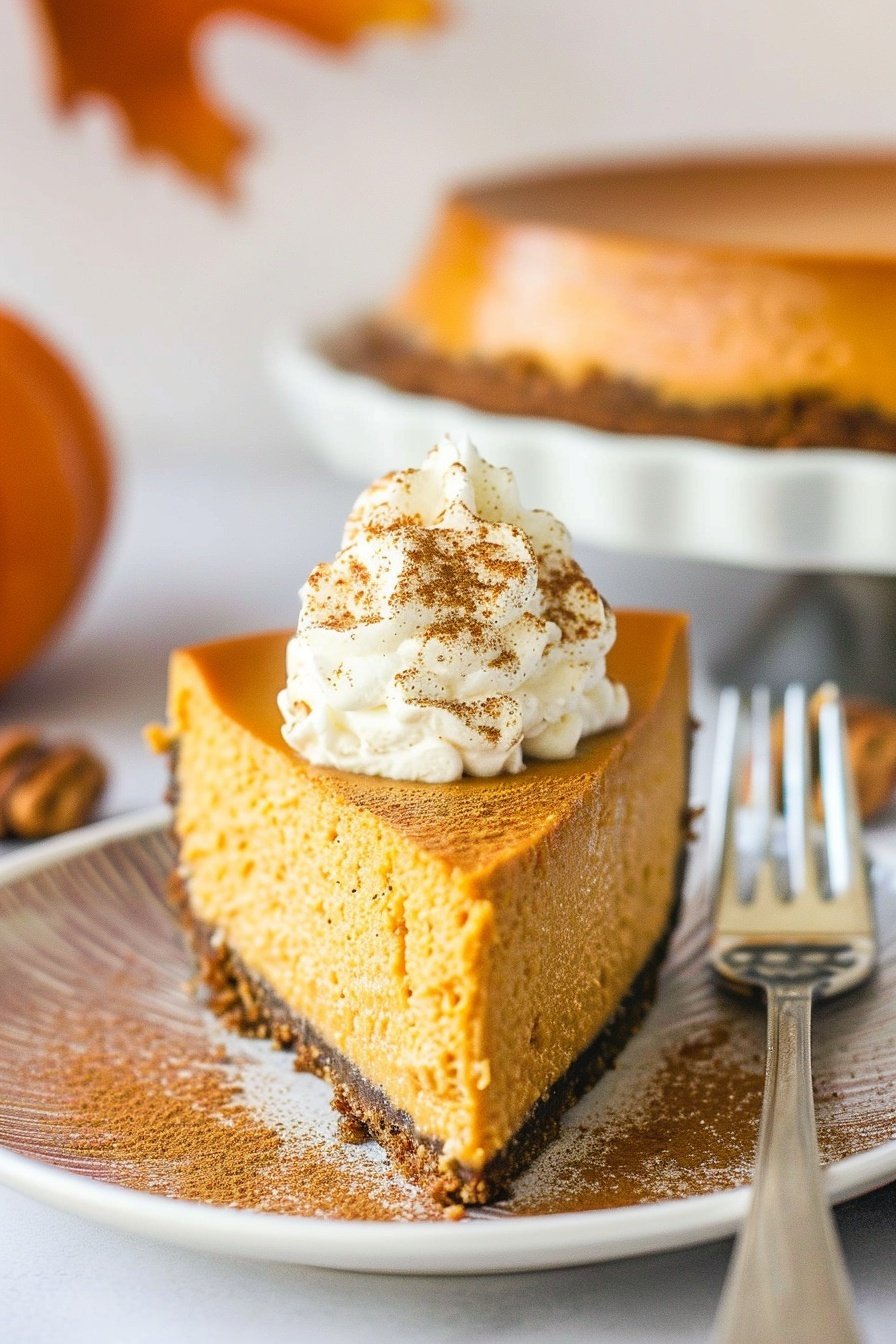
The Perfect Final Touch
Now, how should we serve this masterpiece? A plain slice is just perfect. But a little extra touch makes it a celebration. I like a simple dollop of whipped cream. A sprinkle of cinnamon on top looks so pretty.
For a drink, a hot cup of coffee is my go-to. The bitterness pairs so nicely with the sweet, spiced cake. For a special treat, a glass of sweet dessert wine is lovely. For the kids, a cold glass of milk is always the best choice.
Which would you choose tonight?
Keeping Your Cheesecake Happy
This cheesecake keeps well in the fridge. Just cover it tightly with plastic wrap. It will stay delicious for up to five days.
You can also freeze slices for later. Wrap each piece in plastic, then foil. It will be perfect for a whole month.
I once forgot to wrap a slice properly. It tasted like my freezer smelled. That was a sad day for dessert.
Storing food well saves money and time. You always have a sweet treat ready for guests. It makes life a little easier.
Have you ever tried storing it this way? Share below!
Cheesecake Troubles and Easy Fixes
First, a cracked top is a common worry. The water bath keeps it moist and smooth. I remember my first cheesecake cracked badly. I did not use the water bath.
Second, a soggy crust can happen. Make sure your crust is pressed firmly. Let it cool before adding the filling.
Third, do not over-mix the batter. Too much air makes the cheesecake puff and fall. This is why we fold in the eggs gently.
Getting these steps right builds your confidence. A smooth cheesecake also tastes much creamier. It is worth the extra care.
Which of these problems have you run into before?
Your Cheesecake Questions Answered
Q: Can I make this gluten-free?
A: Yes! Use gluten-free gingersnaps and a gluten-free flour blend. It works just as well.
Q: Can I make it ahead of time?
A: Absolutely. Bake it the day before you need it. The flavor gets even better overnight.
Q: What if I don’t have pumpkin pie spice?
A: Mix cinnamon, ginger, nutmeg, and a pinch of cloves. You can make your own blend.
Q: Can I make a smaller version?
A: You can halve the recipe. Use a smaller pan and reduce the baking time.
Q: Any other tips?
A: A dollop of whipped cream on top is lovely. Fun fact: The gingersnap crust was my grandson’s idea!
Which tip will you try first?
A Final Word From My Kitchen
I hope you love making this cheesecake. It fills the house with the coziest smell. Sharing it with family is the best part.
I would be so happy to see your creation. It makes my day to see your kitchen successes.
Have you tried this recipe? Tag us on Pinterest!
Happy cooking!
—Anna Whitmore.
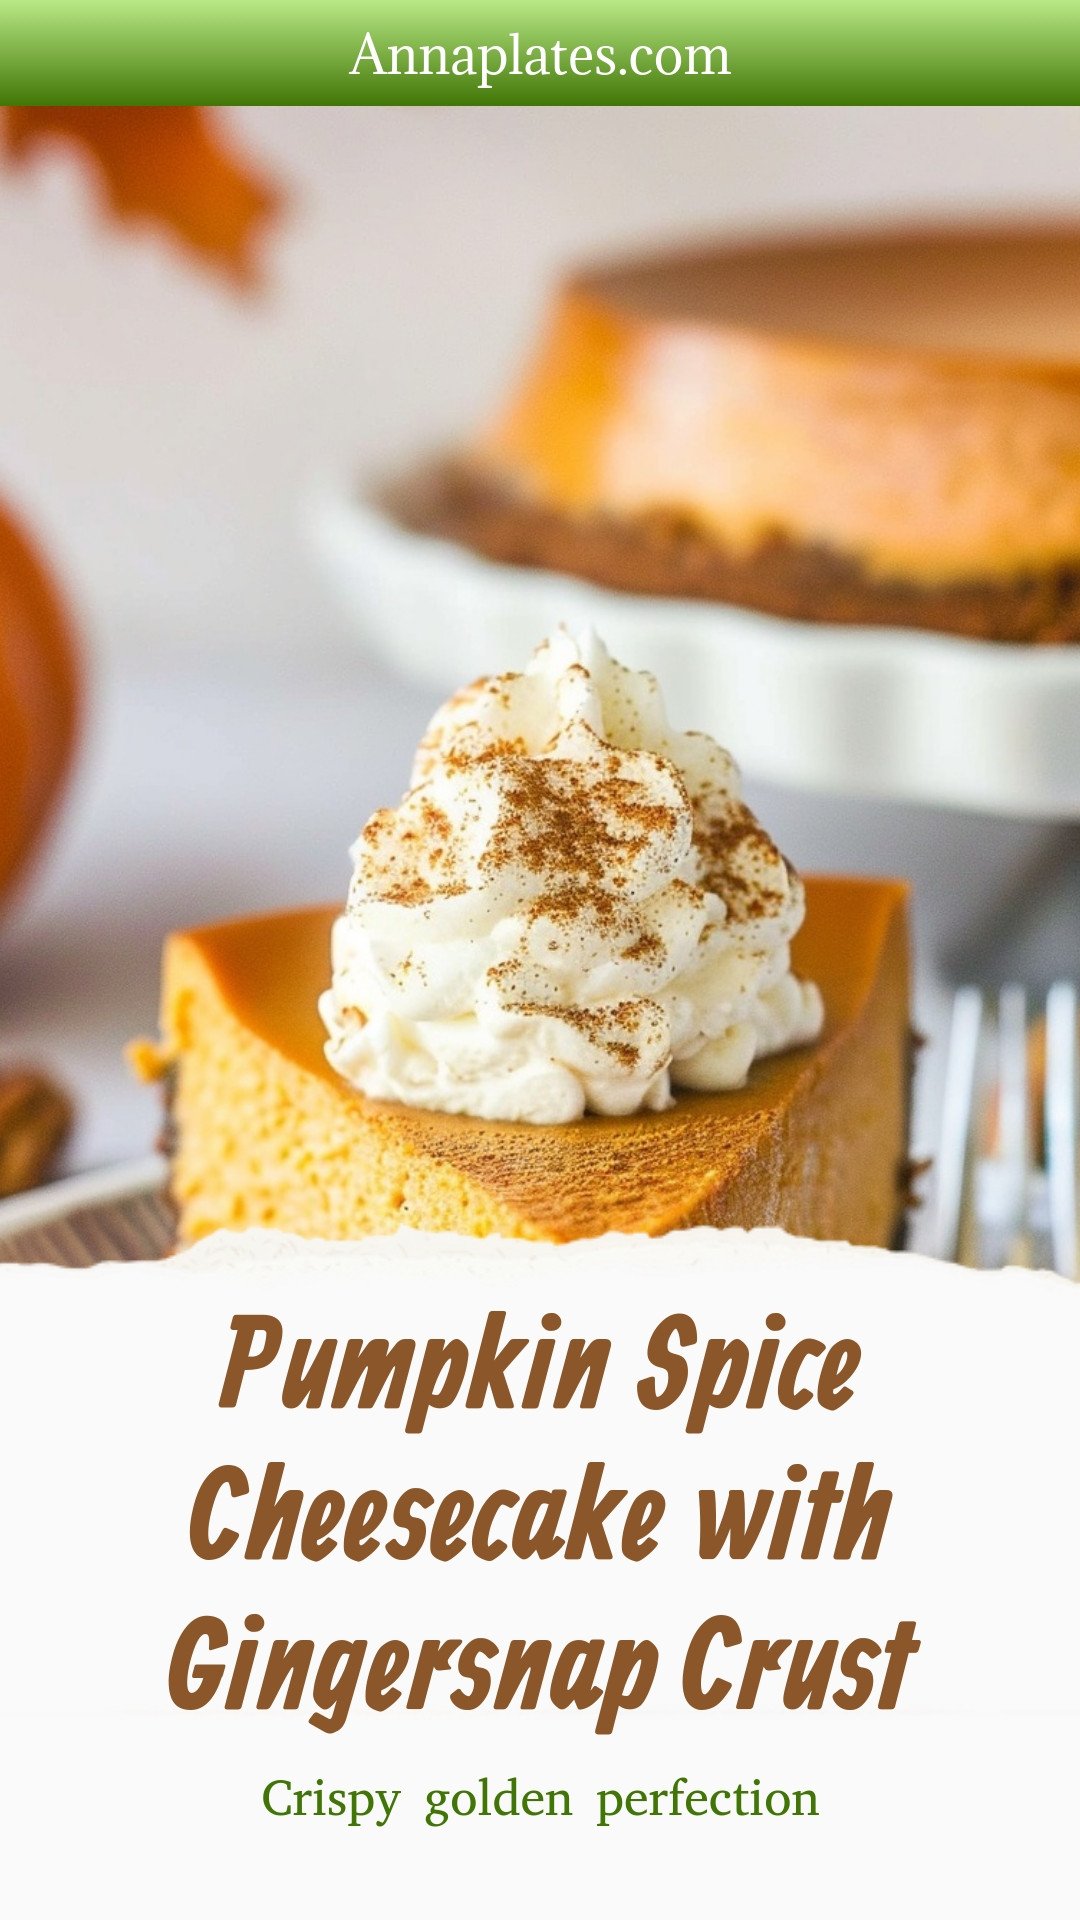
Pumpkin Spice Cheesecake with Gingersnap Crust: Crispy golden perfection
Description
Creamy pumpkin spice cheesecake on a spicy gingersnap crust. The ultimate no-bake fall dessert that’s easy to make and impossibly delicious!
Ingredients
Instructions
- Preheat oven to 325 degrees.
- Using 2 layers of heavy duty aluminum foil, wrap only the outside of a 10 inch springform pan. This will offer an extra layer of protection for the cheesecake in the water bath.
- Fill a 4 ½ to 5 quart roasting pan ½ way with water. A water bath is necessary to provide the moisture a cheesecakes to keep from cracking.
- Lightly spray the springform pan with nonstick spray.
- In a small bowl, combine the gingersnap cookie crumbs, ¼ cup sugar, and ¼ cup melted butter.
- Press the cookie crumb mixture into the bottom and half way up the sides of the springform pan. Set aside.
- In a medium sized mixing bowl or using a stand mixer combine the softened cream cheese, softened butter, and remaining sugar. Mix for 1 to 1 ½ minutes only. Too much air will also cause the cheesecake to crack.
- Blend in the canned pumpkin puree, heavy cream, flour, cornstarch, pumpkin pie spice, and vanilla. Mix just until well blended.
- Using a wooden spoon, not the mixer, carefully fold in the slightly beaten eggs just until there is no yellow visible. Again, creating too much air in the batter will cause cracking.
- Carefully pour the batter into the prepared springform pan. Then carefully place the springform pan into the water bath/roasting pan.
- Place the roasting pan/cheesecake onto the center baking rack.
- Bake cheesecake for 1 hour.
- After baking, turn the oven off and do not open or remove the cheesecake from the oven. Allow the cheesecake to remain in the oven and finish baking for another 30 minutes.
- Remove the cheesecake from the oven. Discard the water from the roasting pan.
- Allow the cheesecake to rest for 5 to 10 minutes. Using a sharp knife, run the blade carefully along the edge of the springform pan to help ensure the sides of the cheesecake do not stick to walls of the springform pan. Do not loosen the sides of the pan.
- Let the cheesecake rest in the springform pan for a further 1 hour. This helps encourage the cheesecake to relax while cooling without cracking.
- Place the cheesecake in the refrigerator to chill completely before serving.
Notes
- For best results, ensure all ingredients are at room temperature before starting. This helps create a smooth, lump-free batter and prevents overmixing.


Leave a Reply