
A Sweet Little Secret
Hello, my dear. Come sit at the kitchen table. I want to tell you a story. My grandson Sam loves pecan pie. But making a whole pie is a big job. So, we made a little secret instead. We made the whole pie into a bite-sized treat. I still laugh at that. He ate three before I even finished cleaning up!
These truffles are that secret. They have all the cozy flavors of pie. You get the nutty crunch and the sweet, gooey filling. But no fork is needed. This matters because joy should be easy to grab. Don’t you think? What’s your favorite pie to eat with your hands?
Why Messy Hands Are Good
The best part is mixing with your hands. You will get sticky. That is the point! Feel the butter and syrup come together with the crumbs. It is a wonderful, squishy feeling. Doesn’t that smell amazing? Like a hug in a bowl.
Getting your hands dirty connects you to your food. This matters. It reminds us that good things take a little touch of love. It is not just about following steps. It is about feeling the dough become one. Do you like getting your hands messy when you bake?
The Magic of Chilling
Now, we must wait. Pop the bowl in the fridge. Waiting is hard, I know. But it is magic time. The cold makes our sticky mix behave. It turns from goo into something you can roll. Patience makes better treats.
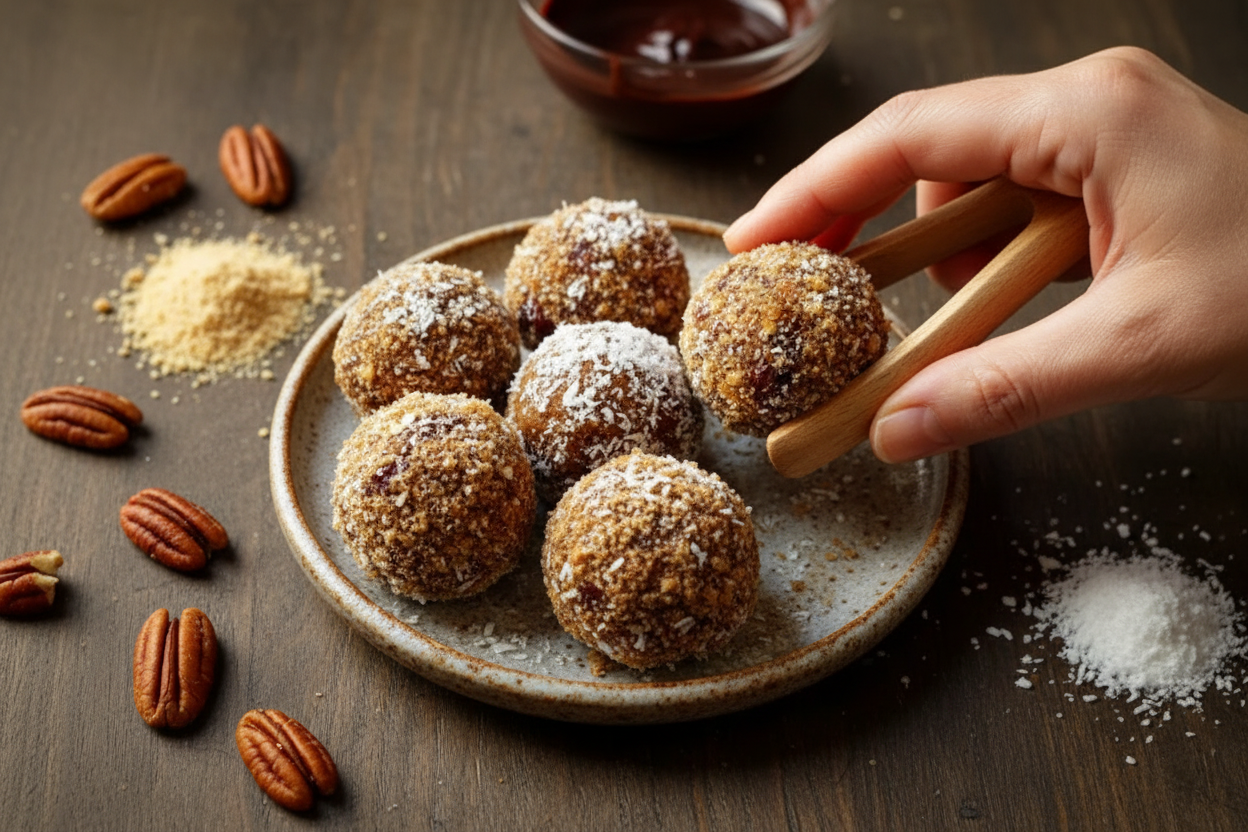
Fun fact: The graham cracker crumbs are our trick. They give that flaky pie crust taste without any rolling pin. Isn’t that clever? After thirty minutes, scoop and roll. Make little balls. They don’t have to be perfect. Homemade never is, and that’s what makes it special.
A Shiny Chocolate Coat
Time for the fancy part. Melting chocolate. Be gentle with it. Use low heat. Stir often. If you rush, the chocolate can get grumpy and clumpy. A tiny bit of coconut oil helps it stay shiny and smooth.
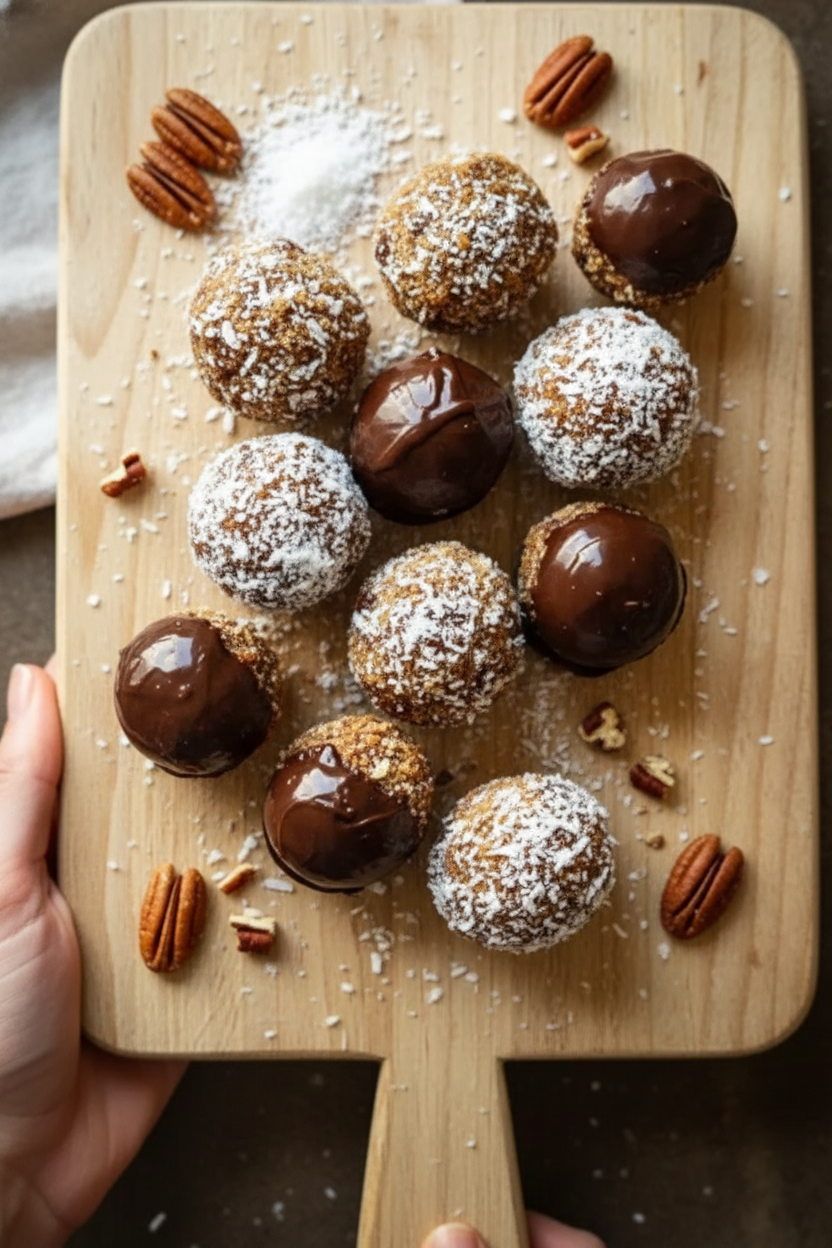
Now, dip! Use a fork to lift each truffle out. Let the extra chocolate drip back. It’s like giving each one a little raincoat. This keeps them from being too messy to eat. Do you prefer milk, dark, or white chocolate for dipping?
Sharing the Sweetness
Last step is the hardest. Wait again for the chocolate to set. Then, you are done. Put them on a pretty plate. Share them with someone you love. Food tastes better when shared, I always say.
Making these is about more than a recipe. It is about making big, complicated feelings small and sweet. A whole pie of happiness in one bite. That is a good lesson, don’t you think? Now, tell me, who will you share your first batch with?
Ingredients:
| Ingredient | Amount | Notes |
|---|---|---|
| Pecans, finely chopped | 1 cup | |
| Graham cracker crumbs | 1 cup | |
| Powdered sugar | 1⁄2 cup | |
| Dark corn syrup | 1⁄2 cup | |
| Unsalted butter, softened | 4 tablespoons | |
| Vanilla extract | 1 teaspoon | |
| Salt | 1⁄2 teaspoon | |
| Semisweet chocolate, chopped | 8 ounces | For coating |
| Coconut oil | 1 tablespoon | Optional, for dipping |
My Pecan Pie Truffles: A Bite of Sweet Memory
Hello, my dear. Come sit at the counter. I want to tell you about these little bites. They taste just like pecan pie, but no fork is needed. My grandson invented them one rainy afternoon. We were craving pie but didn’t want to bake a whole one. Doesn’t that smell amazing? It’s the butter and toasted pecans. It reminds me of my own grandma’s kitchen. Let’s make some magic together.
We’ll start by mixing our dry friends. You’ll need a big bowl. Put in the finely chopped pecans and graham cracker crumbs. Add the powdered sugar and salt. Give it a good stir with a spoon. I still laugh at that. My first time, I forgot the salt. The truffles tasted a bit flat. Now I always add it first. It makes all the flavors sing.
Step 1: Grab your big mixing bowl. Add the pecans, crumbs, sugar, and salt. Mix them until they look like sandy dirt. This is the base of our truffle. It already smells nutty and sweet. I love this part.
Step 2: Now for the sticky glue. Add the soft butter, corn syrup, and vanilla. Time to use your hands. Squish it all together until it forms one big ball. It will be very sticky. That’s perfect. (A hard-learned tip: If the butter is too cold, it won’t mix. Let it sit out first!).
Step 3: Pop the bowl in the fridge. Let it chill for 30 minutes. This makes the dough easier to handle. Wash your hands while you wait. Then, line a tray with parchment paper. Ready for the fun part?
Step 4: Scoop a tablespoon of dough. Roll it into a ball between your palms. Make them all the same size. Place each one on your tray. If the dough gets too sticky, just wash your hands. Cold water works wonders. Do you think these look like little cookie dough balls? Share below!
Step 5: Chill the balls again for one hour. They need to be firm. This patience is the hardest part. While they wait, you can clean up. Or just dream of chocolate.
Step 6: Let’s melt the chocolate. Use a microwave or a pot with a bowl on top. Heat the chopped chocolate and coconut oil in short bursts. Stir until it’s silky smooth. Be careful not to overheat it. Burnt chocolate makes me so sad.
Step 7: Time to dress them up. Dip each cold ball into the chocolate. Use a fork to lift it out. Let the extra chocolate drip off. Place it back on the tray. You can sprinkle a tiny pecan piece on top. It looks so pretty.
Step 8: Final chill. Put the tray back in the fridge. Wait 30 minutes for the chocolate to harden. Then, they are ready. The first bite is always the best. It’s like a secret pie, just for you.
Cook Time: 2 hours (mostly chilling)
Total Time: 2 hours 30 minutes
Yield: About 20 truffles
Category: Dessert, Snack
Three Fun Twists to Try
Once you master the basic recipe, you can play. I love adding little changes. It keeps things exciting. Here are three of my favorite ideas. They are all simple and delicious.
Maple Bacon Bit: Use real maple syrup instead of corn syrup. Add a pinch of cinnamon. Roll the finished truffle in tiny bacon bits. Sweet and salty heaven.
Orange Zest Surprise: Add the zest of one orange to the dough. It makes the flavor bright and sunny. Dip them in dark chocolate. A perfect holiday treat.
Chocolate Cookie Crunch: Swap the graham crumbs for chocolate cookie crumbs. Use milk chocolate for dipping. It’s double the chocolate joy. My grandkids beg for this version.
Which one would you try first? Comment below!
Serving Them Up With Style
These truffles are stars on their own. But you can make them extra special. Place them in a little paper cup. It looks so fancy. Or pile them high on a vintage plate. Add a small bowl of whipped cream for dipping. A sprinkle of sea salt on top is also nice.
What to drink? For a cozy night, I love a glass of cold milk. It cuts the sweetness. For the grown-ups, a small glass of bourbon is lovely. It tastes like the holidays. The flavors dance together so well.
Which would you choose tonight?
Keeping Your Truffles Tasty
These truffles keep well in the fridge. Just store them in a sealed container. They will stay fresh for about one week. You can also freeze them for a month. Place them in a single layer first so they don’t stick.
Let frozen truffles thaw in the fridge before serving. I once left a whole batch out overnight. They became too soft and lost their shape. Now I always pop them right in the fridge. Batch cooking these is a wonderful idea.
Making a double batch saves you time later. You will always have a sweet treat ready for guests. This matters because life gets busy. A ready-made joy from your own kitchen is a special gift. Have you ever tried storing it this way? Share below!
Fixing Common Truffle Troubles
Is your mixture too sticky to roll? Your hands might be too warm. I remember when my first batch melted in my hands. Just wash your hands in cold water and dry them. The coolness will help the dough firm up.
Is the chocolate coating too thick? Try adding a bit of coconut oil. This makes the chocolate smoother and easier to dip. Is the coating cracking? Your truffle centers are probably too cold. Let them sit out for five minutes before dipping.
Fixing these small issues builds your cooking confidence. You learn how ingredients behave. Getting a smooth chocolate coat also makes each bite perfect. This matters for both taste and your proud feeling. Which of these problems have you run into before?
Your Truffle Questions, Answered
Q: Can I make these gluten-free? A: Yes! Use gluten-free graham crackers. Crush them into fine crumbs yourself.
Q: How far ahead can I make them? A: You can make them up to three days ahead. Keep them chilled in the fridge.
Q: What can I use instead of corn syrup? A: Maple syrup works well. It adds a lovely, warm flavor.
Q: Can I double the recipe? A: Absolutely. Just use a bigger bowl. Your mixing arm might get a little workout!
Q: Any optional add-ins? A: A tiny pinch of cinnamon is nice. It whispers of a cozy pie spice. Which tip will you try first?
From My Kitchen to Yours
I hope you love making these little bites. They are full of sweet, nutty memories for me. *Fun fact: The pecan is the only major tree nut that grows naturally in North America.*
It has been so nice sharing this recipe with you. I would love to see your creations. Your kitchen stories make my day brighter. Have you tried this recipe? Tag us on Pinterest!
Happy cooking! —Anna Whitmore.
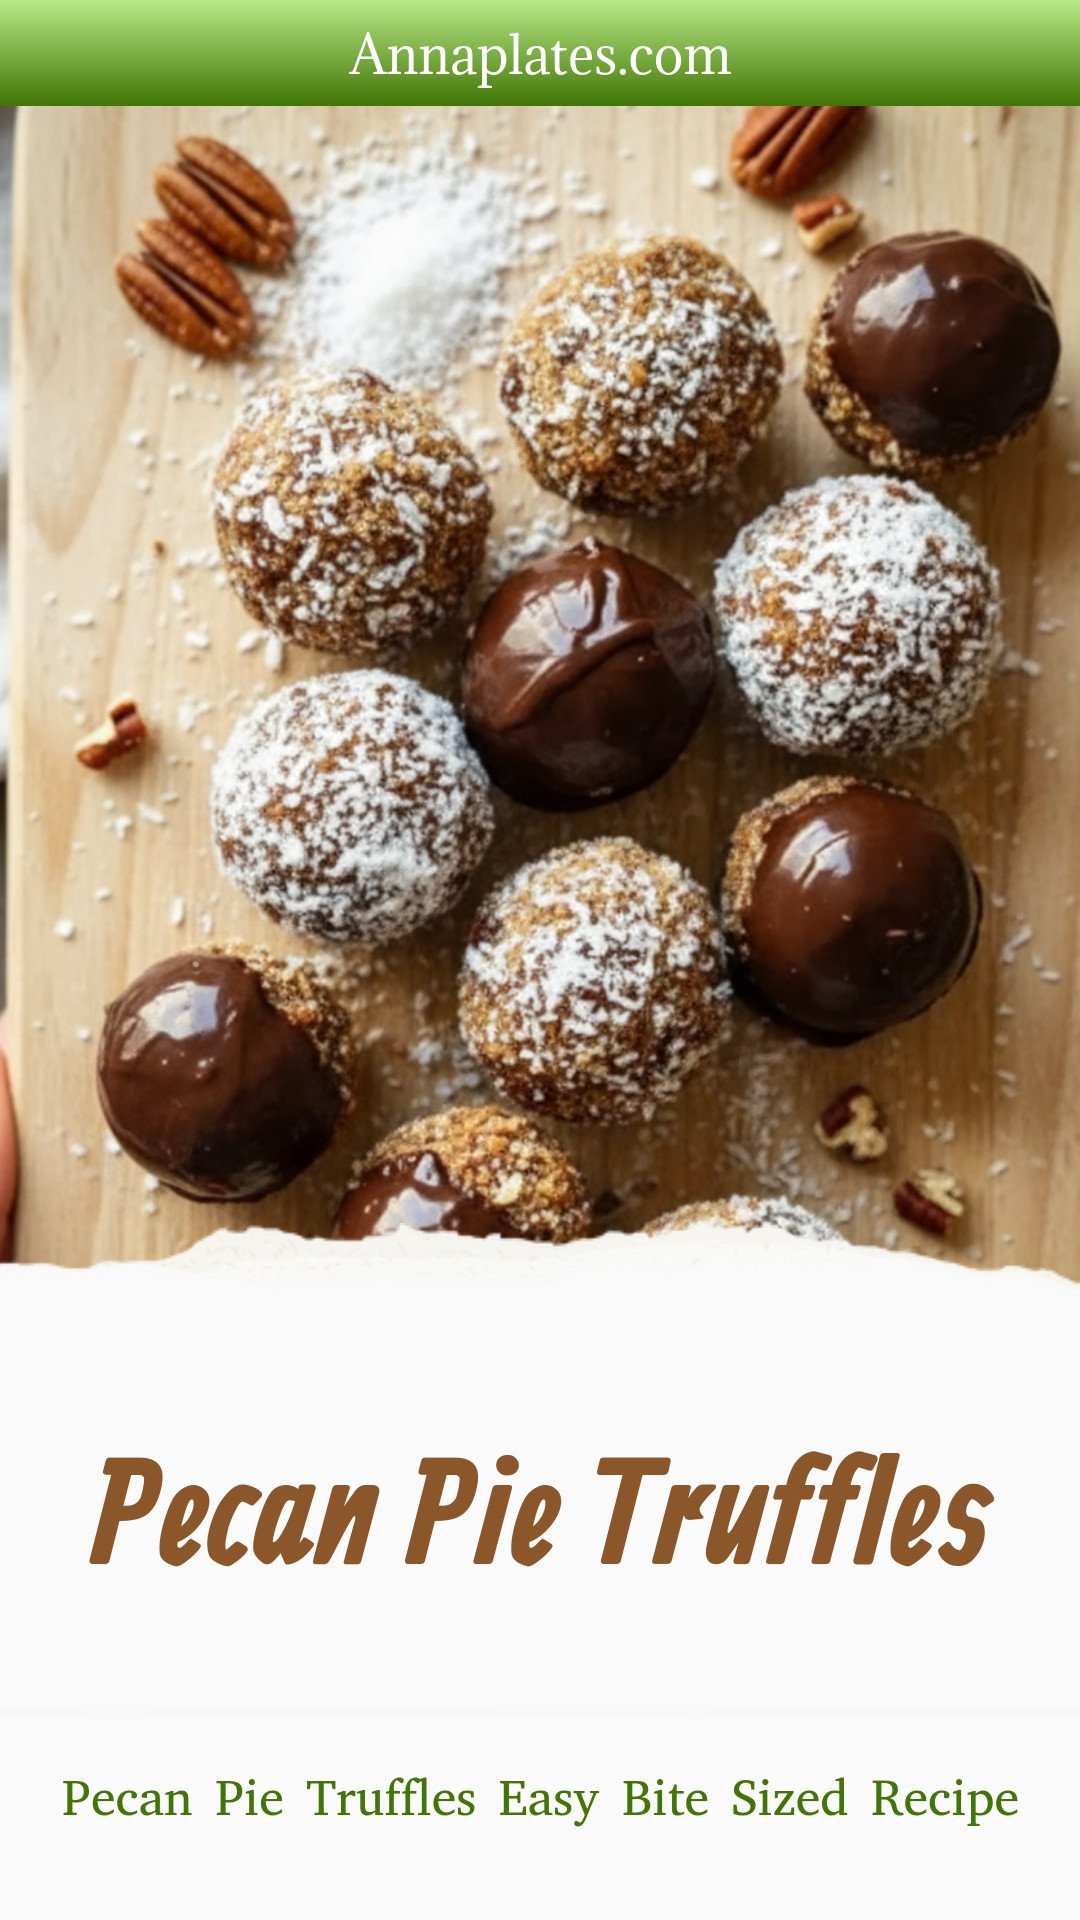
Pecan Pie Truffles Easy Bite Sized Recipe
Description
Decadent pecan pie truffles! A no-bake holiday treat with a buttery crust, sweet filling, and rich chocolate coating. Easy, bite-sized dessert perfection.
Ingredients
Instructions
- In a large mixing bowl, combine the finely chopped pecans, graham cracker crumbs, powdered sugar, and salt. Mix well until all dry ingredients are evenly incorporated.
- Add the softened unsalted butter, dark corn syrup, and vanilla extract to the dry mixture. Use your hands or a spatula to combine until a sticky, cohesive mixture forms.
- Refrigerate the mixture for about 30 minutes to make it easier to handle.
- Once chilled, scoop about a tablespoon of the mixture and roll it into balls between your hands. Place each ball on a parchment-lined baking sheet.
- Once all the mixture is formed into truffles, refrigerate until firm, about 1 hour.
- While the truffles are chilling, set up a double boiler or a microwave-safe bowl for melting the chocolate. If using a double boiler, bring water to a gentle simmer and place the bowl on top. Alternatively, heat the chopped chocolate and coconut oil in the microwave in 30-second intervals, stirring in between until fully melted and smooth.
- Remove the chilled truffles from the refrigerator. Dip each truffle into the melted chocolate, coating evenly. Use a fork to lift them out, allowing excess chocolate to drip off before returning them to the parchment-lined baking sheet.
- Optionally, sprinkle some finely chopped pecans on top of the chocolate-coated truffles before the chocolate sets.
- Place the truffles back in the refrigerator and let them chill until the chocolate coating is firm, about 30 minutes.
- Serve chilled and enjoy your delicious Pecan Pie Truffles!
Notes
- Store truffles in an airtight container in the refrigerator for up to 2 weeks.


Leave a Reply